Welcome important .................................. Safety Instructions Before Setting Oven Controls Setting Setting Oven Warmer Cooking ................. Controls Drawer .. 3-5 13=14 ......... 14 Controls Jnformations 2 ...... 1 5 ..... 16-17 Care & CWeaning .............. 18-25 Adjusting Your Oven Temperature ................ 25 Before You Call SoButions Visit the Frigidaire AND SAVE THESE 26-27 Warranty Cover Web Site at: http://www.frigidaire.com READ to Commo.Problem,...
Welcome & Congratulations Congratulations on your purchase of a new appliance! At ElectroJux Home Products, we are very proud of our product and are completely committed to providing you with the best service possible, Your satisfaction is our number one priority Questions? 1 °800°944°9044 We know you'll enjoy your new appliance and ThankYou for choosing our product, We hope you consider us for future purchases, (United States_ 1°866°294°991 t (Canada) Phase attach sales receipt here for future refer
Read aH instructions before using this appliance. Save these instructions for future reference. This guide contains important safety symbob and instructions. Phase pay special attention to these symbob and follow all instructions given. Here is a brief explanation of these symboB. This symbol Will he!p abrt YOUto s!tuations that may Cause serious bodi!y harm, deat h 0i property damage.
DO NOTTOUCHSURFACEUNmTS, AREASNEAR THESEUNmTS, OVENHEATmNG ELEMENTS ORmNTERmORSURFACESOF THE OVEN OR WARMER DRAWER(if equipped).
o Avoidscratchingthe cooktopglass with sharpobjects. mMPORTANT YOUR OVEN , mNSTRUCTmONS FOR USING Use Care When Opening Door or Warmer Drawer (if equipped)--Stand to the side of the appliance when opening the door of a hot oven, Let hot air or steam escape before you remove or repUace food in the oven/ warmer drawer, Keep Oven Vent Ducts Unobstructed.
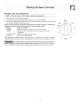
Left front controUand digitaU dispUay (some models) Left rear controU and digitaUdispUay (somemodeb) Ebctronb Oven ControUs with Cbck and Kitchen Timer Broil element Convection fan cover (some models Right rear controUand digitaU dispUay controUand digitaU dispUay some models) Oven Vent some models) SelfoCleaning Oven (some models Oven Light, Single or (2) Adjustable Oven Racks Piece Door Handle Convection grill (some models) Glass Front Oven Doorwith Large Window Opening insert Broil Pan Warm
tVlodeIs with Coit Elements I NOTE: AH knobs shown in this owner's Guide are typical only, 1, PUacethe pan on the surface eUement, 2, Push in and turn the surface eUement control knob to desired setting, 3, The surface signaUHghtwHUgUowwhen one or more eUementsare turned on, AUwaysturn the eUement off before removing the pan, Note: The size and type of utensil used, and the amount and type of food being cooked wilt influence the setting needed for best cooking results, Setting Type of Cooking HU(MAX) Star
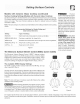
Models with Ceramic Glass Cooktop About co co co co Model A Model B oo oo the Ceramic G_ass Cooktop The ceramic cooktop has radiant surface elements located below the surface of the glass. The design of the ceramic cooktop outlines the area of the surface element underneath. Make sure the diameter of the pan matches the diameter of the element outline on the cooktop (See Figure 1). Heat is transferred up through the surface of the cooktop to the cookware. Only flat-bottom cookware should be used.
Models Surface with Ceramic Cooking Settings Glass Cooktop (Models with (continued) Ceramic Glass Radiant Cooktop) Use the chart (Figure 1) to determine the correct setting for the kind of food you are preparing, The Simmer settings are used to simmer and keep Uargerquantities of foods warm such as stews and soups, The bwer Simmer settings are ideaU for delicate foods and meUting chocoUate or butter, Note: The size and type of cookware used wHUinfluence the setting needed for best cooking resuUt
Models with The Electronic Hot Surface Ceramic Glass Cooktop (continued) Surface Element Control (ESEC) (some models) mndicator Lights After using any of the radiant ebment positions the cooktop will become ve_/hot, After turning any of these ebments OFF, the cooktop will remain HOT for some time, The "Hot Surface" indicator light will glow whenever any of the element positions becomes HOT, The Hot Surface indicator light will remain ON while hot and turn OFF once the cooktop has cooled sufficientl
Models with Ceramic Glass (continued) Operating the Dua_ Surface Radiant 0 @ Small Element Large Element Cooktop E_ement Figure 1 (ModeJs with Ceramic G_ass Cooktop On_y} Model A is equipped with DuaUradiant surface eUements ataH positions (See Figure 8). ModeUs B & C are equipped with a duaU radiant surface eUement Uocated at the right front (See Figures 9 & 10) position. SymboUs on the controU paneU are used to indicate which coil of the duaUradiant eUementwHUheat.
Models with Ceramic Glass Cooktop (continued) Operating the Bridge Surface Radiant Emement (Models with Ceramic G_ass Cooktop On_y) Front Dement Mode] D (See Page 8) is equipped with a "BRIDGE" surface ebment bcated at the bft front and middb (See Figure 6) positions, The Bridge car) be used when cooking with rectanguUar (]ike a griddUe) or ova] shaped cookware, The eUement wiU] maintain an ever) temperature setting across both portions of the Bridge, if needed for norma] cookware, the Bridge eUement
Surface Cooking (Continued) Selecting Cookware Cooking Surface *CORRECT ,, Curved and warped bottoms.
Thisrangehasa fan thatwilt turn "ON"and"OFF"by iteeffto keepthe ebctronice continue to run after the range has been turned "OFF", but may aJso stop immediately white.
Arranging Warmer (Warm & Ready TM) Drawer Rack Positions The rack can be used in 2 ways: o In the upright position to allow low profile food items to be placed both under and on top of the rack (for example, roils or biscuits on top of the rack and a casserole o In the downward position to allow you to place light weight food items and empty dishware (for example, roils or pastries and dinner plates) on the rack, Set the Warmer Drawer Rack in either position as shown aside (Figure 1), awer Rack in u
Oven Baking For best cooking results, heat the oven before baking cookies, breads, cakes, pies or pastries, etc_, There is no need to preheat the oven for roasting meat or baking casseroles, The cooking times and temperatures needed to bake a product may vary slightly from your previously owned appliance, Baking Problems Baking Probbms Causes Cookies and biscuits burn on the bottom.
Broiling Broiling is a method of cooking tender cuts of meat by direct heat under the broil element of the oven, Preheating Preheating is suggested when searing rare steaks, (Remove the broiler pan before preheating, Foods will stick if placed on hot metal,) To preheat, set the oven control(s) to BROIL as instructed in the Electronic Oven Control Guide, Wait for the element to become red-hot, usually about 2 minutes, Preheating is not necessary when broiling meats well-done, Open door to the "Broil Stop" p
C_eaning Various Parts of Your Range Before cbaning any part of the range, be sure aHcontroUs are turned OFF and the range is COOL, REblOVE SPULLOVERS AND HEAVY SOUUNG AS SOON AS POSSIBLE, REGULAR CLEANING WiLL REDUCE THE NUblBER OF blAJOR CLEANING LATER, Surfaces How Amuminum& Vinyt Use hot, soapy water and a cloth, Dry with a clean cloth, to C_ean Painted and Plastic ControB Knobs, Body Parts, and Decorative Trim Using a soft cloth, clean with mild dish detergent and water or a 50/50 solution of vin
Oven Racks Oven racks should be removed, or else their finish will dull and their color turn slightly blue, if they do go through the self=clean cycle, wait until the oven has cooled, then remove the oven racks and rub their sides with wax paper or a cloth containing a small amount of baby or salad oil; this wiii make the oven racks glide easier back in and out of their positions, To clean oven door, wash with hot, soapy water and a clean cloth, DO NOT immerse the door in water, DO NOT clean the oven door
Cooktop CWeaning- Coit Surface Element Models Only (Continued) To Raise theTop for Cleaning (some modeJs) 1, Grasp the sides and lift from the front, A lift-up rod will support the top in its raised position, Only lift the top high enough to allow the support rod to rest in place under the front of the cooktop, 2, Clean underneath using a clean cloth and hot, soapy water, 3, To lower the top, lift the top slightly and lower the rod, Lower the range top down into the range frame, When lowering the lift
Models with Ceramic Gmass Cooktop Consistent Ceramic Glass Cleaning and proper cleaning Cooktop & Maintenance iS essential to maintaining y0ur ceramic glass cooktop Prior to using your cooktop for the first time, apply the recommended CERAMA BRYTE@ Cleaning Creme to the ceramic surface, Clean and buff with a non abrasive cloth or pad, This will make cleaning easier when soiled from cooking, The special cooktop cleaning cream leaves a protective finish on the glass to help prevent scratches and
Models with Ceramic Glass Cooktep (Continued) Do not use the following on the ceramic glass cooktop: , Do not use abrasive cJeaners and scouring pads, such as metal and some nyJon pads. They may scratch the cooktop, making it more difficuJt to ctean. , Do not use harsh cleaners, such as cHorine bleach, ammonia or oven cleaners, as they may etch or discolor the cooktop.
Oven CJeaning Cleaning the (Continued) SeJf-CJean Oven (some modeJs) Adhere to the following cJeaning precautions: - AHow the oven to cooUbefore cbaning. - Wear rubber gbves when cbaning any exterior parts of the oven manually.
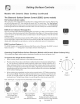
Hinge lever Hinge suppod Lock engaged for door removam - Figure 1 Door removed from the oven - Figure 2 Hinge Removing and Replacing the Oven Door The door is heavy. For safe, temporary storage, Uaythe door fiat with the inside of the door facing down. To Remove Oven Door: 1. Open the door to the fully opened position. 2. Pull up the UockUocatedon both hinge supports and engage it in the hinge Ueverhooks (Figure 1).
To Remove and Repnace Warmer Drawer (some models} To remove Warmer Drawer: 1, Turn power off before removing the warmer drawer, 2, Open the drawer to the fufly opened position, 3, Locate the Uatches on both sides of the warmer drawer, Puff up Uatch Left GUide 4, Puff up on the Ueftguide Uatchand push down on the right guide Uatch, 5, Puff the drawer away from the range, 6, To dean warmer drawer, gentUy scour with a soapy scouring pad, this wHU remove most spots, Rinse with a 1:1 soUution of dear wat
Solutions to Common Problems Before you call for service, review this list, it may save you time and expense, The list includes common occurrences that are not the result of defective workmanship or materialsin this appliance, You will be charged for a service call while the appliance is in warranty if the problem is not caused by defective product workmanship or materials, Your new appliance is a carefully engineered product, Many times, what appears to be a reason to call for service requires nothing m
Soiutions to Common Problems OCCURRENCE POSSIBLE CAUSE/SOLUTION Metalmarks, (1) Sliding or scraping of metal utensils on cooktop surface, Do not slide metal utensils on cooktop surface, Use a ceramic-glass cooktop cleaning cream to remove the marks, "Cooktop Cleaning - Ceramic Glass Cooktop Models" section under General Cleaning, Brown streaks or specks, (!) Boilovers are cooked onto surface, Use razor blade scraper to remove soil, "Cooktop Cleaning - Ceramic Glass Cooktop Models" section under Gene
RANGE WARRANTY Your range is protected WARRANTY PERIOD FULL ONEIyEAR One year from WARRANTY purchase LIMITED 2"_15 TM Second original (Glass purchase fifth original date Seal & Elements) LIMITED Time periods WARRANTY above, (Applicable State Pay all costs listed OUR AUTHORIZED WE WILL: for repairing appliance which workmanship.