
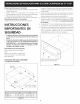
Installation guide


B.Installationfor a cutoutheightof 91/4(23.5cm)
(for30"WarmerDraweronly):
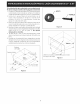
1. Locatethe 2 anti-tip bracketsand the 2 front
supportssuppliedasshownonfigure3. Fixthem
using the 4 black head screws(10-16 X lY4")
supplied
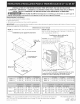
2. Installthe4spacers(Figure4)suppliedunderdrawer
asshowninfigure5 usingthe4 screws(10-24X%").
Installtwospacersoneachsideof drawer.
3. Slidethe drawerintothe cutoutopeninguntil the
front frame of the drawer is flush againstthe
cabinet.Becarefulnotto pinchtheelectricalcord.
4. Removethedrawerasinstructedinthe Use& Care
Guide and secure the drawer housing to the cabinet
using the 2 black head screws (8-18 X Y2") supplied
(see Figure 2). Do not overtighten screws.
5. The 60" (152 cm) appliance power cord can now be
connected into the 120 Volt outlet.
6. Proceed with mounting the built-in oven above the
drawer (if applicable). Follow the installation
instructions provided with the built-in oven. Make
sure to use the anti-tip brackets supplied with the
built-in oven.
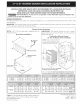
Anti-tip Bracket
Front Su
7"
Figure 3
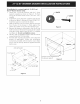
S SPACER
SCREW
Figure 4
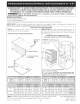
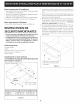
i
Use the screws supplied to fix
the drawer support
Figure 5