OWNER’S GUIDE PLHV36W6KC READ AND SAVE THESE INSTRUCTIONS Contents Product Registration .................................................................................... 2 Important Safety Instructions ..................................................................... 3 Installation ................................................................................................4-7 Use and Care ................................................................................................
Product Registration Register your Product The self-addressed P R O D U C T REGISTRATION CARD should be filled in completely, signed and returned to the Frigidaire Canada. Thank you for choosing this appliance. The information contained within this Owner’s Guide will instruct you on how to properly operate and care for your range hood. Please read through the information contained in your literature pack to learn more about your new appliance.
Important Safety Instructions READ AND SA VE THESE INSTRUCTIONS SAVE Take care when using cleaning agents or detergents. Suitable for use in household cooking area CAUTION - To reduce risk of fire and to properly exhaust air, be sure to duct air outside – Do not vent exhaust air into spaces within walls or ceilings or into attics, crawl spaces, or garages. CAUTION - For General Ventilating Use Only. Do Not Use To Exhaust Hazardous Or Explosive Materials And Vapors.
Installation FOR RESIDENTIAL USE ONLY NOT TO BE INSTALLED OVER GAS GRILLS PLEASE READ ENTIRE INSTRUCTIONS BEFORE PROCEEDING. INSTALLATION MUST COMPLY WITH ALL LOCAL CODES. IMPORTANT: Save these Instructions for the Local Electrical Inspector’s use. INSTALLER: Please leave these Instructions with this unit for the owner. OWNER: Please retain these instructions for future reference. Safety Warning: Turn off power circuit at the service entrance and lock out panel, before wiring this appliance.
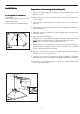
Installation Preparation of mounting surface (Drywall) 1. Select a mounting height comfortable for the user and mark on wall behind cooktop. Tools required for installation Screw driver (flat head, pozidrive n°2 and torx 10) Allen spanner 4mm Electric drill with twist bit Ø 10 mm 2. Mark center line of cooktop and draw vertical line from bottom of hood to the ceiling. 3. Tape template, matching center-line and hood bottom as shown in Figure 2. 4.
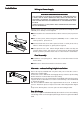
Installation Appliance Installation: 11. Install transition on top of hood if removed for shipping. Figure 4. 1" 12. Hang hood on 2 mounting hooks through the rectangular cutouts on back of hood. Figure 5 13. Level the appliance, using a carpenters level across bottom of hood with leveling screws in mounting hooks or rectangular cutouts. Starting Collar 14. Secure hood with 2 screws on top and 2 screws on bottom. See Figure 5. 15. Connect ducting (Figure 4).
Installation Wiring to Power Supply WARNING! ELECTRICAL GROUNDING INSTRUCTIONS THIS APPLIANCE IS FITTED WITH AN ELECTRICAL JUNCTION BOX WITH 3 WIRES, ONE OF WHICH (GREEN/YELLOW) SERVES TO GROUND THE APPLIANCE. TO PROTECT YOU AGAINST ELECTRIC SHOCK, THE GREEN AND YELLOW WIRE MUST BE CONNECTED TO THE GROUNDING WIRE IN YOUR HOME ELECTRICAL SYSTEM, AND IT MUST UNDER NO CIRCUMSTANCES BE CUT OR REMOVED. Warning: Turn off power circuit at the service panel before wiring this unit.
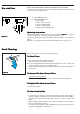
READ THE INSTRUCTIONS CAREFULLY BEFORE USING THE HOOD. For satisfactory use of your hood, become familiar with the various functions of the hood as described below Use and Care A B G C A. Light ON-OFF switch B. Motor ON-OFF switch C. Motor OFF D. Motor speed 1 (low) E. Motor speed 2 (med) F. Motor speed 3 (high) G.
Lights replacement Figure 10 NOTE: Turn blower and lights off. Make sure the lights are cool. If new lights do not operate be sure lights are inserted correctly before calling service. • Using a flat head screwdriver or equivalent tool, carefully pry loose the light cover. • Remove the damaged light and replace with a new 12 Volt, 20 Watt (maximum) halogen light made for a G-4 base. Follow package directions and do not touch new light with bare hands. • Reinstall the light cover.
RANGE HOOD WARRANTY Your range hood is protected by this warranty In the U.S.A., your appliance is warranted by Electrolux Home Products North America, a division of White Consolidated Industries, Inc. We authorize no person to change or add to any of our obligations under this warranty. Our obligations for service and parts under this warranty must be performed by us or an authorized Electrolux Home Products North America servicer. In Canada, your appliance is warranted by WCI Canada, Inc.
GARANTIE DE LA HOTTE DE CUISINE La hotte de cuisine que vous avez acheté est couverte par la présente garantie GARANTIE TOTALE D’UNE ANNÉE GARANTIE LIMITÉE (applicable pour l’Alaska) PÉRIODE SERVICES OFFERTS À TRAVERS NOS CENTRES DE DE GARANTIE SERVICE APRÈS-VENTE AUTORISÉS: Une année à compter de Couverture de tous les frais de réparation ou remplacement des pièces de l’appareil qui se révèlent la date d’achat initiale. défectueuses au niveau des matériaux ou de l’usinage.
11
Remplacement des lampes Figure 10 REMARQUE: Éteindre le rotor et les lampes. S’assurer que les lampes soient froides. Si les lampes neuves ne fonctionnent pas, vérifier qu’elles soient insérées correctement avant de contacter le Service après-vente. • En utilisant un tournevis à tête plate ou un outil équivalent, retirer le plafonnier, en faisant très attention. • Retirer la lampe endommagée puis remplacer celle-ci par une lampe halogène 12 Volts, 20 Watt (maximum) pour un socle G-4.
Emploi er Entretien A C D B G LIRE ATTENTIVEMENT LES INSTRUCTIONS AVANT D’UTILISER LA HOTTE. Afin de pouvoir utiliser la hotte de façon satisfaisante il faut se familiariser avec toutes ses fonctions: A. Interrupteur ON/OFF d’allumage et extinction des lumières B. Interrupteur ON-OFF d’allumage et extinction du moteur C. Moteur éteint (OFF) D. Vitesse moteur 1 (faible) E. Vitesse moteur 2 (moyenne) F. Vitesse moteur 3 (grande) G.
Installation Branchement au réseau d’alimentation électrique AVERTISSEMENTS! INSTRUCTIONS POUR LE BRANCHEMENT ÉLECTRIQUE DE TERRE LE PRÉSENT APPAREIL EST ÉQUIPÉ D’UNE BOÎTE DE CONNEXION ÉLECTRIQUE ÉQUIPÉE DE 3 FILS, DONT UN (VERT/JAUNE) EST DESTINÉ À LA CONNEXION DE TERRE DE L’APPAREIL.
Installation Installation de l’appareil: 11. Si le raccord a été retiré pour effectuer le transport, il faudra ensuite l’installer sur la partie la plus haute de la hotte (Figure 4). 1" 12. Suspendre la hotte aux 2 crochets de montage, en utilisant les ouvertures rectangulaires qui se trouvent sur la partie arrière de la hotte (Figure 5). 14. Fixer la hotte en appliquant 2 vis sur la partie la plus haute et 2 vis sur le fond (Figure 5). Figure 4 13.
Installation Préparation de la surface de montage (placoplâtre) 1. Choisir une hauteur pour le montage pratique pour l’utilisateur et marquer cette dernière sur la paroi, derrière le plan de cuisson. Outils requis pour l’installation Tournevis (vis à tête plate, pozidrive n°2 et torx 10) Clé pour vis Allen 4mm. Perceuse électrique avec mèche hélicoïdale de Ø 10 mm 2. Marquer l’axe du plan de cuisson et tracer une ligne verticale allant du fond de la hotte jusqu’au plafond. 3.
Installation UNIQUEMENT POUR EMPLOI RÉSIDENTIEL. NE PAS INSTALLER SUR LES GRILLES AVEC CHAUFFAGE AU GAZ. AVANT D’UTILISER L’APPAREIL, LIRE ATTENTIVEMENT LES PRÉSENTES INSTRUCTIONS. L’INSTALLATION DOIT ÊTRE EFFECTUÉE CONFORMÉMENT AUX REGLEMENTS LOCAUX. IMPORTANT: Conserver les présentes instructions pour l’emploi destinées à l’Inspecteur de la société électrique. INSTALLATEUR: Conserver avec l’appareil les présentes instructions pour l’emploi destinées au propriétaire.
Informations importantes relatives à la sécurité (suite) AVERTISSEMENT – POUR RÉDUIRE LES RISQUES D’INCENDIES, CHOCS ÉLECTRIQUES OU ACCIDENTS, SUIVRE LES INDICATIONS SUIVANTES: a) Confier l’installation et l’adaptation des connexions électriques à un personnel qualifié qui opère conformément aux normes et aux dispositions établies, y compris aux normes de construction antiincendie.
Informations importantes relatives à la sécurité LIRE ET CONSER VER LES PRÉSENTES INSTRUCTIONS CONSERVER Faire extrêmement attention lors de l’emploi de substances nettoyantes ou détergentes. Aptitude à l’emploi dans l’environnement domestique/cuisine ATTENTION – Afin de réduire le risque d’incendies et de garantir une évacuation de l’air appropriée il faut prévoir une conduite pour l’évacuation de l’air à l’extérieur.
Enregistrement de l’appareil Enregistrer l’appareil La CARTE D’ENREGISTREMENT préalablement adressée doit être remplie en entier, signée et retournée à Frigidaire Canada. Merci d’avoir choisi cet appareil. Les renseignements contenus dans ce guide de l’utilisateur expliquent comment utiliser et entretenir la hotte. Lire les documents qui accompagnent l’appareil pour en savoir davantage sur cette hotte.
GUIDE DE L’UTILISATEUR PLHV36W6KC LISEZ ET CONSERVEZ CES INSTRUCTIONS Table des matières Enregistrement de l’appareil ...................................................................... 2 Informations importantes relatives à la sécurité ....................................... 3 Installation ................................................................................................5-8 Emploi et entretien ......................................................................................