
Installation Guide


6
induction cooKtoP inStALLAtion inStRuctionS
Cooktop Installation
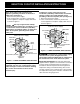
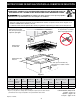
1. Visuallyinspectthecooktopfordamage.Alsomake
sureallcooktopscrewsaretight(seeFigure7).
NOTE:Donotusecaulkingcompound;cooktopshould
beremovableforservicewhenneeded.
Screws
Figure 7
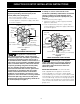
2.Installtheretainerbrackets.SeeFigure8.
The retainer brackets MUST be installed, to meet
local codes or, in their absence, with the National
Electrical Code ANSI/NFPA No. 70—latest edition
(see Figure 8).
3. Setthecooktopintothecountertopcutout.
Figure 8
Cooktop
Spring
Spacer
Countertop
Retainer
Bracket
Checking Operation
RefertotheUse and Care Guide for operation.
CAUTION
Donottouchcooktopglassorelements.
Theymaybehotenoughtoburnyou.
Before You Call for Service
ReadtheBeforeYouCallforServiceChecklistand
operatinginstructionsinyourUse and Care Guide.
Itmaysaveyoutimeandexpense.Thelistincludes
common occurrences that are not the result of
defectiveworkmanshipormaterialsinthisappliance.
RefertoyourUse and Care Guideforservicephone
numbers.
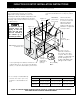
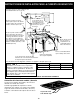
WARNING
Do not remove the spring spacers on
the edges of the cooktop. These spacers center the
cooktop in the space provided. The cooktop must
be centered to prevent excess heat buildup that
may result in heat damage or fire (see Figure 9).
4. Fixthecooktoptothebracketusingthescrews
supplied (see Figure 9).
Figure 9
Spring
Spacer(8)
Retainerbracket(2)
Position brackets on
unit cutout center line
as shown.
Holelocated
under the
burner box to
fix the retainer
bracket.
Granite countertop Installation Kit
AGraniteCountertopInstallationkit#903061-9010can
beorderedthroughaServiceCenterorbyphoneat1-877-
ELECTROLUX (1-877-435-3287).