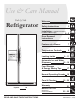
Use & Care Manual Side by Side Refrigerator Welcome 2 Safety Instructions 3 Installation -- Includes Connecting Ice Maker To Water Supply 4-5 Door Removal Instructions 6 Features at a Glance 7 Temperature Controls 8 Looking Inside 9 - 11 Automatic Ice and Water Dispenser 12 - 16 Food Storage & Energy Saving Tips 17 Normal Operating Sounds 18 Care & Cleaning Warranty Español 26 21 Before You Call Solutions to Common Problems READ AND SAVE THESE INSTRUCTIONS 19 - 20 22 - 25 P/N 24157280
Welcome & Congratulations Congratulations on your purchase of a new refrigerator! We here at Electrolux Home Products are very proud of our product and we are completely committed to providing you with the best service possible. Your satisfaction is our #1 priority. Questions? 1-800-944-9044 (United States) 1-866-213-9397 Please read this Use & Care Manual very carefully. It contains valuable information on how to properly maintain your new refrigerator. (Canada) or visit our web site at www.
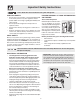
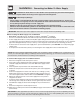
Important Safety Instructions Please Read All Instructions Before Using This Refrigerator. FOR YOUR SAFETY • • • • PROPER DISPOSAL OF YOUR REFRIGERATOR OR FREEZER Do not store or use gasoline, or other flammable liquids in the vicinity of this or any other appliance. Read product labels for warnings regarding flammability and other hazards. Do not operate the refrigerator in the presence of explosive fumes. Avoid contact with any moving parts of automatic ice maker. Remove all staples from the carton.
This Owner’s Guide provides specific operating instructions for your model. Use the refrigerator only as instructed in this Use & Care Manual. Before starting the refrigerator, follow these important first steps. LOCATION • • • • Choose a place that is near a grounded electrical outlet. Do Not use an extension cord or an adapter plug. If possible, place the refrigerator out of direct sunlight and away from the range, dishwasher or other heat sources.
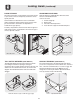
Installation - Connecting Ice Maker To Water Supply To avoid electric shock, which can cause death or severe personal injury, disconnect the refrigerator from electrical power before connecting a water supply line to the refrigerator. To Avoid Property Damage: • • • Copper tubing is recommended for the water supply line. Water supply tubing made of ¼” plastic is not recommended since it greatly increases the potential for water leaks.
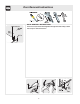
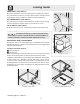
Door Removal Instructions DOOR REMOVAL INSTRUCTIONS: If it is necessary to move the refrigerator through narrow doorways, follow these steps to remove the doors.
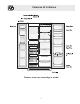
Features At A Glance Features may vary according to model 7
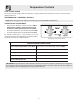
Temperature Controls COOL DOWN PERIOD To ensure safe food storage, allow the refrigerator to operate with the doors closed for at least 8 to 12 hours before loading it with food. REFRIGERATOR & FREEZER CONTROLS NOTE: When changing control settings, wait 24 hours before making additional adjustments. TEMPERATURE ADJUSTMENT • After 24 hours, adjust the controls as needed. Adjust temperatures gradually: move the knob in small increments, allowing the temperature to stabilize.
Looking Inside PIZZA SHELF (SOME MODELS) This shelf is attached to the freezer wall beside the ice dispenser container. This convenient area allows for storage of pizza and other tall items placed vertically between the ice dispenser container and the freezer wall. ICE CREAM SHELF (SOME MODELS) This shelf attaches to the top of the ice dispenser container. It allows storage of both round and rectangular cartons of your favorite ice cream.
Looking Inside (continued) DOOR STORAGE ADJUSTABLE DOOR BINS Door bins and shelves are provided for convenient storage of jars, bottles, and cans. Frequently used items can be quickly selected. Some models have adjustable door bins that can be moved to suit individual needs. Some models have door bins that can accommodate gallon-sized plastic drink containers and economy-sized jars and containers. Some bins are adjustable for maximum storage capacity. To move door bins 1. Lift bin straight up. 2.
Looking Inside - Special Storage Areas CRISPERS (SOME MODELS) MEAT KEEPER (SOME MODELS) The crispers, located under the bottom refrigerator shelf, are designed for storing fruits, vegetables, and other fresh produce. Wash items in clear water and remove excess water before placing them in the crispers. Items with strong odors or high moisture content should be wrapped before storing. Some models are equipped with a Meat Keeper.
Automatic Ice and Water Dispenser AUTOMATIC ICE & WATER DISPENSER OPERATING INSTRUCTIONS EXTREME FREEZE To freeze food at a faster rate to preserve freshness, push the Touch Pad for 3-5 seconds to activate this feature. A green light will appear above the Touch Pad. Push the Touch Pad again for 3-5 seconds to deactivate. EXTRA ICE To increase ice production for special occasions, such as parties, push the Touch Pad 2 for 3-5 seconds to activate this feature.
Automatic Ice and Water Dispenser ICE AND WATER DISPENSER FEATURES The ice and water dispenser conveniently dispenses chilled water, and ice cubes or crushed ice, depending on the model. To operate the ice dispenser, select the ice option desired using the touchpad. Press a glass against the dispensing paddle as far up as possible to catch all ice. To stop dispensing ice, pull glass away from dispensing paddle. Do not remove the glass until the ice has completely dispensed.
Automatic Ice and Water Dispenser 14
Automatic Ice and Water Dispenser PureSource TM * Ice and Water Filter (some models) NOTE: If you purchased a refrigerator with a PureSource TM * Ice and Water filter, please read the following use and care information. This ice and water filter system filters water to your ice maker and water dispenser. It is located in the upper right back corner of the fresh food compartment.
Automatic Ice and Water Dispenser PureSource2TM * Ice and Water Front Filter (some models) NOTE: If you purchased a refrigerator with a PureSource2TM * Ice and Water front filter, please read the following use and care information. This ice and water filter system filters water to your ice maker and water dispenser. It is located in the upper right front corner of the fresh food compartment.
Food Storage & Energy Saving Ideas FOOD STORAGE IDEAS Fresh Food Storage • The fresh food compartment should be kept between 34° F and 40° F with an optimum temperature of 37° F. • Avoid overcrowding the refrigerator shelves. This reduces the circulation of air around the food and results in uneven cooling. Fruits and Vegetables • Storage in the crisper drawers traps moisture to help preserve the fruit and vegetable quality for longer time periods.
Normal Operating Sounds & Sights UNDERSTANDING THE SOUNDS YOU MAY HEAR Your new high-efficiency refrigerator may make unfamiliar sounds. These are all normal sounds and soon will become familiar to you. They also indicate your refrigerator is operating as designed. Hard surfaces, such as vinyl or wood floors, walls, and kitchen cabinets may make sounds more noticeable. Listed below are descriptions of some of the most common sounds you may hear, and what is causing them. A.
Care & Cleaning Keep your refrigerator and freezer clean to prevent odor build-up. Wipe up any spills immediately and clean both sections at least twice a year. Never use any type of scouring pads, brushes, abrasive cleaners or strong alkaline solutions on any surface. Do not wash any removable parts in a dishwasher. Always unplug the electrical power cord from the wall outlet before cleaning. • • • When moving the refrigerator, pull straight out.
Care & Cleaning (continued) Wear gloves when replacing light bulbs to avoid getting cut. REPLACING LIGHT BULBS 1. Unplug refrigerator. 2. Wear gloves as protection against possible broken glass. 3. Remove light cover, if necessary. 4. Unscrew and replace old bulb with an appliance bulb of the same type and wattage. 5. Replace light cover, if necessary. 6. Remember to plug the refrigerator back in.
Warranty Information REFRIGERATOR WARRANTY Your refrigerator is protected by this warranty WARRANTY PERIOD THROUGH OUR AUTHORIZED SERVICERS, WE WILL: FULL ONE-YEAR WARRANTY One year from original purchase date Pay all costs for repairing or replacing any parts of this appliance which prove to be defective in materials or workmanship. Excludes original and replacement Ice & Water filter cartridges (if equipped). Original and replacement cartridges are warranted for 30 days (parts only).
1-800-944-9044 (United States) 1-866-213-9397 (Canada) PROBLEM Visit our web site at www.frigidaire.com. Before You Call CAUSE CORRECTION RUNNING OF REFRIGERATOR Compressor does not run. • • Freezer control is set to "O". Refrigerator is in defrost cycle. • • • Plug at wall outlet is disconnected. House fuse blown or tripped circuit breaker. Power outage. • Room or outside weather is hot. Refrigerator has recently been disconnected for a period of time. Automatic ice maker is operating.
Before You Call PROBLEM CAUSE (continued) CORRECTION TEMPERATURES ARE TOO WARM Freezer/Refrigerator temperature is too warm. • • • Doors are opened too frequently or too long. Door is slightly open. Warm air enters the refrigerator whenever the door is opened. Open the door less often. See PROBLEM section OPENING/CLOSING OF DOORS/DRAWERS. Clean condenser. See Care & Cleaning Chart in Care and Cleaning section. • • Condenser is dirty. • Freezer temperature is too warm.
Before You Call (continued) PROBLEM CAUSE CORRECTION AUTOMATIC ICE MAKER (CONTINUED) Ice maker is not making enough ice. • Ice maker is producing less ice than you expect. • • Freezer is not cold enough. • • Household water line valve is not completely open. Check to see if water dispenser is dispensing slower than normal. • Ice maker should produce approximately 4 – 5 pounds of ice every 24 hours. Extra Ice should produce up to 6 pounds of ice every 24 hours.
Before You Call (continued) PROBLEM CAUSE CORRECTION WATER DISPENSER Dispenser will not dispense water. • • • Water has an odd taste and/or odor. • • • Open household water line valve. See PROBLEM section ICE MAKER IS NOT MAKING ANY ICE. Ensure that freezer door is closed. Replace filter cartridge. • Push filter in until you hear a “click”. Filter should be flush with cabinet. Water has been in the tank for a period of time. Unit not properly connected to cold water line.