Use & Care Manual Top Mount Refrigerator Welcome 2 Safety Instructions 3 Installation -- Includes Connecting Optional Ice Maker To Water Supply 4-5 Door Removal & Reversal 6-9 Features at a Glance 9 Temperature Controls 9 - 10 Looking Inside 10 - 12 Ice Service 12 - 13 Food Storage & Energy Saving Tips 13 Normal Operating Sounds 14 Care & Cleaning Español 15 - 16 Warranty 17 Before You Call 18 19 READ AND SAVE THESE INSTRUCTIONS P/N 241694400 (0106)
WELCOME & CONGRATULATIONS Questions? Congratulations on your purchase of a new refrigerator! We here at Electrolux Home Products, Inc. are very proud of our product and we are completly committed to providing you with the best service possible. Your satisfaction is our #1 priority. 1-800-944-9044 (United States) Please read this Use & Care Manual very carefully. It contains valuable information on how to properly maintain your new refrigerator.
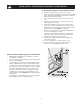
IMPORTANT SAFETY INSTRUCTIONS PROPER DISPOSAL OF YOUR REFRIGERATOR OR FREEZER WARNING Please Read All Instructions Before Using This Refrigerator. Risk of child entrapment Child entrapment and suffocation are not problems of the past. Junked or abondoned refrigerators or freezers are still dangerous – even if they will sit for “just a few days.” If you are getting rid of your old refrigerator or freezer, please follow the instructions below to help prevent accidents.
INSTALLATION LEVELING This Use & Care Manual provides specific operating instructions for your model. Use the refrigerator only as instructed in this Use & Care Manual. Before starting the refrigerator, follow these important first steps. All four corners of your refrigerator must rest firmly on a solid floor. Your refrigerator is equipped with adjustable front rollers or front leveling screws to help level your unit. LOCATION • • • • Choose a place that is near a grounded electrical outlet.
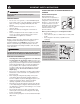
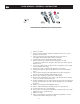
INSTALLATION - CONNECTING ICE MAKER TO WATER SUPPLY To Connect Water Supply Line To Ice Maker Inlet Valve 1. 2. Disconnect refrigerator from electric power source. Place end of water supply line into sink or bucket. Turn ON water supply and flush supply line until water is clear. Turn OFF water supply at shutoff valve. 3. Unscrew plastic cap from water valve inlet and discard cap. 4. Slide brass compression nut, then ferrule (sleeve) onto water supply line, as shown. 5.
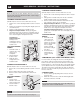
DOOR REMOVAL / REVERSAL INSTRUCTIONS DOOR REMOVAL AND REVERSAL INSTRUCTIONS: 1. 2. 3. 4. 5. 6. 7. 8. 9. 10. 11. 12. 13. 14. 15. 16. 17. 18. Remove toe grille. Remove top hinge with 3/8” hex driver and lift freezer door off of center hinge pin. Set door aside. Unscrew center hinge pin using adjustable wrench and save for reassembly. Ensure plastic washer stays on hinge pin. Lift refrigerator door off of bottom hinge and set aside.
DOOR REMOVAL / REVERSAL INSTRUCTIONS NOTE TO REMOVE FREEZER HANDLE: (Handles may be easier to reverse while doors are off.) Some models have “pocket” handles, which are recessed into the sides of the door. On these models, only the hinges will need to be reversed. 1. 2. TO REMOVE FREEZER HANDLE: 3. (Handles may be easier to reverse while doors are off.) 1. Remove two screws attaching handle to bottom of freezer door. 2. Remove short trim piece by sliding trim straight up and off of handle bracket. 3.
DOOR REMOVAL / REVERSAL INSTRUCTIONS TO REMOVE REFRIGERATOR HANDLE: TO ATTACH TRIM: (Handles may be easier to reverse while doors are off.) 1. 2. Figure 1 Style Handles 1. 2. 3. Remove two screws attaching handle to top of refrigerator door. Remove screw attaching bottom of handle to door. Remove two hole plugs and hinge pin plug on top of door and install on opposite side.
DOOR REMOVAL / REVERSAL INSTRUCTIONS 6. 7. To Remove Handles Remove bottom hinge. Reinsert two outside screws in holes and tighten. Reverse steps 1 - 6 to reinstall doors 1. 2. Firmly hold freezer handle while loosening set screws with 3/32” allen wrench. Remove freezer handle. Repeat step 1 for refrigerator door.
TEMPERATURE CONTROLS (CONTINUED) Freezer Control (some models) Refrigerator & Freezer Control (some models) * IMPORTANT Turning the refrigerator temperature control to “0” turns off the compressor, but does not disconnect the power to the light bulb and other electrical components. To turn off power to your refrigerator, you must unplug the power cord from the wall outlet.
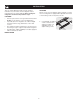
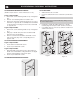
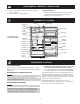
LOOKING INSIDE (CONTINUED) ADJUSTABLE DOOR BINS To adjust cantilever shelves: Some models have adjustable door bins that can be moved to suit individual needs. NOTE Cantilever shelves are supported at the back of the refrigerator. Cantilever shelves are available in either glass or wire. 1 2 To move door bins 1. 2. 3. Lift front edge up. Pull shelf out. Replace the shelf by inserting the hooks at rear of the shelf into the wall bracket. Lower the shelf into the desired slots and lock into position.
LOOKING INSIDE (CONTINUED) HUMIDITY CONTROL (SOME MODELS) DELI DRAWER (SOME MODELS) The Humidity Control, present on some models with crisper drawers, allows you to adjust the humidity within the crisper. This can extend the life of fresh vegetables that keep best in high humidity. Some models are equipped with a Deli Drawer for storage of luncheon meats, spreads, cheeses, and other deli items.
ICE SERVICE (CONTINUED) • • • Wash the ice container in warm water with mild detergent. Rinse well and dry. Stop the ice maker when cleaning the freezer and during vacations. If the ice maker will be turned off for a long period of time, turn the water supply valve to the closed position. NOTE For more information on these operations, see Normal Operating Sounds and Sights section on page 17. CAUTION Do Not place the ice container in your dishwasher.
NORMAL OPERATING SOUNDS & SIGHTS UNDERSTANDING THE SOUNDS YOU MAY HEAR Your new high-efficiency refrigerator may make unfamiliar sounds. These are all normal sounds and soon will become familiar to you. They also indicate your refrigerator is operating as designed. Hard surfaces, such as vinyl or wood floors, walls, and kitchen cabinets may make sounds more noticeable. Listed below are descriptions of some of the most common sounds you may hear, and what is causing them. A.
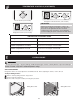
CARE & CLEANING Keep your refrigerator and freezer clean to prevent odor build-up. Wipe up any spills immediately and clean both sections at least twice a year. Never use any type of scouring pads, brushes, abrasive cleaners or strong alkaline solutions on any surface. Do not wash any removable parts in a dishwasher. Always unplug the electrical power cord from the wall outlet before cleaning. CAUTION • • • When moving the refrigerator, pull straight out.
CARE & CLEANING (CONTINUED) NEVER CLEAN CONDENSER (SOME MODELS) CAUTION If your refrigerator is equipped with a Never Clean condenser, there’s no need to clean the condenser under normal operating conditions. If the refrigerator is operated under particularly dusty or greasy conditions, or if there is significant Defrost Water Pan (some models) pet traffic in your home, it may be necessary to periodically clean the condenser for maximum efficiency. Avoid cuts when replacing light bulbs, wear gloves.
Major Appliance Warranty Information Your appliance is covered by a one year limited warranty. For one year from your original date of purchase, Electrolux will pay all costs for repairing or replacing any parts of this appliance that prove to be defective in materials or workmanship when such appliance is installed, used and maintained in accordance with the provided instructions. Exclusions This warranty does not cover the following: 1.
BEFORE YOU CALL ATTENTION To Properly Install Your Refrigerator See “Installation” Section On Pages 4-5 OR To Reverse The Doors See “Door Removal & Reversal” Section On Pages 6-9 Common Occurrences Before calling for service, review this list. It may save you time and expense. This list includes common occurrences that are not the result of defective workmanship or materials in this appliance. • • • • Ensure plug is tightly pushed into electrical outlet. Check/replace fuse with a 15 amp time-delay fuse.