"Pasta Magic" Gas Pasta Cooker Installation and Operation Manual Frymaster, a member of the Commercial Food Equipment Service Association, recommends using CFESA Certified Technicians.
DANGER IMPROPER INSTALLATION, ADJUSTMENT, ALTERATION, SERVICE, OR MAINTENANCE CAN CAUSE PROPERTY DAMAGE, INJURY, OR DEATH. READ THE INSTALLATION, OPERATING, AND SERVICE INSTRUCTIONS THOROUGHLY BEFORE INSTALLING OR SERVICING THIS EQUIPMENT. DANGER FOR YOUR SAFETY, DO NOT STORE OR USE GASOLINE OR OTHER FLAMMABLE LIQUIDS OR VAPORS IN THE VICINITY OF THIS OR ANY OTHER APPLIANCE. DANGER POST IN A PROMINENT LOCATION THE INSTRUCTIONS TO BE FOLLOWED IN THE EVENT THE USER SMELLS GAS.
PASTA MAGIC GAS COOKERS INSTALLATION AND OPERATION MANUAL TABLE OF CONTENTS CHAPTER 1: General Information 1.1 Parts Ordering and Service Information ............................................................................1-1 1.2 Safety Information .............................................................................................................1-2 1.3 Equipment Description ......................................................................................................1-2 1.
PASTA MAGIC GAS COOKERS INSTALLATION AND OPERATION MANUAL CHAPTER 1: GENERAL INFORMATION RETAIN AND STORE THIS MANUAL IN A SAFE PLACE FOR FUTURE USE This appliance is only for professional use and shall be used by qualified personnel only, as defined in Section 1.5. 1.1 Parts Ordering and Service Information In order to assist you quickly, the Frymaster Factory Authorized Servicer (FAS) or Service Department representative requires certain information about your equipment.
1.2 Safety Information Before attempting to operate your unit, read the instructions in this manual thoroughly. Throughout this manual, you will find notations enclosed in double-bordered Caution, Warning, and Danger boxes similar to the ones below. CAUTION Caution boxes contain information about actions or conditions that may cause or result in a malfunction of your system.
Model Comparison: GPCRB/GPCR: The “Gas Pasta Magic System” consists of a gas cooker and rinse tank combination. The unit is equipped with a programmable controller, which controls water temperature, water level, and cooking times. A swing-away water faucet is standard. GPCRB units are equipped with a programmable basket lift system, which lowers and raises bulk or individualized portions of pasta.; GPCR units are not equipped with a basket lift system.
QUALIFIED OPERATING PERSONNEL Qualified operating personnel are those who have carefully read the information in this manual and have familiarized themselves with the equipment functions, or who have had previous experience with the operation of the equipment covered in this manual. QUALIFIED SERVICE PERSONNEL Qualified service personnel are those who are familiar with Frymaster equipment and who have been authorized by Frymaster Corporation to perform service on Frymaster equipment.
PASTA MAGIC GAS COOKERS INSTALLATION AND OPERATION MANUAL CHAPTER 2: INSTALLATION INSTRUCTIONS 2.1 General Installation Requirements Qualified, licensed, and/or authorized installation or service personnel, as defined in Section 1.5 of this manual, should perform all installation and service on Frymaster equipment. Conversion of this appliance from one type of gas to another should only be performed by qualified, licensed, and/or authorized installation or service personnel as defined in Section 1.
installed so that products of combustion are removed efficiently, and that the kitchen ventilation system does not produce drafts that interfere with proper burner operation. The cooker flue opening must not be placed close to the intake of the exhaust fan, and the cooker must never have its flue extended in a “chimney” fashion. An extended flue will change the combustion characteristics of the cooker, causing longer recovery time. It also frequently causes delayed ignition.
When installing Pasta Magic cookers in the UNITED STATES, the installation must conform to the latest edition of the Nation Fuel Gas Code, ANSI Z223.1. In addition, installation must comply with all local codes. In CANADA, installation must conform to Standard CAN/CGA-B149.1 or CAN/CGA-B149.2, Installation Codes for Gas Burning Appliances and Equipment. In addition, installation must comply with all local codes.
2.3 Pre-Connection Preparations DANGER Do not connect cooker to gas supply before completing each step in this section. After the cooker has been positioned under the exhaust hood, ensure the following has been accomplished: 1. Adequate means must be provided to limit the movement of cookers without depending upon the gas line connections. If a flexible gas hose is used, a restraining cable must be connected at all times when the cooker is in use.
6. Connect the desired drain plumbing to the 1¼–inch drain valve. 7. Test the cooker electrical system: a. Plug the cooker electrical cord into a grounded electrical receptacle of appropriate voltage. (Check the rating plate on the cooker door to determine the proper voltage). b. Place the power switch in the ON position and verify that the display indicates LO. c. Place the cooker power switch in the OFF position. Verify that the display is blank. 8.
Before connecting new pipe to your unit, the pipe must be thoroughly blown out to remove any foreign particles. If these foreign particles get into the burner and controls, they will cause improper and sometimes dangerous operation. 1. Connect the quick-disconnect hose to the cooker quick-disconnect fitting at the rear of the cooker and to the building gas line. NOTE: Some cookers are configured for a rigid connection to the gas supply line.
2.5 Converting to Another Gas Type DANGER Your cooker is configured at the factory for a specific type of gas. If you desire to switch from one type of gas to another, specific gas-conversion components must be installed. Switching to a different type of gas without installing the proper conversion components may result in fire or explosion! NEVER attach your cooker to a gas supply for which it is not configured.
PASTA MAGIC GAS COOKERS INSTALLATION AND OPERATION MANUAL CHAPTER 3: OPERATING INSTRUCTIONS 3.
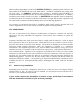
1 10 2 1 2 3 4 5 3.2 3 4 Numeric Keypad Boil Mode Indicator Boil Mode Switch Power Switch LED Display 6 5 6 7 8 9 10 7 8 9 Skim Switch Timer Start Switch Simmer Mode Switch Simmer Mode Indicator Trouble Light Controller The Pasta Magic Controller allows the operator to specify a cook time in minutes and seconds, and then initiate a cooking cycle. This controller is available in three configurations.
low-water sensor, such as when draining and cleaning the cookpot, the controller display will read LO. NORMAL WATER LEVEL SENSING, on units configured with the Autofill feature, automatically adds water during or after a cooking cycle if the water in the cookpot drops to a level lower than approximately 1¼-inch (32 mm) below the overflow drain. With this automatic filling feature, the water level does not have to be continuously monitored. The cookpot always has the correct amount of water.
The burners should light for several seconds and then go out. A few seconds later they should light again. This cycle will repeat about 10 times, at which time the burners should remain lit until the setpoint is reached. switch to the If the burners fail to light, press the power OFF position, wait 60 seconds, then repeat this step. 3. After the burners have been lit continuously for at least 90 seconds, observe the burners through the burner viewports. They should display a bright orange-red glow.
3.3.3 Boiling Out the Cookpot To ensure that the cooker is free of contamination from manufacture, shipping, or handling during installation, the cookpot must be boiled out before first use. 1. Close the drain valve and fill the cookpot with a mixture of cold water and 1 cup of detergent. 2. Place the unit into operation (see Sections 3.3.1 and 3.3.2). 3. Press the Simmer Mode button and allow the solution to simmer for at least 1 hour. 4.
PASTA MAGIC GAS COOKERS INSTALLATION AND OPERATION MANUAL CHAPTER 4: PREVENTIVE MAINTENANCE 4.1 Daily Preventive Maintenance It is normal for a coating of starch to form on the sensors and temperature probes during operation. If the coating is allowed to build-up, it will adversely affect the operation of the equipment. The preventive maintenance routines below should be performed at least daily to keep your equipment functioning at peak efficiency.
4.2 Cleaning the Gas Valve Vent Tube This procedure should be performed at least once every 90 days. 1. Set the power switch and the gas valve to the OFF position. 2. Carefully unscrew the vent tube from the gas valve. NOTE: The vent tube may be straightened for ease in removal. 3. Pass a piece of wire through the tube to remove any obstruction. 4. Remove the wire and blow through the tube to ensure it is clear. 5. Reinstall the tube and bend it so that the opening is pointing downward. 4.
Wrap the motor and wires with plastic wrap or a plastic bag. BLOWER HOUSING BLOWER WHEEL 5. Remove the plastic wrap from the blower motor assembly. Reassemble the blower motor assembly and blower housing. Reinstall the blower assembly in the cooker and reconnect the wires disconnected in Step 1. 4. Reinstall the blower shield or shield assembly. 5. Light the cooker in accordance with the procedure described in Chapter 3, Section 3.3. 6.
4.4 Adjusting the Burner Gas Pressure DANGER Frymaster recommends that ONLY qualified service personnel perform this task. 1. Ensure that the gas valve knob is in the OFF position. 2. Remove the pressure tap plug from the gas valve assembly. Pressure Tap Plug Typical Valve Assembly 3. Insert the fitting for a gas pressure-measuring device into the pressure tap hole 4. Place the gas valve in the ON position. 5. Place the power switch in the ON position.
6. To adjust the burner gas pressure, remove the cap from the gas valve regulator and use a flat-tipped screwdriver to adjust the regulator to obtain the correct pressure. GAS VALVE REGULATOR CAP 7. Place the power switch and the gas valve in the OFF position. Remove the fitting from the pressure tap hole and reinstall the pressure tap plug. 4.5 Measuring Flame Current When the burner flame is properly adjusted, it will produce a current between 2.5 μA and 3.5 μA.
PASTA MAGIC GAS COOKERS INSTALLATION AND OPERATION MANUAL CHAPTER 5: OPERATOR TROUBLESHOOTING 5.1 Introduction This chapter provides a reference guide to the more common problems that may occur during the operation of this equipment. The troubleshooting guides in this chapter are intended to help you diagnose problems with the equipment.
5.2 Operator Troubleshooting Guides Problem Probable Causes A. Ignition module lockout (the burners failed to light within 4 seconds). Corrective Action A. Turn the controller OFF. Open the control panel by removing the screws in the upper corners. If there are two ignition modules, check for blown 2-amp Indicator: Red trouble light on fuses and replace as necessary. control panel is illuminated. Close the control panel and BURNERS DO NOT press the power switch. Wait at LIGHT least 4 minutes.
Problem Probable Causes A. Dirty water level sensors. ON UNIT WITH B. Insufficient mineral content in AUTOFILL, water. WATER DID NOT SHUT OFF WHEN COOKPOT WAS FULL Corrective Action A. Remove the probe block cover and clean the sensors using a Scotchbrite™ or similar pad and a solution of detergent and water. NOTE: Do not use deliming solution. B. Add ⅛-cup of baking soda to the water in the cookpot as the unit fills. DO NOT USE SALT! Doing so will damage the cookpot.
Shipping Address: 8700 Line Avenue, Shreveport, Louisiana 71106 TEL 1-318-865-1711 FAX (Parts) 1-318-219-7140 PRINTED IN THE UNITED STATES SERVICE HOTLINE 1-800-551-8633 (Tech Support) 1-318-219-7135 Price: $8.