
Quick Start Guide

MAC
S/N
SSID
FS_wi_XXXXXX
FS_wi_XXXXXX_5G
Reset WPS WAN 1
2 IPTV/3
POWER
Copyright © 2021 FS.COM All Rights Reserved.
Q.C. PASSED
120mm
180mm
封面背面封面正面
DUAL-BAND GIGABIT Wi-Fi 6 ROUTER
DUAL-BAND GIGABIT Wi-Fi 6 ROUTER
ROUTEUR Wi-Fi 6 GIGABIT DUAL-BAND
Quick Start Guide
V1.0
Quick-Start Anleitung
Guide de Démarrage Rapide
Introduction
Thank you for choosing the dual-band gigabit Wi-Fi 6 Router. This guide is designed to familiarize you
with the the layout of the Wi-Fi Router and describes how to deploy the Wi-Fi Router in your network.
Accessories
WR-AX1800
Back Panel Ports
Back Panel Jack and Buttons
LED Indicators
The Screen Displays Request Timed Out
Hardware Overview Installation Requirements
Mounting the Wi-Fi Router
WR-AX1800
WR-AX1800
Ethernet Cable x 1
Power Adapter x 1
Einführung
Vielen Dank, dass Sie sich für den Dual-Band Gigabit Wi-Fi 6 Router entschieden haben. Diese Anleitung
soll Sie mit dem Aufbau des Wi-Fi-Routers vertraut machen und beschreibt, wie Sie den Wi-Fi-Router in
Ihrem Netzwerk einsetzen.
Zubehör
WR-AX1800
WR-AX1800
Ethernet-Kabel x 1
Netzadapter x 1
Reset WPS WAN 1
2 IPTV/3
POWER
Reset WPS WAN 1
2 IPTV/3
POWER
Reset WPS WAN 1
2 IPTV/3
POWER
RESET
WPS
POWER
WAN
LAN 3/IPTV
LAN port 1, 2
WAN
10/100/1000Mbps auto-negotiation WAN port. Used to connect to a
modern or the Ethernet jack using an Ethernet cable for internet access.
10/100/1000Mbps auto-negotiation LAN port. Used to connect to
computers, switches or game machines, etc.
10/100/1000Mbps auto-negotiation Ethernet port. It is a LAN port by
default. When the IPTV function is enabled, it can only serve as an IPTV
port to connect to a set top box.
LAN 1, 2
LAN 3/IPTV
Ports Description
LED Indicator
Solid on
Blink slow
Blink fast for
3 seconds
Blink fast for
2 minutes
O
The system is starting up, or the router is already
connected to the internet.
The router fails to connect to the internet.
A device is connect to or disconnected from an
Ethernet port of the router.
The router is pending for or performing WPS
negotiation.
The system is faulty, or the router is not powered on
properly.
LED Indicator Description
Status
Reset
Used to restore the factory settings of the router.
Method: When the router is working normally, hold the button down
with a needle-like object for about 8 seconds, and then release it when
the LED indicator blinks fast. The router is reset.
Used to start the WPS negotiation of the router.
Method: Press the button, and the LED indicator blinks fast. Within 2
minutes, enable the WPS function of the other WPS-supported device
to establish a WPS connection.
Power jack.
Please use the included power adapter to connect this jack to a power
supply.
WPS
POWER
Button/Jack Description
Introduction
Merci d'avoir choisi le Routeur Wi-Fi 6 gigabit à double bande. Ce guide est conçu pour que vous
puissiez vous familiariser avec la conguration du Routeur Wi-Fi et décrit comment procéder à son
déploiement.
Accessoires
WR-AX1800
Ports du Panneau Arrière
Prise et Boutons du Panneau Arrière
Aperçu du Matériel
WR-AX1800
Câble Ethernet x 1
Adaptateur d'Alimentation x 1
Reset WPS WAN 1
2 IPTV/3
POWER
Reset WPS WAN 1
2 IPTV/3
POWER
RESET
WPS
POWER
WAN
LAN 3/IPTV
LAN port 1, 2
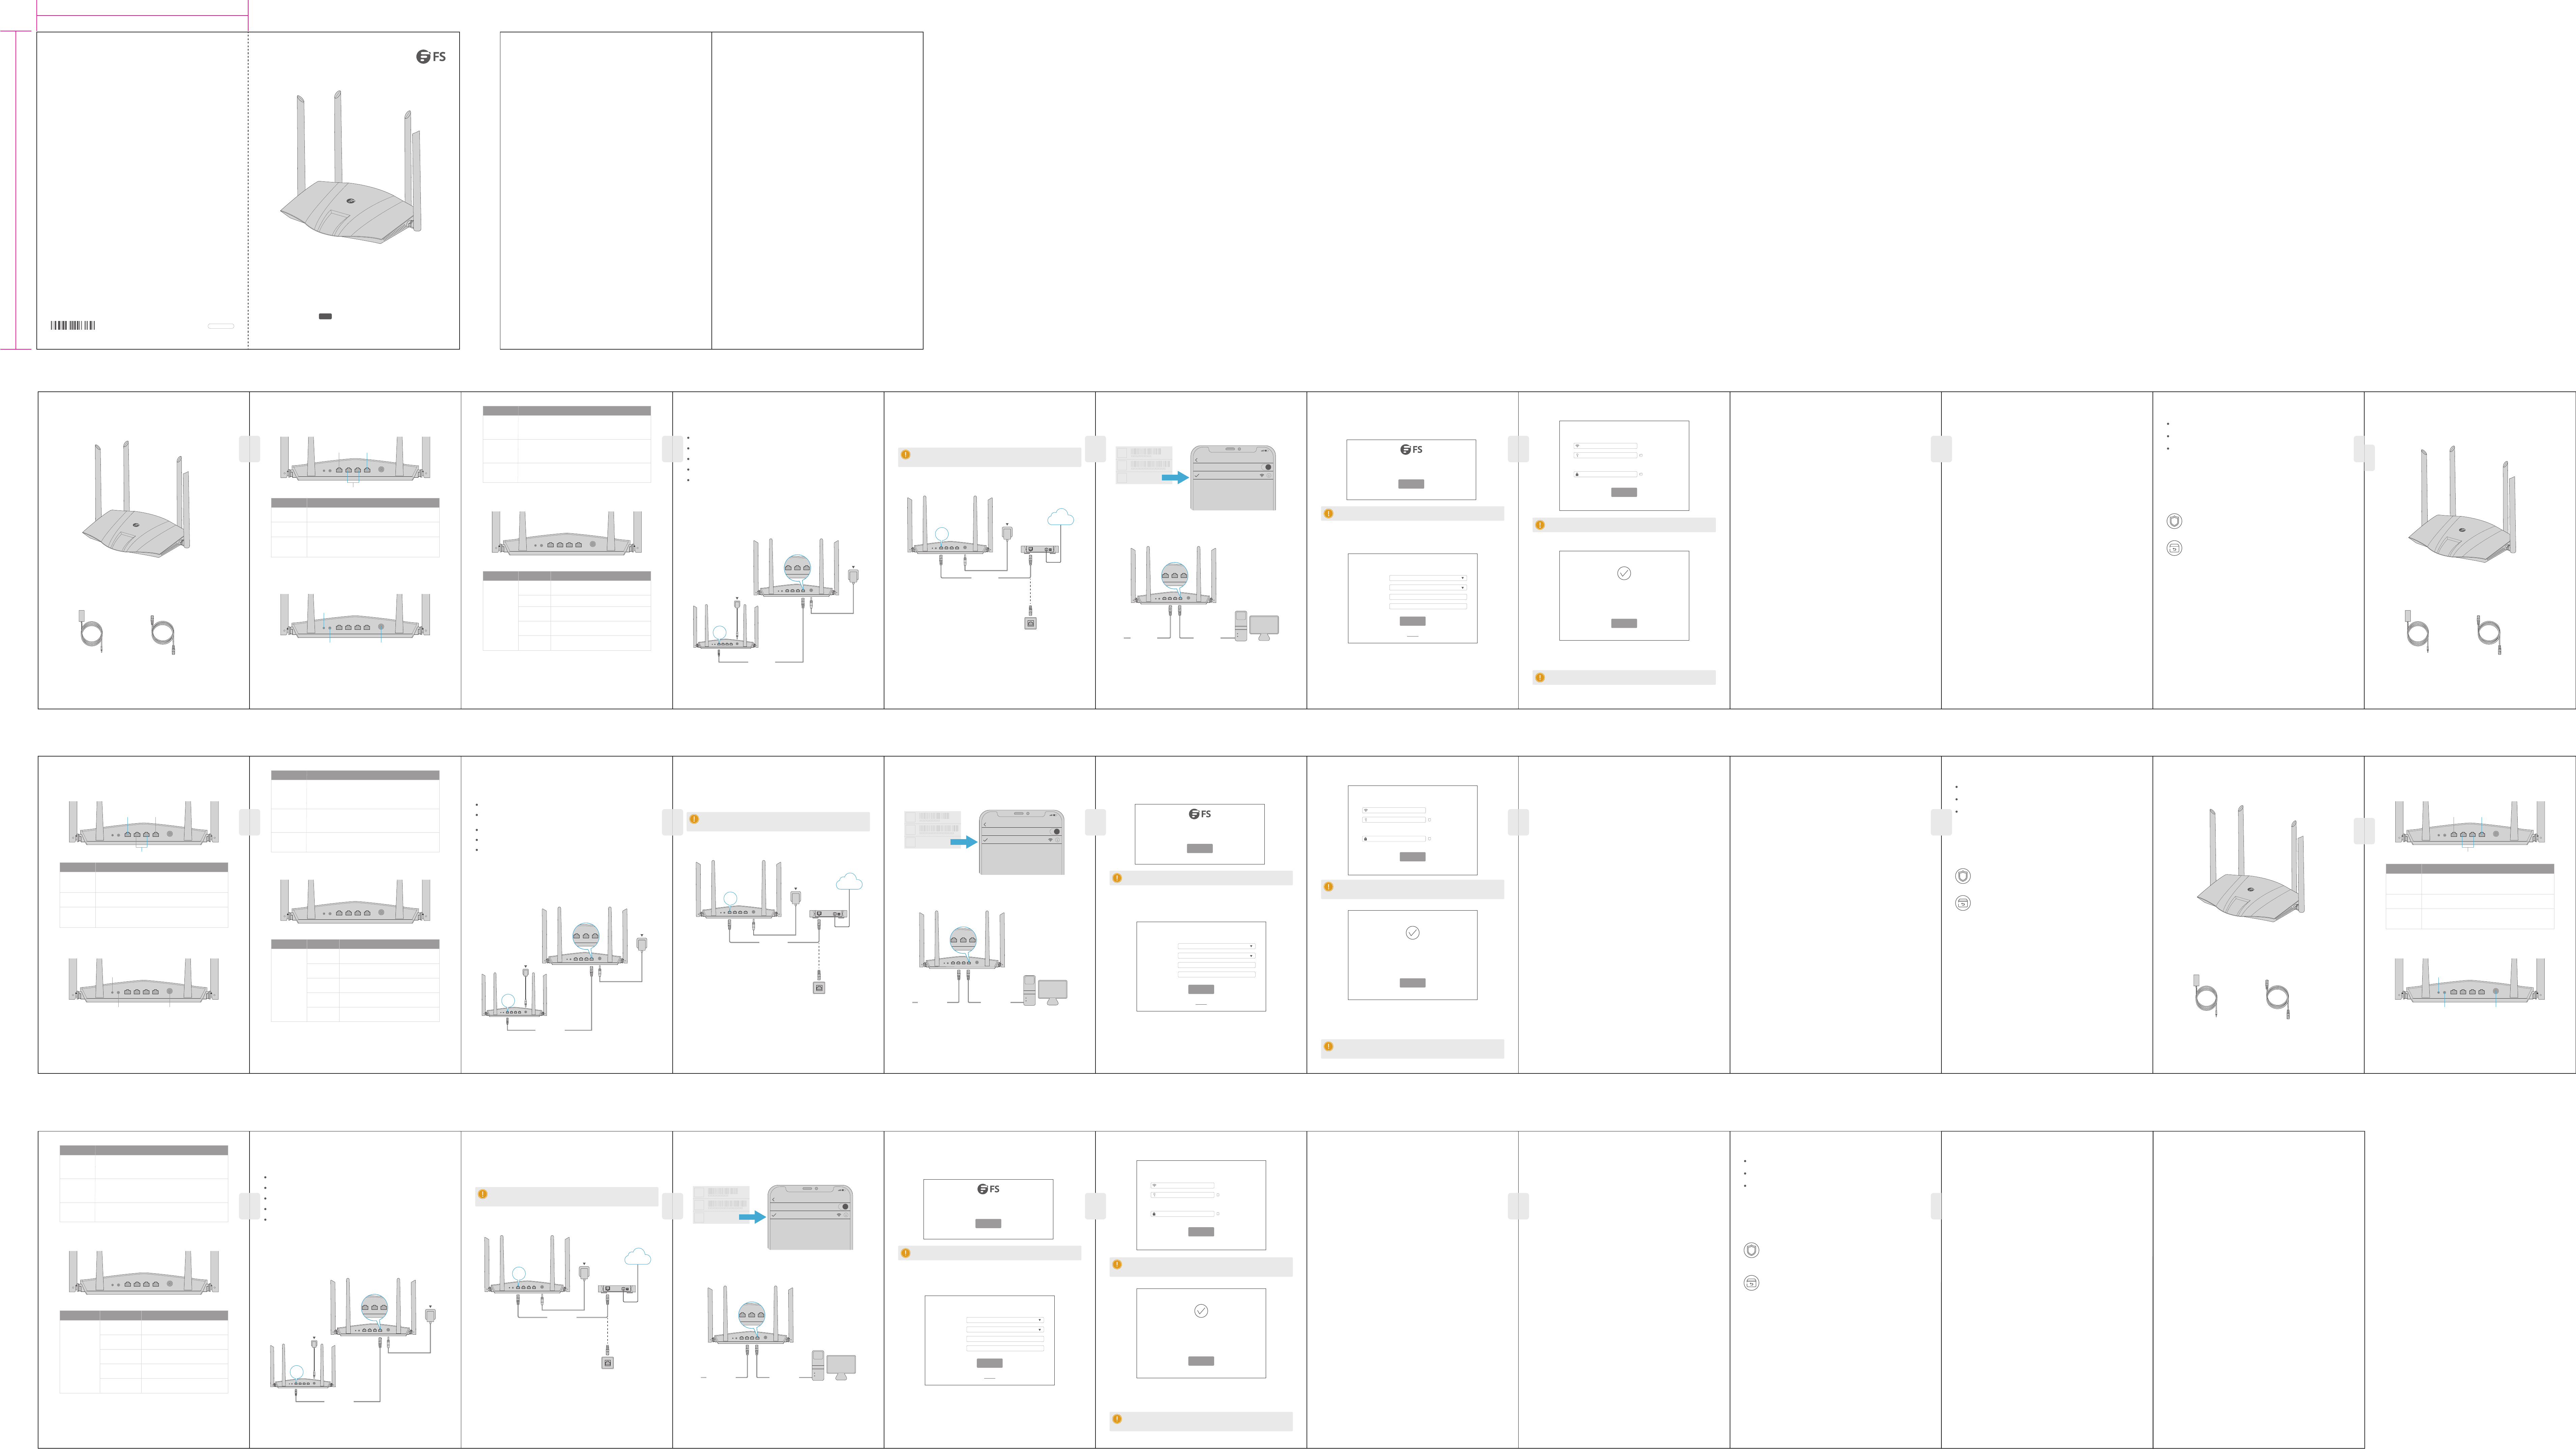
Before you begin the installation, make sure that you have the following:
Connect the router
Ensure that the controller is properly grounded.
Keep the Wi-Fi router clean and dust-free.
Place the Wi-Fi router in a ventilated place.
Step 1: Import your PPPoE user name and password into the new router (Optional).
Step 1: Start a web browser on the device connected to the router, and visit fswi.com or 192.168.0.1.
Click Start.
Step 2: The router detects your connection type automatically. Select the ISP Type based on your
region and ISP and enter the required parameters (if any). Click Next.
To access the Internet with:
1. Wi-Fi-enabled devices: Connect to the Wi-Fi network using the Wi-Fi name and password you set.
2. Wired devices: Connect to a LAN port of the router using an Ethernet cable.
Option A: Connect your Wi-Fi-enabled device, such as a smartphone, to the wireless network of
the router. You can nd the default Wi-Fi network information on the bottom label of the router.
Option B: Connect your wired device, such as a computer, to a LAN port of the router using an
Ethernet cable. The LED indicator blinks fast for 3 seconds.
Step 2: Connect the WAN port of the router.
Make sure the installation site is dry and at.
1. Power on your original and new routers.
2. Connect the WAN port of the original router to a LAN port of the new router using an Ethernet
cable. After the LED indicator of the new router blinks fast for 8 seconds, the PPPoE user name and
password are imported to your new router.
3. Remove the original router.
Connect your device to the router
Step 3: Set the Wi-Fi name, Wi-Fi password, and Login password for the router. Click Next.
1. Check if the network cable is intact.
2. Check if the hardware connection is correct.
3. The system status indicator on the device panel and the NIC indicator on the computer must be lit.
4. The computer’s IP address setting is correct.
Done.
Troubleshooting
FAQ
Set up the router
1. Ensure that the router is powered on.
2. Connect the router’s WAN port to the LAN port of your modem or the Ethernet jack using an
Ethernet cable. The LED indicator blinks fast for 3 seconds.
Place the Wi-Fi router in a dry area and avoid liquid intrusion.
Reset WPS WAN 1
2 IPTV/3
POWER
Reset WPS WAN 1
2 IPTV/3
POWER
Reset WPS WAN 1
2 IPTV/3
POWER
Ethernet cable
Power source
New router
Original router
Power source
WAN
Power source
TIPS: If the above page does not appear, refer to Q1 in FAQ.
TIPS: The Wi-Fi password is used to connect to the Wi-Fi network, while the login password
is used for logging in to the web UI of the router.
TIPS: If you need to modify the Wi-Fi name and Wi-Fi password, see Q3 in FAQ. If you still
cannot access the internet after the conguration, refer to Q2 in FAQ.
TIPS: This function is only applicable when the connection type of the original router is
PPPoE, except for PPPoE of some special ISPs or PPPoE connection set up manually with
VLAN information.
WAN
Internet
Or
Ethernet cable
Setting
Wi-Fi
Wi-Fi
9:07
FS_wi_XXXXXX
Wi-Fi-enabled device
CHOOSE A NETWORK...
Ethernet cableEthernet cable
Reset WPS WAN 1
2 IPTV/3
POWER
Reset WPS WAN 1
2 IPTV/3
POWER
Wired device
Welcome
Start
Quick Setup Wizard
Connection Type:
Isp User Name:
Isp Password:
Isp Type:
Next
Please select your connection type.
As detected, your connection type may be: PPPoE
Normal
Skip
PPPoE
Enter the user name from your ISP
Enter the password from your ISP
Next
WiFi Settings
Set the Wi password as the login password of the admin account.
Normal
Not Required
WiFi password of 8-32 characters
Login password of 5-32 characters
Not Required
FS_wi_XXXXXX
More
Your’re all set! You can now connect to
To change settings of other feactures, click the “More” button below.
Q1: I cannot log in to the web UI of the router by visiting fswi.com or 192.168.0.1. What should I
do?
A1: Try the following solutions:
• If you are using a Wi-Fi-enabled device, such as a smartphone:
− Ensure that it connects to the Wi-Fi network of the router.
− Ensure that the cellular network (mobile data) of the device is disabled.
• If you are using a wired device, such as a computer:
− Ensure that fswi.com or 192.168.0.1 is entered correctly in the address bar, rather than the search
bar of the web browser.
− Ensure that the computer is connected to a LAN port of the router properly using an Ethernet
cable.
− Ensure that the computer is set to obtain an IP address and the DNS server address automatically. If
the problem persists, reset the router, and try it again.
Q2: I cannot access the internet after the conguration. What should I do?
A2: Try the following solutions rst:
• Check whether the WAN port of the router is connected to a modem or Ethernet jack properly.
• Log in to the web UI of the router and navigate to the Internet Settings page. Follow the
instructions on the page to solve the problem.
If the problem persists, try the following solutions:
• For Wi-Fi-enabled devices:
− Check whether your Wi-Fi-enabled devices are connected to the Wi-Fi network of the router.
− Visit fswi.com or 192.168.0.1 to log in to the web UI and change your Wi-Fi name and Wi-Fi
password on the Wi-Fi Settings > Wi-Fi Name & Password page. Then try again.
• For wired devices:
− Check whether your wired devices are connected to a LAN port properly.
− Check whether wired devices are set to obtain an IP address automatically and obtain DNS server
address automatically.
Q3: How to change the Wi-Fi names and passwords?
A3: Follow the steps below:
1. Connect your Wi-Fi-enabled device to the Wi-Fi network of the router, or connect your computer to
a LAN port using an Ethernet cable.
2. Start a web browser and visit fswi.com or 192.168.0.1 to log in to the web UI of the router.
3. Navigate to the Wi-Fi Settings > Wi-Fi Name & Password page to change and save the settings.
Q4: How to reset the router?
A4: Try the following methods:
Method A: When the router is working normally, hold down the Reset button with a needle-like
object for about 8 seconds and release it when the LED indicator blinks fast. The router is reset.
Method B: Log in to the web UI of the router and navigate to System Settings > Backup / Restore.
Q5: I cannot nd the Wi-Fi network of the router on my Wi-Fi-enabled device. What should I do?
A5: Connect your computer to a LAN port of the router to log in to the web UI. Navigate to Wi-Fi
Settings > Wi-Fi Name & Password and ensure that:
• The Wi-Fi networks are enabled.
• The Hide function is disabled.
Q6: I cannot nd the 5 GHz Wi-Fi network of the router on my Wi-Fi-enabled device. What should I
do?
A6: Try the following solutions:
• Check whether your Wi-Fi-enabled device supports 5 GHz Wi-Fi network. Only devices supporting 5
GHz network can nd and connect to the 5 GHz Wi-Fi network.
• Check whether the Unify 2.4 GHz & 5GHz function is disabled. If it is disabled, refer to Q5 to nd a
solution.
Support and Other Resources
Download
Help Center
Contact Us
https://www.fs.com/download.html
https://www.fs.com/service/help_center.html
https://www.fs.com/contact_us.html
Product Warranty
FS ensures our customers that any damage or faulty items due to our workmanship, we will oer a
free return within 30 Days from the day you receive your goods. This excludes any custom made
items or tailored solutions.
Warranty: The Wi-Fi router enjoys 2 years limited warranty against defect in materials or
workmanship. For more details about warranty, please check at
https://www.fs.com/policies/warranty.html
Return: If you want to return item(s), information on how to return can be found at
https://www.fs.com/policies/day_return_policy.html
2
MAC
S/N
SSID
FS_wi_XXXXXX
FS_wi_XXXXXX_5G
Reset WPS WAN 1
2 IPTV/3
POWER
Ports an der Rückseite
Buchse und Tasten an der Rückseite
LED-Anzeigen
Auf dem Bildschirm erscheint “Request Timed Out”
Hardware-Übersicht Installationsvoraussetzungen
Montage des Wi-Fi-Routers
Reset WPS WAN 1
2 IPTV/3
POWER
Reset WPS WAN 1
2 IPTV/3
POWER
Reset WPS WAN 1
2 IPTV/3
POWER
RESET
WPS
POWER
WAN
LAN 3/IPTV
LAN port 1, 2
WAN
10/100/1000Mbps WAN Port mit Auto-Negotiation. Dient zum
Anschluss an ein modernes Gerät oder an die Ethernet-Buchse
mit einem Ethernet-Kabel für den Internetzugang.
10/100/1000Mbps LAN Port mit Auto-Negotiation. Dient zum Anschluss
von Computern, Switches oder Spielautomaten usw.
10/100/1000Mbps Ethernet Port mit Auto-Negotiation. Standardmäßig
ist dies ein LAN Port. Wenn die IPTV-Funktion aktiviert ist, kann er nur als
IPTV-Port für die Verbindung mit einer Set-Top-Box verwendet werden.
LAN 1, 2
LAN 3/IPTV
Ports Beschreibung
WAN
Port WAN 10/100/1000Mbps à auto-négociation. Utilisé pour la
connexion à une prise moderne ou prise Ethernet à l'aide d'un câble
Ethernet pour accès Internet.
Port LAN 10/100/1000Mbps à auto-négociation. Utilisé pour la
connexion aux ordinateurs, switchs ou consoles de jeux, etc.
Port Ethernet 10/100/1000Mbps à auto-négociation. Il s'agit d'un port
LAN par défaut. Lorsque la fonction IPTV est activée, il peut uniquement
servir de port IPTV pour la connexion à un boîtier décodeur.
LAN 1, 2
LAN 3/IPTV
Ports Description
LED Indicator
Dauerhaft ein
Blinkt langsam
Blinkt schnell
für 3 Sekunden
Blinkt schnell
für 2 Minuten
Aus
Das System wird hochgefahren, oder der Router ist
bereits mit dem Internet verbunden.
Der Router kann keine Verbindung zum Internet
herstellen.
Ein Gerät ist mit einem Ethernet-Port des Routers
verbunden oder von diesem getrennt.
Der Router wartet auf die WPS-Aushandlung oder
führt sie durch.
Das System arbeitet nicht richtig, oder der Router ist
nicht richtig eingeschaltet.
LED-Anzeige Beschreibung
Status
Reset
Dient zur Wiederherstellung der Werkseinstellungen des Routers.
Methode: Wenn der Router normal funktioniert, halten Sie die Taste mit
einem nadelähnlichen Gegenstand etwa 8 Sekunden lang gedrückt und
lassen Sie sie dann los, wenn die LED-Anzeige schnell blinkt. Der Router
wird zurückgesetzt.
Wird verwendet, um die WPS-Verhandlung des Routers zu starten.
Methode: Drücken Sie die Taste, und die LED-Anzeige blinkt schnell.
Aktivieren Sie innerhalb von 2 Minuten die WPS-Funktion des anderen
WPS-unterstützten Geräts, um eine WPS-Verbindung herzustellen.
Stromanschluss.
Verwenden Sie den mitgelieferten Netzadapter, um diese Buchse mit
dem Stromnetz zu verbinden.
WPS
POWER
Taste/Buchse Beschreibung
Bevor Sie mit der Installation beginnen, sollten Sie sich vergewissern,
dass die folgenden Voraussetzungen erfüllt sind:
Anschließen des Routers
Stellen Sie sicher, dass der Controller ordnungsgemäß geerdet ist.
Halten Sie den Wi-Fi-Router sauber und staubfrei.
Stellen Sie den Wi-Fi-Router an einem gut belüfteten Ort auf.
Schritt 1: Importieren Sie Ihren PPPoE-Benutzernamen und Ihr Passwort in den neuen Router
(optional).
Schritt 1: Starten Sie einen Webbrowser auf dem Gerät, das mit dem Router verbunden ist, und
besuchen Sie fswi.com oder 192.168.0.1. Klicken Sie auf Start.
Schritt 2: Der Router erkennt Ihren Verbindungstyp automatisch. Wählen Sie den ISP-Typ auf der
Grundlage Ihrer Region und Ihres ISP aus und geben Sie die erforderlichen Parameter ein (falls
vorhanden). Klicken Sie auf Next.
So greifen Sie auf das Internet zu:
1. Wi-Fi-fähigen Geräten: Verbinden Sie sich mit dem Wi-Fi-Netzwerk unter Verwendung des von
Ihnen festgelegten Wi-Fi-Namens und -Passworts.
2. Kabelgebundene Geräte: Schließen Sie sie mit einem Ethernet-Kabel an einen LAN Port des Routers
an.
Option A: Verbinden Sie Ihr Wi-Fi-fähiges Gerät, z. B. ein Smartphone, mit dem Drahtlosnetzwerk des
Routers. Sie nden die Standard-Wi-Fi-Netzwerkinformationen auf dem unteren Etikett des Routers.
Option B: Schließen Sie Ihr kabelgebundenes Gerät, z. B. einen Computer, mit einem Ethernet-Kabel
an einen LAN Port des Routers an. Die LED-Anzeige blinkt 3 Sekunden lang schnell.
Schritt 2: Schließen Sie den WAN Port des Routers an.
Stellen Sie sicher, dass der Installationsort trocken und eben ist.
1. Schalten Sie den alten und den neuen Router ein.
2. Verbinden Sie den WAN-Port des alten Routers über ein Ethernet-Kabel mit einem LAN-Port des
neuen Routers. Nachdem die LED-Anzeige des neuen Routers 8 Sekunden lang schnell blinkt, werden
der PPPoE-Benutzername und das Kennwort in Ihren neuen Router importiert.
3. Entfernen Sie den alten Router.
Verbinden Sie Ihr Gerät mit dem Router
Schritt 3: Legen Sie den Wi-Fi-Namen, das Wi-Fi-Passwort und das Anmeldepasswort für den
Router fest. Klicken Sie auf Next.
1. Prüfen Sie, ob das Netzwerkkabel intakt ist.
2. Prüfen Sie, ob die Hardwareverbindung korrekt ist.
3. Die Systemstatusanzeige auf dem Gerätepanel und die NIC-Anzeige auf dem Computer müssen
leuchten.
4. Die Einstellung der IP-Adresse des Computers ist korrekt.
Erledigt.
Fehlerbehebung
FAQ
Einrichten des Routers
1. Vergewissern Sie sich, dass der Router eingeschaltet ist.
2. Verbinden Sie den WAN-Port des Routers über ein Ethernet-Kabel mit dem LAN-Port Ihres Modems
oder mit der Ethernet-Buchse. Die LED-Anzeige blinkt 3 Sekunden lang schnell.
Stellen Sie den Wi-Fi-Router an einem trockenen Ort auf und vermeiden Sie das Eindringen von
Flüssigkeiten.
Reset WPS WAN 1
2 IPTV/3
POWER
Reset WPS WAN 1
2 IPTV/3
POWER
Reset WPS WAN 1
2 IPTV/3
POWER
Ethernet-Kabel
Stromquelle
Neuer Router
Alter Router
Stromquelle
WAN
Stromquelle
TIPPS: Wenn die obige Seite nicht angezeigt wird, lesen Sie bitte unter F1 in den FAQ nach.
TIPPS: Das Wi-Fi-Passwort wird für die Verbindung mit dem Wi-Fi-Netzwerk verwendet,
während das Anmeldepasswort für die Anmeldung bei der Web-UI des Routers verwendet
wird.
TIPPS: Wenn Sie den Wi-Fi-Namen und das Wi-Fi-Passwort ändern müssen, siehe F3 in den
FAQ. Wenn Sie nach der Konguration immer noch nicht auf das Internet zugreifen können,
lesen Sie unter F2 in den FAQ nach.
TIPPS: Diese Funktion ist nur anwendbar, wenn der Verbindungstyp des alten Routers
PPPoE ist, mit Ausnahme von PPPoE einiger spezieller ISPs oder PPPoE-Verbindungen, die
manuell mit VLAN-Informationen eingerichtet wurden.
WAN
Internet
Oder
Ethernet-Kabel
Setting
Wi-Fi
Wi-Fi
9:07
FS_wi_XXXXXX
Wi-Fi-Gerät
CHOOSE A NETWORK...
Ethernet-KabelEthernet-Kabel
Reset WPS WAN 1
2 IPTV/3
POWER
Reset WPS WAN 1
2 IPTV/3
POWER
Kabelgebundenes Gerät
Welcome
Start
Quick Setup Wizard
Connection Type:
Isp User Name:
Isp Password:
Isp Type:
Next
Please select your connection type.
As detected, your connection type may be: PPPoE
Normal
Skip
PPPoE
Enter the user name from your ISP
Enter the password from your ISP
Next
WiFi Settings
Set the Wi password as the login password of the admin account.
Normal
Not Required
WiFi password of 8-32 characters
Login password of 5-32 characters
Not Required
FS_wi_XXXXXX
More
Your’re all set! You can now connect to
To change settings of other feactures, click the “More” button below.
F1: Ich kann mich nicht bei der Web-UI des Routers anmelden, indem ich fswi.com oder
192.168.0.1 besuche. Was muss ich tun?
A1: Versuchen Sie die folgenden Lösungen:
• Wenn Sie ein Wi-Fi-fähiges Gerät, wie z. B. ein Smartphone, verwenden:
- Stellen Sie sicher, dass es mit dem Wi-Fi-Netzwerk des Routers verbunden ist.
- Stellen Sie sicher, dass das Mobilfunknetz (mobile Daten) des Geräts deaktiviert ist.
• Wenn Sie ein kabelgebundenes Gerät, z. B. einen Computer, verwenden:
- Stellen Sie sicher, dass fswi.com oder 192.168.0.1 korrekt in die Adressleiste und nicht in die
Suchleiste des Webbrowsers eingegeben wurde.
- Stellen Sie sicher, dass der Computer über ein Ethernet-Kabel ordnungsgemäß mit einem LAN Port
des Routers verbunden ist.
- Stellen Sie sicher, dass der Computer so eingestellt ist, dass er eine IP-Adresse und die
DNS-Serveradresse automatisch bezieht. Wenn das Problem weiterhin besteht, setzen Sie den Router
zurück und versuchen Sie es erneut.
F2: Ich kann nach der Konguration nicht auf das Internet zugreifen. Was muss ich tun?
A2: Versuchen Sie zunächst die folgenden Lösungen:
• Überprüfen Sie, ob der WAN-Port des Routers richtig mit einem Modem oder einer Ethernet-Buchse
verbunden ist.
• Melden Sie sich bei der Web-UI des Routers an und navigieren Sie zur Seite Interneteinstellungen.
Befolgen Sie die Anweisungen auf der Seite, um das Problem zu lösen.
Wenn das Problem weiterhin besteht, versuchen Sie die folgenden Lösungen:
• Für Wi-Fi-fähige Geräte:
- Überprüfen Sie, ob Ihre Wi-Fi-fähigen Geräte mit dem Wi-Fi-Netzwerk des Routers verbunden sind.
- Besuchen Sie fswi.com oder 192.168.0.1, um sich bei der Web-UI anzumelden, und ändern Sie
Ihren Wi-Fi-Namen und Ihr Wi-Fi-Passwort auf der Seite Wi-Fi-Einstellungen > Wi-Fi-Name &
Passwort. Versuchen Sie es dann erneut.
• Für kabelgebundene Geräte:
- Überprüfen Sie, ob Ihre kabelgebundenen Geräte ordnungsgemäß an einen LAN Port angeschlos-
sen sind.
- Prüfen Sie, ob kabelgebundene Geräte so eingestellt sind, dass sie automatisch eine IP-Adresse und
eine DNS-Serveradresse beziehen.
F3: Wie ändere ich die Wi-Fi-Namen und -Kennwörter?
A3: Führen Sie die folgenden Schritte aus:
1. Verbinden Sie Ihr Wi-Fi-fähiges Gerät mit dem Wi-Fi-Netzwerk des Routers, oder schließen Sie Ihren
Computer mit einem Ethernet-Kabel an einen LAN-Port an.
2. Starten Sie einen Webbrowser und besuchen Sie fswi.com oder 192.168.0.1, um sich bei der
Web-UI des Routers anzumelden.
3. Navigieren Sie zur Seite Wi-Fi-Einstellungen > Wi-Fi Name & Passwort, um die Einstellungen zu
ändern und zu speichern.
F4: Wie kann ich den Router zurücksetzen?
A4: Versuchen Sie die folgenden Methoden:
Methode A: Wenn der Router normal funktioniert, halten Sie die Reset-Taste mit einem nadelartigen
Gegenstand etwa 8 Sekunden lang gedrückt und lassen Sie sie los, wenn die LED-Anzeige schnell
blinkt. Der Router ist zurückgesetzt.
Methode B: Melden Sie sich bei der Web-UI des Routers an und navigieren Sie zu Systemeinstellun-
gen > Sichern / Wiederherstellen.
F5: Ich kann das Wi-Fi-Netzwerk des Routers auf meinem Wi-Fi-fähigen Gerät nicht nden. Was
muss ich tun?
A5: Schließen Sie Ihren Computer an einen LAN Port des Routers an, um sich bei der Web-UI
anzumelden. Navigieren Sie zu Wi-Fi-Einstellungen > Wi-Fi Name & Passwort und stellen Sie sicher,
dass:
• Die Wi-Fi-Netzwerke sind aktiviert.
• Die Funktion Ausblenden ist deaktiviert.
F6: Ich kann das 5-GHz-Wi-Fi-Netzwerk des Routers auf meinem Wi-Fi-fähigen Gerät nicht nden.
Was muss ich tun?
A6: Versuchen Sie die folgenden Lösungen:
• Überprüfen Sie, ob Ihr Wi-Fi-fähiges Gerät das 5-GHz-Wi-Fi-Netzwerk unterstützt. Nur Geräte, die das
5-GHz-Netz unterstützen, können das 5-GHz-Wi-Fi-Netz nden und sich mit ihm verbinden.
• Prüfen Sie, ob die Funktion Unify 2,4 GHz & 5GHz deaktiviert ist. Wenn sie deaktiviert ist, lesen Sie
bitte unter F5 nach, um eine Lösung zu nden.
MAC
S/N
SSID
FS_wi_XXXXXX
FS_wi_XXXXXX_5G
Reset WPS WAN 1
2 IPTV/3
POWER
Indicateurs LED
L'Écran Ache “Request Timed Out”
Exigences d'Installation
Installation d'un routeur Wi-Fi
Reset WPS WAN 1
2 IPTV/3
POWER
Indicateur LED
Allumé
Clignote lentement
Clignote rapidement
pendant 3 secondes
Clignote rapidement
pendant 2 secondes
Éteint
Le système est en train de démarrer, ou le
routeur est déjà connecté à Internet.
Le routeur ne parvient pas à se connecter à
Internet.
Un périphérique est connecté ou déconnecté
d'un port Ethernet du routeur.
Le routeur est en attente ou eectue une
négociation WPS.
Le système est défectueux, ou le routeur n'est
pas correctement mis sous tension.
Indicateurs LED Description
Statut
Reset
Permet de restaurer les paramètres d'usine du routeur.
Méthode: Lorsque le routeur fonctionne normalement, appuyez sur le
bouton avec un objet n pendant environ 8 secondes, puis relâchez-le
lorsque l'indicateur LED clignote rapidement. Le routeur est réinitialisé.
Utilisé pour démarrer la négociation WPS du routeur.
Méthode: Appuyez sur le bouton, et l'indicateur LED clignotera
rapidement. Dans les 2 minutes, activez la fonction WPS de l'autre
appareil compatible WPS pour établir une connexion WPS.
Prise d'alimentation.
Veuillez utiliser l'adaptateur électrique inclus pour connecter cette prise
à une alimentation électrique.
WPS
POWER
Bouton/Prise Description
Avant de commencer l'installation, assurez-vous que vous disposez des
éléments suivants :
Connexion du routeur
Assurez-vous que le contrôleur est correctement mis à terre.
Assurez-vous que le routeur Wi-Fi est propre et exempt de poussière.
Placez le routeur Wi-Fi dans un endroit ventilé.
Étape 1: Importez votre nom d'utilisateur et votre mot de passe PPPoE au nouveau routeur
(Optionnel).
Étape1: Démarrez un navigateur Web sur l'appareil connecté au routeur, et visitez fswi.com ou
192.168.0.1. Cliquez sur Démarrer.
Étape 2: Le routeur détecte automatiquement votre type de connexion. Sélectionnez le Type de FAI
en fonction de votre région et de votre FAI et entrez les paramètres requis (le cas échéant). Cliquez
sur Next (Suivant).
Pour accéder à l'Internet avec :
1. Appareils compatibles Wi-Fi : Connectez-vous au réseau Wi-Fi à l'aide de l'identiant et du mot de
passe Wi-Fi que vous avez dénis.
2. Dispositifs laires : Connectez-vous à un port LAN du routeur à l'aide d'un câble Ethernet.
Option A: Connectez votre appareil compatible Wi-Fi, tel qu'un smartphone, au réseau sans l du
routeur. Vous trouverez les informations relatives du réseau Wi-Fi par défaut sur l'étiquette inférieure
du routeur.
Option B: Connectez votre périphérique laire, tel qu'un ordinateur, à un port LAN du routeur
à l'aide d'un câble Ethernet. L'indicateur lumineux clignotera rapidement pendant 3 secondes.
Étape 2: Connectez le port WAN du routeur.
Assurez-vous que le site d'installation est exempt d'humidité et horizontal.
1. Mettez sous tension votre routeur traditionnel et votre nouveau routeur.
2. Connectez le port WAN de votre routeur traditionnel à un port LAN du nouveau routeur à l'aide
d'un câble Ethernet. Après que l'indicateur LED du nouveau routeur clignote rapidement pendant 8
secondes, le nom d'utilisateur et le mot de passe PPPoE sont importés au nouveau routeur.
3. Retirez le routeur traditionnel.
Connexion de votre appareil au routeur
Étape 3: Dénissez le nom Wi-Fi, le mot de passe Wi-Fi et le mot de passe de connexion pour le
routeur. Cliquez sur Next (Suivant).
1. Vériez si le câble réseau est en bon état.
2. Vériez si la connexion matérielle est correctement établie.
3. L'indicateur d'état du système sur le panneau de commande et l'indicateur NIC sur l'ordinateur
doivent être allumés.
4. Le paramètre de l'adresse IP de l'ordinateur est correct.
Terminé.
Dépannage
QUESTIONS FRÉQUENTES
Conguration du Routeur
1. Assurez-vous que le routeur est sous tension.
2. Connectez le port WAN du routeur au port LAN de votre modem ou à la prise Ethernet à l'aide
d'un câble Ethernet. L'indicateur lumineux clignotera rapidement pendant 3 secondes.
Placez le routeur Wi-Fi dans un endroit sec et évitez toute inltration de liquide.
Reset WPS WAN 1
2 IPTV/3
POWER
Reset WPS WAN 1
2 IPTV/3
POWER
Reset WPS WAN 1
2 IPTV/3
POWER
câble Ethernet
Source d'énergie
Nouveau routeur
Routeur d'origine
Source d'énergie
WAN
Source d'énergie
CONSEILS: Si la page n'apparaît pas, reportez-vous à la question 1 de la FAQ.
CONSEILS: Le mot de passe Wi-Fi est utilisé pour la connexion au réseau Wi-Fi, tandis que le
mot de passe de connexion est utilisé pour se connecter à l'interface utilisateur Web du
routeur.
CONSEILS: Si vous devez modier l'identiant et le mot de passe Wi-Fi, consultez la section
Q3 de la FAQ. Si vous ne pouvez toujours pas accéder à Internet après la conguration,
reportez-vous à la section Q2 de la FAQ.
CONSEILS: Cette fonction n'est applicable que lorsque le type de connexion du routeur
d'origine est PPPoE, à l'exception de PPPoE de certains FAI spéciaux ou d'une connexion
PPPoE congurée manuellement avec des informations VLAN.
WAN
Internet
Ou
Câble Ethernet
Setting
Wi-Fi
Wi-Fi
9:07
FS_wi_XXXXXX
Appareils Wi-Fi
CHOOSE A NETWORK...
Câble EthernetCâble Ethernet
Reset WPS WAN 1
2 IPTV/3
POWER
Reset WPS WAN 1
2 IPTV/3
POWER
Appareil laire
Welcome
Start
Quick Setup Wizard
Connection Type:
Isp User Name:
Isp Password:
Isp Type:
Next
Please select your connection type.
As detected, your connection type may be: PPPoE
Normal
Skip
PPPoE
Enter the user name from your ISP
Enter the password from your ISP
Next
WiFi Settings
Set the Wi password as the login password of the admin account.
Normal
Not Required
WiFi password of 8-32 characters
Login password of 5-32 characters
Not Required
FS_wi_XXXXXX
More
Your’re all set! You can now connect to
To change settings of other feactures, click the “More” button below.
Q1 : Je ne peux pas me connecter à l'interface Web du routeur en visitant fswi.com ou
192.168.0.1. Que dois-je faire ?
R1: Essayez les solutions suivantes:
• Si vous utilisez un appareil compatible Wi-Fi, tel qu'un smartphone:
- Assurez-vous que celui-ci se connecte au réseau Wi-Fi du routeur.
- Assurez-vous que le réseau cellulaire (données mobiles) de l'appareil est désactivé.
• Si vous utilisez un périphérique laire, tel qu'un ordinateur:
- Assurez-vous que fswi.com ou 192.168.0.1 est correctement saisi dans la barre d'adresse, plutôt
que dans la barre de recherche du navigateur Web.
- Assurez-vous que l'ordinateur est correctement connecté à un port LAN du routeur à l'aide d'un
câble Ethernet.
- Vériez que l'ordinateur est conguré pour obtenir automatiquement une adresse IP et l'adresse du
serveur DNS. Si le problème persiste, réinitialisez le routeur et réessayez.
Q2 : Je ne peux pas accéder à l'Internet après la conguration. Que dois-je faire ?
R2: Essayez les solutions suivantes:
• Vériez si le port WAN du routeur est correctement connecté à un modem ou à une prise Ethernet.
• Connectez-vous à l'interface Web du routeur et accédez à la page des Paramètres Internet. Suivez
les instructions de la page pour résoudre le problème.
Si le problème persiste, essayez les solutions suivantes:
• Pour les appareils équipés de la technologie Wi-Fi:
- Vériez si vos appareils compatibles Wi-Fi sont connectés au réseau Wi-Fi du routeur.
- Visitez fswi.com ou 192.168.0.1 pour accéder à l'interface Web et modier votre identiant et
votre mot de passe Wi-Fi sur la page Wi-Fi Settings > Wi-Fi Name & Password. Puis réessayez.
• Pour les dispositifs laires :
- Vériez si vos périphériques câblés sont correctement connectés à un port LAN.
- Vériez si les périphériques câblés sont congurés pour obtenir automatiquement une adresse IP et
une adresse de serveur DNS.
Q3 : Comment changer l'identiant et mot de passe Wi-Fi ?
R3: Suivez les étapes ci-dessous :
1. Connectez votre appareil compatible Wi-Fi au réseau Wi-Fi du routeur, ou connectez votre
ordinateur à un port LAN à l'aide d'un câble Ethernet.
2. Lancez un navigateur Web et visitez fswi.com ou 192.168.0.1 pour accéder à l'interface Web du
routeur.
3. Accédez à la page Wi-Fi Settings > Wi-Fi Name & Password pour modier et enregistrer les
paramètres.
Q4 : Comment réinitialiser le routeur ?
R4: Essayez les méthodes suivantes:
Méthode A : Lorsque le routeur fonctionne normalement, appuyez sur le bouton Reset avec un objet
n pendant environ 8 secondes et relâchez-le lorsque l'indicateur lumineux clignote rapidement. Le
routeur est réinitialisé.
Méthode B : Connectez-vous à l'interface Web du routeur et accédez à System Settings > Backup /
Restore.
Q5 : Je ne parviens pas à détecter le réseau Wi-Fi du routeur sur mon appareil compatible Wi-Fi.
Que dois-je faire ?
R5: Connectez votre ordinateur à un port LAN du routeur pour accéder à l'interface Web. Naviguez
jusqu'à Wi-Fi Settings > Wi-Fi Name & Password et assurez-vous que:
• The Wi-Fi networks are enabled.
• The Hide function is disabled.
Q6 : Je ne trouve pas le réseau Wi-Fi 5 GHz du routeur sur mon périphérique Wi-Fi. Que dois-je
faire ?
R6: Essayez les solutions suivantes:
• Vériez si votre appareil Wi-Fi prend en charge la connectivité Wi-Fi 5 GHz. Seuls les appareils
prenant en charge la fréquence 5 GHz peuvent détecter et se connecter au réseau Wi-Fi 5 GHz.
• Vériez si la fonction Unify 2,4 GHz & 5GHz est désactivée. Si elle est désactivée, reportez-vous à la
question 5 pour trouver une solution.
Compliance Information
FCC
Note:This equipment has been tested and found to comply with the limits for a Class B digital device,
pursuant to part 15 of the FCC Rules. These limits are designed to provide reasonable protection
against harmful interference in a residential installation. This equipment generates, uses and can
radiate radio frequency energy and, if not installed and used in accordance with the instructions, may
cause harmful interference to radio communications. However, there is no guarantee that
interference will not occur in a particular installation. If this equipment does cause harmful
interference to radio or television reception, which can be determined by turning the equipment o
and on, the user is encouraged to try to correct the interference by one or more of the following
measures:
—Reorient or relocate the receiving antenna.
—Increase the separation between the equipment and receiver.
—Connect the equipment into an outlet on a circuit dierent from that to which the receiver is
connected.
—Consult the dealer or an experienced radio/TV technician for help.
This device complies with part 15 of the FCC Rules. Operation is subject to the following two
conditions: (1) This device may not cause harmful interference, and (2) this device must accept any
interference received, including interference that may cause undesired operation.
The antennas used for this transmitter must be installed to provide a separation distance of at least
20cm from all persons and must not be located or operating in conjunction with any other antenna
or transmitter.
CAUTION:
Any changes or modications not expressly approved by the grantee of this device could void the
user's authority to operate the equipment.
Responsible party (only for FCC matter)
FS.COM Inc.
380 Centerpoint Blvd, New Castle, DE 19720, United States
https://www.fs.com
FS.COM GmbH déclare par la présente que cet appareil est conforme à la Directive 2014/53/UE. Une
copie de la Déclaration de Conformité de l'UE est disponible à l'adresse suivante
https://www.fs.com/fr/company/quality_control.html
Die FS.COM GmbH erklärt hiermit, dass dieses Gerät mit der Richtlinie 2014/53/EU übereinstimmt. Eine
Kopie der EU-Konformitätserklärung nden Sie unter
www.fs.com/de/company/quality_control.html
FS.COM GmbH hereby declares that this device is in compliance with the Directive 2014/53/EU. A copy
of the EU Declaration of Conformity is available at
www.fs.com/company/quality_control.html
FS.COM GmbH
NOVA Gewerbepark Building 7, Am
Gld 7, 85375 Neufahrn bei Munich, Germany
FS.COM LIMITED
24F, Infore Center, No.19, Haitian 2nd Rd,
Binhai Community, Yuehai Street,Nanshan
District, Shenzhen City
CE
1 2 3 4 5 6 7 8 9 10 11 12
EN
EN
DE
DE
EN
EN
EN
EN
EN
EN
EN
EN
DE
EN
13 14
DE
DE
15 16
DE
DE
17 18
DE
DE
19 20
DE
DE
21 22
FR
FR
23 24
FR
FR
25 26
FR
FR
27 28
FR
FR
29 30
FR
FR
31 32
FR
33 34 35
Produktgarantie
Wir garantieren unseren Kunden, dass wir bei Schäden oder fehlerhaften Artikeln, die auf unsere
Verarbeitung zurückzuführen sind, eine kostenlose Rückgabe innerhalb von 30 Tagen nach Erhalt der
Ware gewähren. Dies gilt nicht für Sonderanfertigungen oder maßgeschneiderte Lösungen.
Garantie: Der Wi-Fi-Router genießt 2 Jahre beschränkte Garantie gegen Material- und
Verarbeitungsfehler. Weitere Details zur Garantie nden Sie unter:
https://www.fs.com/de/policies/warranty.html
Rückgabe: Wenn Sie Artikel zurücksenden möchten, nden Sie Informationen unter:
https://www.fs.com/de/policies/day_return_policy.html
2
Support und andere Ressourcen
Downloads
Hilfecenter
Kontakt
https://www.fs.com/de/download.html
https://www.fs.com/de/service/fs_support.html
https://www.fs.com/de/contact_us.html
Garantie des Produits
FS garantit à ses clients que tout dommage ou article défectueux dû à sa fabrication peut être
retourné dans un délai de 30 jours à compter de la date de réception de la marchandise. Cela exclut
tout article fabriqué sur mesure ou toute solution personnalisée.
Garantie : Le routeur Wi-Fi bénécie d'une garantie limitée de 2 ans contre les défauts
matériel ou de fabrication. Pour plus de détails sur la garantie, veuillez consulter la page
suivante :
https://www.fs.com/fr/policies/warranty.html
Retour: Si vous souhaitez retourner un ou plusieurs articles, vous trouverez des
informations sur les modalités de retour à l'adresse suivante
https://www.fs.com/fr/policies/day_return_policy.html
2
Support et Autres Informations
Télécharger
Centre d'Assistance
Contactez-Nous
https://www.fs.com/fr/download.html
https://www.fs.com/fr/service/help_center.html
https://www.fs.com/fr/contact_us.html
5653