User Manual CT-7031-UD Rev. 1.
Table of Contents Section I. Unit Operations Page No. 1 Getting Started 1 Powering Up the CaddyTrek 2 Charging the Battery 2 Standby Mode 3 Manual Push Mode 3 Remote Control 3 Follow Mode 3 Marching Mode 4 Grouping Mode 4 Using the Directional Buttons 5 Additional Handset Commands 6 Tips for High Level Tracking 6 II. Maintenance 7 III. Frequently asked questions 11 IV. Precautions 15 V. Specifications 17 VI.
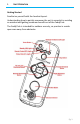
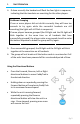
I. UNIT OPERATION Getting Started Familiarize yourself with the handset layout. Understanding how to quickly maneuver the unit is essential in avoiding an accident and getting maximum benefit out of the CaddyTrek. The CaddyTrek is intended for outdoor use only, so practice in a wideopen area away from obstacles. Pg.
I. UNIT OPERATION Powering up the CaddyTrek 1. Power on the CaddyTrek by pressing the far left button on the dashboard 2. Position yourself behind the large wheels of CaddyTrek, then power on the handset. Point the handset towards CaddyTrek to establish communication. You will hear two short beeps once the communication link is established. 3. CaddyTrek will be in the Standby Mode (SB) with the SB LED light flashing.
I. UNIT OPERATION Standby (SB) Mode Standby Mode is a starting point for all other modes. When turned on the unit will automatically enter into SB mode and wait for further instruction from the user. While in SB mode: 1. CaddyTrek’s wheels will be locked. 2. The unit will automatically sync with the handset. 3. You should not push the CaddyTrek. Manual Push Mode (use on level ground) 1. Make sure CaddyTrek and the handset are powered off. 2. Guide CaddyTrek with the push bar. 3.
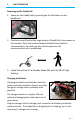
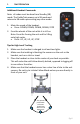
I. UNIT OPERATION Marching Mode 1. Power on the CaddyTrek and handset. 2. Stand 4.5 ft. from the unit and between the sensors. 3. Make sure the handset is facing the unit. 4. Hold down the right directional button. 5. Move towards the CaddyTrek to engage unit. Turning the unit while in Marching Mode: a. Move one-half step in the opposite direction. Turning Left Turning Right Front of unit Front of unit Exiting Marching mode: a. Press the STOP or FOLLOW buttons on handset.
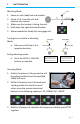
I. UNIT OPERATION 4. If done correctly the handsets will flash the four lights in sequence, indicating that the handsets are searching for the other players. Problems Grouping If one or more players did not do this correctly they will have ten seconds to try again while the successful handsets are still searching (the lights will still flash in sequence).
I. UNIT OPERATION Additional Handset Commands Note: all codes must be done from Standby (SB) mode. The CaddyTrek powers up in SB mode and returns to SB mode upon exiting any other mode. 1. Mute the sound of the handset. a. Press: DOWN, DOWN, DOWN, DOWN, STOP 2. Free the wheels of the cart while it is still on. Note: Great for freeing the unit and for lifting onto high curbs. a. Press: UP, UP, UP, UP, STOP Tips for High Level Tracking 1. Make sure the handset is charged to at least two lights. 2.
II. MAINTENANCE Introduction This chapter is designed to educate users on how to keep their CaddyTrek unit in ideal operating condition. Though the frequency to perform maintenance tasks are recommended, it may be necessary to perform certain procedures more or less frequently depending on use. Owners must use their best judgement in maintaining their CaddyTrek.
II. MAINTENANCE Caster Wheel Assembly Maintenance The Caster Wheel Assembly requires a high level of maintenance. Dirt and grass often get stuck in or around the caster wheel and caster wheel fork. If you let it accumulate, it will weaken the caster wheel. After a day out on the golf course, before storing your unit, lightly brush the dirt and grass off the assembly. 1. Cleaning It is common for grass and dirt to collect in the caster fork area.
II. MAINTENANCE Motor Wheels Assemblies Maintenance 1. Use a flat head screwdriver to remove large clumps of grass that are caught in the treads of the motor wheels. 2. Once the large clumps are removed, brush off the remaining dirt and grass with a cloth. 3. There are six long screws that attach the treaded wheel to the motor hub. Using a Phillips screwdriver, check that these are well secured. 4.
II. MAINTENANCE Sensors It is recommended that you check your sensors from time to time. Make sure the plug is screwed into the electronics box securely. Check the wire and make sure it is in good shape. Finally, inspect the sensor head. Make sure it is intact and is firmly secured to the sensor arms. Handset Practice cleanliness with your handset. A damp cloth works best for cleaning. Keep your handset free from dirt, moisture and impacts.
III. FREQUENTLY ASKED QUESTIONS What allows the CaddyTrek to follow you hands free? CaddyTrek is a proprietary robotic system with advanced sensing and motion control technology. Sensors on CaddyTrek pick up signals from the remote handset worn by the golfer to determine distance and angle. How fast will the CaddyTrek follow or move? CaddyTrek can travel up to 4 mph and typically follows within 5 yards of the golfer while in Follow Mode.
III. FREQUENTLY ASKED QUESTIONS Can I purchase any accessories for my CaddyTrek? CaddyTrek has added new accessories and you may purchase them through our website. Can I purchase an additional battery or handset? Additional batteries and other parts can be purchased through our website at www.caddytrek.com I’ve powered on my CaddyTrek cart and handset, yet I cannot operate the unit or engage any of the modes. What do I do now? Begin with powering off CaddyTrek and the handset.
III. FREQUENTLY ASKED QUESTIONS I’ve plugged the CaddyTrek cart and handset to the charger but it’s still beeping three long beeps. How do I get this beeping to stop? Ensure that the connection between CaddyTrek and the charging adapter is secure and that the plug is securely connected to the power outlet. This should resolve the issue; the beeping may continue for a short while until the batteries have accumulated some power.
III. FREQUENTLY ASKED QUESTIONS What is OA? OA stands for “Object Avoidance.” This mode is just like follow mode except it detects and avoids hitting objects that come in its path, between the user and the cart. This mode is not ready to be released so disregard it until further notice. CaddyTrek usually follows great but sometimes it spins out or loses connection even on wide and flat open ground. What is the cause of this? There are two main causes for this: 1.
III. PRECAUTIONS Wide Open Spaces CaddyTrek is designed for use in wide open spaces only. Do not operate CaddyTrek in enclosed or confined areas. Abnormal or erratic behavior can be caused by radio frequency signals / interference Wi-Fi or similar electronic signals. The CaddyTrek uses RF and Ultrasound signals to communicate back and forth from the CaddyTrek to the remote handset. On occasion the user may experience interference with the communication of the CaddyTrek when using FL mode.
IV. PRECAUTIONS Troubleshooting Procedures For best FL mode results, make sure the handset sensor and unit sensors are facing each other with a clear line of site. Take sharp turns at a slower pace. Do not let anything including a towel block the sensors on the unit. Use caution when operating the CaddyTrek in a confined area, on steep slopes and side hills. Walk slowly and guide CaddyTrek carefully to clear hazardous areas, bodies of water, bunkers, cliffs, and other obstructions.
V. SPECIFICATIONS Remote Control Motor Drive: Battery Type Battery: Battery Charger: Weight Speed Stopping Distance “Follow” Max.
WARRANTY FTR Systems warrants the product against manufacture design and defects in materials and for a period of ONE (1) YEAR from the date of purchase. The following is covered under the terms of the limited warranty: YEAR 1: motors, electronics, battery, and mechanical parts. To view the complete warranty policy, visit www.caddytrek.com/warranty. Warranty Registration It is recommended that customers register their CaddyTrek as soon as receiving the product and at least within 30 days of its receipt.