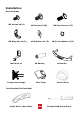
Installation Parts Included M5 Screws x8 (A) M6 Wing Nut x2 (D) M6 Screws x8 (B) M6 Step Screw x2 (C) ø6.5 Washer x2 (E) Tank Hook x1 Temperature Gauge AA Battery Door Clasp ø6.
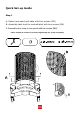
Quick Set-up Guide Step 1 A: Fasten rear panel grill base with four screws (M5) B: Assemble tank hook to marked label with two screws (M6) C: Assemble door clasp to rear panel with two screws (M6)” *Note: Install all screws loose before tightening any screw completely.
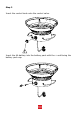
Step 2 Insert the control knob onto the control valve. Insert the AA battery into the battery pack with the + end facing the battery pack cap.
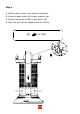
Step 3 Place control assembly upside down on the floor or low flat surface. Place assembled rear door and grill base onto the control assembly with four screws (M5) *Note: Install all screws loose before tightening any screw completely.
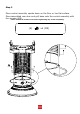
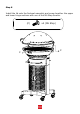
Step 4 A. Slide support spine onto control assembly. B. Insert support spine to firebox support top. C. Fasten two screws (M6) to grill base. (B) D. Now the grill can be flipped onto its wheels.
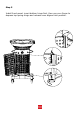
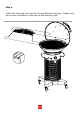
Step 5 Install front panel: insert bottom hinge first, then use your finger to depress top spring-hinge and release once aligned into position.
Step 6 A. Install the temperature gauge into the cooking lid. B. Install the lid handle onto the lid. Be sure to use both the locking washer and washer in the order shown in the drawing below.
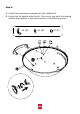
Step 7 A. Place diffuser panel, cast iron grate, and grill lid in place. Please note that the grill grate should be positioned with the “FACE DOWN” writing as the bottom side of the grate. B. Insert the residue tray shield into the residue tray and slide residue tray into place in the space between the burner knob and below the fire-bowl.
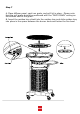
Step 8 Install the lid onto the firebowl assembly and screw together the upper and lower hinge sections with use of the M6 Step Screws.
Step 9 Install the warming rack into the lid and firebowl assembly. Please note the correct orientation of the legs on the warming rack.
Step 10 Gas hook up (LP gas is Standard). Open the front door, install a standard 20lb LP cylinder (Type 1) into the opening of the grill base (Note: the tank must be hanging from the tank hook) and connect the LP gas hose with regulator assembly to the LP cylinder. Proper procedures for gas leakage testing must be obeyed. Please note the Gas Hook-Up, Danger, and Warnings pages for more information.
Step 11 Fasten two screws (M6) to the upper support spine.