Version: 210233-00-24A-LS
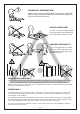
IMPORTANT INFORMATION! please read the entire manual before starting to assemble and/or using this product.follow the manual thoroughly and keep it for further reference. AVOID SCRATCHES! In order to avoid scratching this furnuture should be assembled on a soft layer-could be a rug. IMPROVE EFFICIENCY ! Try to find a partner to install with you, which can speed up the installation efficiency and shorten the time. ANTI-TOPPLE WARNING ! Overturned furniture can cause serious or fatal crush injuries.
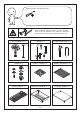
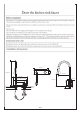
Please prepare the following tools When installing, please carefully confirm whether each screw corresponds to the manual, accessories with similar shapes can be distinguished by size Cup Washer x 1 Faucet x 1 Soap Dispenser x 1 Drain x 1 Drain Cover x 1 Roller Shutter x 1 Sink Grate x 1 Strainer Basket x 1 Cutting Board x 1 3/15
/15
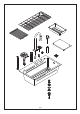
118/4.65" 114/4.49" 118/4.65" 73/2.87" 73/2.87" 114/4.49" P=2.309/0.09" 57.4/22.6" 57.4/22.6" Serial number Product name Unit(mm/inch) 90x20/ 3.54"x0.79" 82x23/ 3.23"x0.91" 15x25/ 0.59"x0.98" 114x55/ 4.49"x2.17" 113x2.5/ 4.45"x0.1" 117x11/ 4.61"x0.43" 118x73/ 4.65"x2.
5/2.56" 240/9.45" 415/16.34" 200/7.87" 240/9.45" 55/2.17" 210/8.27" The opening 30/1.18" M28x1.5/1.1"x0.06" The opening 5/0.2" 35/1.38" 30/1.18" M32x1.5/1.26"x0.06" 6/15 24/0.94" Surface width 220/8.66" Center distance 150/5.
/15
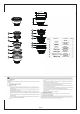
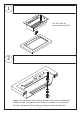
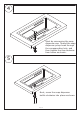
1 Fix the sink to countertop at first. 2 Begin by loosening the central screw in the drain assembly. Attach three components beneath the basin, securing the fourth component from above using a screw as shown.
3 Place the stainless steel strainer basket and drain cover in position as shown.
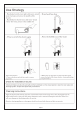
4 Start by unscrewing the soap dispenser cap. Thread the soap dispenser pump head through the corresponding hole, and then tighten the cap clockwise from below as shown. 5 Next, screw the soap dispenser bottle clockwise into place as shown.
6 Loosen the cup washer nut, insert the cup washer into the designated hole, and then tighten the nut clockwise from below as shown. 7 Secure the hose clockwise to the bottom of the cup washer as shown.
8 Begin by unscrewing the washer under the faucet and the nut below it. Insert the faucet into the corresponding hole, and then tighten the washer and nut clockwise from below. Ensure that the screws underneath the waterfall faucet are also tightened as shown. 9 After unscrewing the screw for the gravity ball, attach it to the faucet's water pipe position. Then connect the two water pipes as shown.
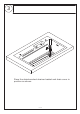
10 Attach the cold and hot water pipes to their respective positions and tighten them clockwise as shown. 11 Place the drain cover in its designated position as shown.
12 Place the bottom basket into the sink as shown. 13 Place the roller shutter in its designated position as shown.
14 Place the strainer basket in its designated position as shown. 15 Place the cutting board into its designated position as shown.
WARRANTY WARRANTY CLAIMS •There is a 30-day warranty for broken furniture or any other problems that do not work properly. The warranty will start from the date of purchase which must be verified by proof of purchase. •Before making a claim, we may be able to answer your query, simply call us. Please leave your purchase order number, along with some details of the problem, if you want a replacement part. We will arrange within 48 hours. If there is out of stock, we will reply with a shipping date.
RETURNS CHANGED YOUR MIND AND NEED TO RETURN YOU ITEM? PLEASE FOLLOW THE BELOW INSTRUCTIONS: •If you have purchased and have simply changed your mind, follow the retailer’s instructions for returns. DEFECTIVE ITEMS •If your item is defective in any way, i.e. it doesn’t work but you can’t identify why, in the first instance, please call us. DAMAGED ITEMS •If you receive an order with obvious shipping damage from the retailer, then we suggest the delivery is refused.