
User's Manual


Scanning 365
3
Click
Basic Information
.
4
Set
Administrator E-Mail Address
. In the
Administrator E-Mail Address
text box. Up to 63 alphanumeric
characters, periods, hyphens, underscores, and at symbols (@) can be used.
5
Click
Apply New Settings
.
Setting the Information Necessary to Access the Mail Server
To make the printer to send an e-mail, follow the steps below:
1
Launch the
Dell Printer Configuration Web Tool
.
a
Open the web browser.
b
Enter the IP address of your printer in the web browser.
See "Dell™ Printer Configuration Web Tool."
2
Click
E-Mail Alert
.
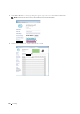
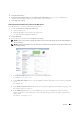
3
Set the mail server information under
E-Mail Server Settings
.
NOTE: In this procedure, the server settings for a Gmail account are used as an example. The server settings will differ for
each e-mail service.
NOTE: Information about the Gmail account is based on the information as of October 2013. For the latest information, visit
the homepage of Gmail.
a
In the
Primary SMTP Gateway
text box, set the primary SMTP gateway.
For example:
smtp.gmail.com
b
In the
SMTP Port Number
text box, enter the SMTP port number. This must be 25,587 or between 5,000 and
65,535.
For example:
587
c
In the
E-Mail Send Authentication
drop-down menu, specify the authentication method for outgoing e-mail.
For example:
SMTP_Auth
(
Auto
)
d
In the
SMTP Login User
text box, set the SMTP login user. Up to 63 alphanumeric characters, periods,
hyphens, underscores, and at symbols (@) can be used. If specifying more than one address, separate them
using commas.
For example:
aaaa@gmail.com