
User's Manual


Maintaining Your Printer 507
Entering Values
When Using the Operator Panel
Using the operator panel, enter the values found in the color registration chart to make adjustments.
1
Press the
(Information)
button.
2
Tap the
Tools
tab, and then tap
Admin Settings
.
3
Ta p
Maintenance
.
4
Tap until
Color Reg Adjust
appears, and then tap
Color Reg Adjust
.
5
Ta p
Enter Number
.
6
Ta p
-
or
+
to specify the values for left colors (
LY
,
LM
, and
LC
), and then tap
Next
.
7
Ta p
-
or
+
to specify the values for right colors (
RY
,
RM
, and
RC
), and then tap
Next
.
8
Ta p
-
or
+
to specify the values for process colors (
PY
,
PM
, and
PC
), and then tap
OK
.
NOTE: The registration values are always shown as 0 the next time you enter the menu.
9
Ta p
Color Regi Chart
.
10
Ta p
Print
.
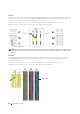
The color registration chart with the new values is printed.
If the straightest line is not at the value of 0, adjust the values again. Checking the charts before and after the
adjustments will help you to determine the values to enter.
When Using the Tool Box
Using the Tool Box, enter the values that you found in the color registration chart to make adjustments.
1
Click
Start
o
All Programs
o
Dell Printers
o
Dell C2665dnf Color Laser Multifunction Printer
o
Tool Box
.
NOTE: For details about starting the T
Tool Box
, see "Starting the Tool Box."
The
Tool Box
opens.
2
Click the
Printer Maintenance
tab.
3
Select
Service Tools
from the list at the left side of the page.
The
Service Tools
page is displayed.
4
Specify each value for process, left, and right colors in
Enter Number
under
Color Registration Adjustments
, and
then click
Apply New Settings
.
5
Click
Start
next to
Color Regi Chart
under
Color Registration Adjustments
.
The color registration chart is printed with the new values.
6
Adjust till all straight lines are at the value of 0. Show image of before and after adjustment will help.
After printing the color registration chart, do not turn off the printer until the printer motor has stopped running.
NOTE: If 0 is not next to the straightest lines, determine the values and adjust the printer again.