Notice to the user Government law prohibits the operation of unlicensed radio transmitters within the territories under government control. Illegal operation is punishable by fine or imprisonment or both. THANK YOU We are grateful you choose BelFone series professional radio communications products! Since 1989, BelFone has been always engaging in research and exploration of radio communications technologies, In order to lead intelligent technologies in the industry.
Changes or modifications not expressly approved by the party responsible for compliance could void the user's authority to operate the equipment. For a Class B digital device or peripheral, the instructions furnished to the user shall include the following or similar statement, placed in a prominent location in the text of the manual: NOTE: This equipment has been tested and found to comply with the limits for a Class B digital device, pursuant to part 15 of the FCC Rules.
This radio is designed for and classified as “Occupational/Controlled Use Only”, meaning it must be used only during the course of employment by individuals aware of the hazards, and the ways to minimize such hazards; NOT intended for use in an General population/uncontrolled environment – DO NOT operate the radio without a proper antenna attached, as this may damage the radio and may also cause you to exceed RF exposure limits.
Precautions It’s important that the operator is aware of and understands hazards common to the operation of any radio .Please observe the following safety precautions to prevent radio damage or personal injury. The following precautions shall be observed during operation, service and repair of this radio.
Content Supplied Accessories......................................................................................................................... 6 Getting Acquainted ......................................................................................................................... 12 Basic Operation ............................................................................................................................... 14 LCD Icons ...........................................................
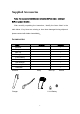
Supplied Accessories Notes: The accessories listed below are covered by BelFone dealer、authorized BelFone agents or factories . After carefully unpacking the transceiver, identify the items listed in the table below. If any items are missing or have been damaged during shipment please contact with dealer immediately.
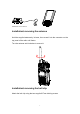
Installation of Accessories Installation/ removing the antenna Hold the supplied antenna by its base, then screw it into the connector on the top panel of the radio until fasten. Turn the antenna anti-clockwise to remove it. Installation/ removing the belt clip Attach the belt clip using the two supplied3*7mm binding screws.
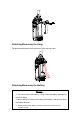
Attaching/Removing the Strap Thread the hand strap to the loop back of your two-way radio. Attaching/Removing the Battery Warning! 1. Don’t short-circuit the battery, it may cause the battery damaged or burst into flame; 2. Never attempt to remove the casing from battery, that avoid to short the battery terminal; 3. Battery is flammable objects, don’t8throw it into fire or don’t use it on dangerous area.
Match the guides of the battery with the corresponding grooves on the upper rear of the radio, then press the battery until a click is heard to lock it in place. To remove the battery, please turn the power off then press the release latch to unlock the battery pull the battery away from the radio. Note: Don’t attach / remove the battery if the transceiver turned on.
charge/discharge cycles. If you notice the battery power runs lows, please recharge the battery. Applicable Battery To reduce the risk of injury, please only use the battery and charger specified by belfone, other batteries may burst, causing bodily injury and property damage. Battery Tips 1. When charging your battery, keep it at a temperature among 5℃—40℃. Temperature out of the limit may cause battery leakage or damage. 2.
damage due to over-discharge. 2. Recharge a battery after several months’ storage, to avoid battery capacity reduction due to over-discharge.(NI-MH batteries:3 months, Li-Ion& Li-polymer batteries: 6 months) 3. Store your battery in a cool, dry place under room temperature, to reduce self-discharge. Charging the battery Use only the charger specified by the manufacturer, the charge indicator indicates the charging progress.
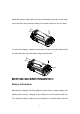
Attaching the Speaker/Microphone Open the accessory port cover, then align the plug with the accessory port. Getting Acquainted ① Channel Selector Knob Turn the knob to select channel 1-16.
② Power switch/volume adjust keys Turn clockwise to switch the radio power on, when the radio is turned on, rotate clockwise to increased volume, counter- clockwise to decrease the volume. Turn counterclockwise fully to switch the radio off. ③ LED Indicator When transmitting LED glows red, when receiving LED glows green; when un-programmed LED flashes red; when scanning LED flashes red. ④ Orange Button Press to activate the programmable function.
Basic Operation LCD Icons Signal All Call Emergency On Scanning On Keypad Locked Unread Direct /Talk message around Mode Inbox Full Monitoring/Perma Strength High/Low Power Digital Mode Analog Mode nent Monitoring Analog Message send Disable All Tone compatible successfully Alert Digital Message send Battery Capacity compatible Failed digital analog Private Call Read Message Inbox Group Call Unread Message Inbox Turning the power on /off Rotate the power switch/volume adjusting k
transceiver will restart automatically and then input password again . When 3 times wrong in input password continuously, after it transceiver must be kill, only reprogram it then device work normal. Please enable power on password with due care. Adjusting the volume After the radio is power on, you can rotate the power switch/volume adjust keys to adjust the volume level, rotate the knob clockwise to increase the volume, or rotate the knob anti-clockwise to decrease the volume.
Dual Modes Switching If current channel mode is D/A compatible, press side button【AD Switch】 function to switch the channel mode. The current channel mode is digital compatible analog , press 【AD Switch】button to switch to analog compatible digital mode; the current channel mode is analog compatible digital, press 【AD Switch】button to switch to digital compatible analog mode.
to transmit will with a tone. Private Call If the feature “private call ACK” is enabled, to transmit a private call need to confirm whether it is power on or activate on the current channel. (1) If you preset a private call contact for current digital channel.
(3) Enter Call Log menu to select the group call number you want to call, then press PTT key to transmit a group call; (4) You can set the One Touch Call key as group call feature, then press programmed key to transmit a group call. All Call (1) If you preset an all call contact for current digital channel.
with a tone. Button Setting For enhanced convenience, you may program the keys button1, button2, short and Long press of a key can be assigned with different functions. Programmable keys are including functions listed below, icon indicates functions that are available on analog mode. No.
9 All Alert Tones On/Off To enable or disable all tones quickly 10 Battery Indication Quick view battery capacity 11 Short Message Quick access to short message 12 Zone Toggle Quick access to Zone Toggle 13 AD Switch To temporarily switch channel mode to AD or DA 14 Address List Quick access to Address List 15 Radio Enable Quick access to Radio Enable 16 Radio Disable Quick access to Radio Disable 17 Radio Check Quick access to Radio Check 18 Remote Monitor Quick access to Remot
Functions and Operations Contacts On the contacts, you can search address list members, add new contacts, manual dialing. 1.Group Call( ) While the contacts type as group call, you can select the menu to view its ID or send message. 2. Private Call( ) While select a contact as private call, a private call can view its ID、send call alert 、send message、edit name or number 、delete、send device check、 disable or enable、send remote monitor.
●Remote Monitor: Allow a user to send a "Remote Monitor" request to the target device via menu. If the request is successful, you can enable the microphone of the target radio, and monitor its activities. Only the target radio is set remote monitor decode, that enable monitor its activities. ●Remote Revive : Allow a user to send " Remote revive " command to the target killed device, to allow it to be used normally.
You can manually input the private call number for calling or sending call alert , send message ,radio check, remote monitor , remote revive , remote kill. 5. New Contact You can add a private call contact to the contact list. When input number, the available number range is 1~16776415, then edit name, press” * ” key to delete, press “#” to switch input method, name input 16 characters at most. After add a private call contact successfully, on contacts list will show new contact. Scan 1.
If the channel enables the feature “Auto Scan” via the programming software, switch to the channel will enter scanning automatically; While button 1 or 2 programmed as Scan on/off, press it to enable scan feature. 2. View/Edit List Allow a user to view/edit the scan list via menu, "View /edit list" allows a user to view the scan member, edit scan priority and delete a member from the scan list; Add scan channel allow a user to add a new member to the scan list, the list contain 16 channels at most.
private call contact or group call contact, when editing a message, press “# ”key for switching input method, press “*” key for deletion and modification, press up or down key to switch input cursor. For non-numeric input method, key “1” is a symbol key. Key “0” is a space key. After the message is edited, you can select a contact from the address list which the message is sent to or manually dial a number to send to. 3.
contact list or delete it. 2. Answered Calls The answered calls list can save up to 50 entries, when the memory for call logs is full, the oldest entry will be deleted automatically. You can add it to contact list or delete it. 3. Outgoing Calls The outgoing calls list can save up to 50 entries, when the memory for call logs is full, the oldest entry will be deleted automatically. You can add it to contact list or delete it. Settings 1.Radio Setting Allow a user to perform basic settings for the radio.
●Backlight: To set the backlight parameters, you can select enable or disable, while you select enable, the light will become dark after 5 second you don't operate the key and the light will go out immediately while you select disable. ●Boot Display: Allow a user to enable or disable the boot screen via menu. If the Intro screen is enabled, while the radio power on, the screen display BelFone Logo and device name; while the Intro screen is disable, the screen only displays device name.
●To enable this function, TX frequency should be different from RX frequency, and the channel will set as allow talk around on the programming software. ●Press the programmed Talk Around key to switch DM mode and RM mode. ●VOX: While this function is enabled, you can enjoy hands-free communication. The radio will automatically begin transmitting when you speaking, and terminate transmitting when you stop talking with no need of PTT press. Allow user to set the VOX level (level 1-9) and VOX delay(0.
emergency alarm function. In case of an emergency you can enter emergency mode to ask for help, short press programmed “Emergency on” key to send emergency information, to exit emergency mode, long press “Emergency off”. On regular type alarm, after send emergency information then receive ACK command or the alarm cycles expire, the radio will exit the emergency mode automatically. On silent type alarm, after send emergency information the n press PTT key to exit emergency mode.
●Hot MIC Duration: If the emergency mode set as emergency alarm with voice to follow, after send emergency information, your voice and background noise to be transmitted automatically as you don’t need to press PTT key within hot MIC duration. Note: while the short press is set as emergency on, the long press will be set as emergency off default.
Permanent Monitor: Permanent monitor feature is the same as monitor, but long press the Permanent Monitor key to enter monitor mode, the radio will remain on monitor mode until long press it again to exit. Voice Encryption The voice encryption can encrypt your audio signals to guarantee the privacy of your communication, via the programming software user can select encryption type as static or dynamic.
Reject Stranger Call On digital mode, if enable reject strange call feature, while the call ID not exist in the contacts list, it’s unable to transmit or receive. When received group call or all call, the device ID of transmitter and group call ID or all call ID should preset on address list.
indication for transmission on digital channel). Via programmable software to set it: General Settings folder →Tone Alerts → Voice Indication → Channel Free Indication → Talk Permit Indication Lowery Battery Alert When your battery gets low, LED indicator glows red and with a warning tone: “Please Charge”,please replace the battery or charge the battery in time. The radio will turn off automatically while battery is too low.
free, if choose always, whenever press PTT key to transmit directly; If choose color code free, you will be unable to transmit on the channel if the color code is already in use; If choose channel free, you will be unable to transmit on the channel if it is already in use. If the channel is busy, press PTT key a low-pitched tone will sound.
squelch threshold required for the radio to un-mute. You can set SQL 0~9, Level 3 is set to its basic setting. Bandwidth On analog mode, there are two types of bandwidth available, you can choose bandwidth as wide (25 KHz) or narrow (12.5 kHz) via programming software.
CTCSS/CDCSS signaling matches your radio’s. Note: The radio approve of non-standard code, on analog mode, you can input non-standard code manually as you need. CTCSS Standard Frequency Table CTCSS Freq. CTCSS Freq. CTCSS Freq. CTCSS Freq. No. [Hz] No. [Hz] No. [Hz] No. [Hz] 1 67.0 11 94.8 21 131.8 31 186.2 2 69.3 12 97.4 22 136.5 32 192.8 3 71.9 13 100.0 23 141.3 33 203.5 4 74.4 14 103.5 24 146.2 34 210.7 5 77.0 15 107.2 25 151.4 35 218.1 6 79.
8 85.4 18 118.8 28 167.9 38 241.8 9 88.5 19 123.0 29 173.8 39 250.3 10 91.5 20 127.3 30 179.
23 D152N D152I 51 D411N D411I 79 D731N D731I 24 D155N D155I 52 D412N D412I 80 D732N D732I 25 D156N D156I 53 D413N D413I 81 D734N D734I 26 D162N D162I 54 D423N D423I 82 D743N D743I 27 D165N D165I 55 D431N D431I 83 D754N D754I 28 D172N D172I 56 D432N D432I Specifications General Frequency range UHF:400-480 MHz Channel Capacity 1024 Zones 64 Channel Spacing 12.5KHz/25KHz Operating Voltage DC 7.
Transmitter High Power: 4W RF Output Power Low Power:1W 4FSK Modulation 12.5kHz Only data:7K60FXD 12.5kHz data and audio:7K60FXE Modulation Limiting +/- 2.5kHz @ 12.5kHz; +/- 5kHz @ 25kHz FM Noise Conducted -40dB Emission -36 dBm≤1GHz/-30 dBm≥1GHz Adjacent Channel Power ≤-60dB Audio Response +1/-3 dB Audio Distortion 3% Digital Voice coder Type AMBE3000 Receiver Digital Sensitivity 5% BER:0.25 uV Analog Sensitivity 0.
Statement Our Company endeavors to achieve the accuracy and completeness of this manual, if you have any question, you can contact with us, we will make a detailed answer to you in time. All the above specifications and design are subject to change without prior notice due to continuous development.