
User's Manual
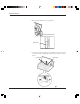
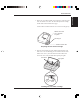

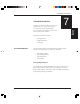
Table Of Contents
- QUICK REFERENCE
- CHAPTER 1 INTRODUCTION
- CHAPTER 2 SETTING UP
- CHAPTER 3 PAPER HANDLING
- CHAPTER 4 PRINTING
- CHAPTER 5 USING SETUP MODE
- HOW TO USE THIS CHAPTER
- ENTERING SETUP MODE
- OVERVIEW OF SETUP MODE
- PRINTING A LIST OF SELECTED OPTIONS
- DECIDING WHICH OPTIONS TO CHANGE
- CHANGING MENU1 AND MENU2 OPTIONS
- CHANGING HARDWARE OPTIONS
- CHANGING PRINT POSITION ADJUSTMENT OPTIONS
- CHANGING CONFIGURATION OPTIONS
- EXITING AND SAVING
- RESETTING DEFAULTS
- USING THE DIAGNOSTIC FUNCTIONS
- SETUP MODE REFERENCE
- ONLINE SETUP MODE
- CHAPTER 6 MAINTENANCE
- CHAPTER 7 TROUBLE-SHOOTING
- APPENDIX A SUPPLIES AND OPTIONS
- APPENDIX B PRINTER AND PAPER SPECIFICATIONS
- CHAPTER C COMMAND SETS
- APPENDIX D INTERFACE INFORMATION
- APPENDIX E CHARACTER SETS
- CHARACTER SETS 1 AND 2 (DPL24C PLUS AND IBM XL24E EMULATION)
- ITALIC AND GRAPHICS CHARACTER SETS (ESC/P2 EMULATION)
- NATIONAL CHARACTER SETS (ALL EMULATIONS)
- NATIONAL CHARACTER SETS (DPL24C PLUS AND IBM XL24E EMULATION)
- NATIONAL CHARACTER SETS (ESC/P2 EMULATION)
- NATIONAL CHARACTER SETS AND SUPPORTED RESIDENT FONTS (ALL EMULATIONS)
- APPENDIX F RESIDENT FONTS
- GLOSSARY OF TERMS

Maintenance
User's Manual 6-5
MAINTENANCE
5. Remove the new ribbon cartridge from its package. Push in the sides
of the two ribbon release tabs. The tabs will snap into the cartridge
and the ribbon feed mechanism will engage.
Turn the ribbon feed knob clockwise to be sure that it feeds properly.
Ribbon feed knob
Turn clockwise
to tighten.
Ribbon release tabs
Preparing the new ribbon cartridge
6. Place the two mounting pins on the ribbon support brackets of the
head carrier. The two mounting pins are located on the sides of the
ribbon release levers.) Insert the ribbon so that the ribbon falls
between the nose of the print head and the plastic print guide.
Munting pin
Print guide
Print head
Installing the new ribbon cartridge