Fujitsu LifeBook C Series BIOS Guide LifeBook C Series Model: C-6611 C-6631 C-7631 Document Date: 10/29/01 Document Part Number: FPC58-0625-01 F U J I T S U P C C O R P O R AT I O N
LifeBook C Series BIOS C Series BIOS PO INTS BIOS SETUP UTILITY n The BIOS Setup Utility is a program that sets up the operating environment for your notebook. Your BIOS is set at the factory for normal operating conditions, therefore there is no need to set or change the BIOS environment to operate your notebook. n The BIOS Setup Utility configures: Device control feature parameters, such as changing I/O addresses and boot devices. System Data Security feature parameters, such as passwords.
C Series BIOS 3. If an error message is displayed on the screen, and you want to enter the setup utility, press the [F2] key. 4. When the setup utility starts with a fault present, the system displays the following message: Warning! Error message [Continue] 5. Press any key to enter the setup utility. The system will then display the Main Menu with current parameters values.
LifeBook C Series BIOS MAIN MENU – SETTING STANDARD SYSTEM PARAMETERS The Main Menu allows you to set or view the current system parameters. Follow the instructions for Navigating Through The Setup Utility to make any changes. (See Navigating Through The Setup Utility on page 2 for more information.
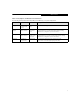
Main Menu Table 1: Fields, Options and Defaults for the Main Menu Note that the parameters listed below may differ, as determined by your system configuration. Menu Field Options Floppy Disk A: n n Disabled [1.44/1.2 MB 3.5"] Default Description [1.44/1.2 MB 3.5"] Enables or disables a floppy disk drive. Primary Master: Selects Primary Master submenu The product # of the Hard Drive Display the type of device on this ATA/ATAPI interface, if there is one.
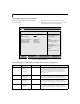
LifeBook C Series BIOS Primary Master Submenu of the Main Menu The Primary Master submenu identifies what ATA devices are installed. *Note that actual hard drive label shown may vary. Depending on the drive type, information such as cylinders, heads and sectors may also be displayed. PhoenixBIOS Setup Utility Main Primary Master [TOSHIBA MK2018GAP -(PM)] Item Specific Help Type: Maximum Capacity: [Auto] 20004MB Select ATA/ATAPI drive installed here.
Main Menu Table 2: Fields, Options and Defaults for the Primary Master Submenu of the Main Menu Menu Field Options Maximum Capacity: n Multi-Sector Transfers: n n n n n n n n LBA Mode Control: n PIO Transfer Mode: n n n n n n DMA Transfer Mode: n n n n n n Default Description Display only –— Displays the maximum capacity of the drive calculated from the parameters of the hard disk when Hard Disk is selected.
LifeBook C Series BIOS Primary Slave Submenu of the Main Menu The Primary Slave submenu is for the internal CD-ROM drive. The drive type is displayed on this menu as well as the Main menu. Your notebook auto-senses the characteristics of the internal CD-ROM Drive installed. You will not need to modify these settings, they are displayed for your reference. Note that actual drive labels shown may vary.
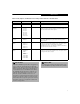
Main Menu Table 3: Fields, Options and Defaults for the Primary Slave Submenu of the Main Menu Menu Field Options PIO Transfer Mode: n n n n n DMA Transfer Mode: n n n n n n Default Description Standard Fast PIO 1 Fast PIO 2 Fast PIO 3 Fast PIO 4 [Standard] Selects the method for moving data to/from the drive. Autotype the drive to select the optimum transfer mode. This option cannot be changed when Auto is selected.
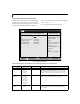
LifeBook C Series BIOS ADVANCED MENU – SETTING DEVICE FEATURE CONTROLS The Advanced Menu allows you to: n Enable or disable support for Plug & Play operating systems. n Set the I/O addresses for the serial and parallel ports. n Set the communication mode for the parallel and infrared ports. n Set the features of the keyboard/mouse. n Select between the display panel and an external CRT display. n Enable or disable compensation for your display. n Configure PCI devices in your system.
Advanced Menu Table 4: Fields, Options and Defaults for the Advanced Menu Menu Field Options Plug & Play O/S: n n Default Description No Yes [No] Select Yes if you are using a Plug & Play capable operating system. Select No if you need the BIOS to configure non-boot devices. No Yes [No] No: allows Plug & Play operating system to change device system settings. Yes: prevents a Plug & Play operating system from changing system settings.
LifeBook C Series BIOS Serial/Parallel Port Configuration Submenu of the Advanced Menu The Serial/Parallel Port Configuration submenu provides the ability to set the I/O addresses and interrupt levels for the serial, infrared, and parallel ports of your notebook. P O I N TS CAUTION I/O addresses, DMA channels, and Interrupt levels can be entered in various ways, including via the BIOS setup utility, the control software for the I/O device, or the hardware.
Advanced Menu Table 5: Fields, Options and Defaults for the Port Configuration Submenu of the Advanced Menu Menu Field Options Infrared Port: n n n Mode: n n I/O Address: n n n n Interrupt: n n n I/O address: n n n n DMA Channel: n n Parallel Port: n n n Mode: n n n I/O address: n n n Interrupt: n n Default Description Disabled Enabled Auto [Enabled] Configures the infrared port using either no configuration (Disabled), a user defined configuration (Enabled), or by allowing the BI
LifeBook C Series BIOS Keyboard/Mouse Features Submenu of the Advanced Menu The Keyboard/Mouse Features submenu is for setting the parameters of the integrated and external mouse and keyboard. Advanced PhoenixBIOS Setup Utility Security Power Savings Exit Item Specific Help Keyboard/Mouse Features Numlock: Internal Pointing Device: Select Item Select Menu Select power-on state for Numlock.
Advanced Menu Video Features Submenu of the Advanced Menu The Video Features Submenu is for setting the display parameters. Main Advanced PhoenixBIOS Setup Utility Security Power Savings Exit Item Specific Help Video Features Display: Compensation: [Internal Flat Panel] [Disabled] TV Output: TV Standard: [Disabled] [NTSC] Select Item Select Menu -/Space Change Values Enter Select Sub-Menu ▲ F1 Help ESC Exit Select display terminal. F9 Setup Defaults F10 Save and Exit Figure 7.
LifeBook C Series BIOS Internal Device Configuration Submenu of the Advanced Menu The Internal Device Configuration submenu allows the user to configure other internal devices. Main Advanced PhoenixBIOS Setup Utility Security Power Savings Exit Item Specific Help Internal Device Configurations Floppy Disk Controller: [Enabled] IDE Controller: [Enabled] [Disabled] Floppy disk drive is disabled. [Enabled] Floppy disk drive is enabled.
Advanced Menu PCI Configuration Submenu of the Advanced Menu The PCI Configuration submenu allows the user to reserve specific interrupts (IRQs) for legacy ISA devices, and to enable or disable built in PCI device modules. Main Advanced PhoenixBIOS Setup Utility Security Power Savings Exit Item Specific Help PCI Configuration ▲ IRQ Reservation Reserve specific IRQs for use by legacy ISA devices.
LifeBook C Series BIOS IRQ Reservation Submenu of the PCI Configuration Submenu The IRQ Reservation submenu allows the user to mark various IRQs as reserved for use by legacy ISA devices. When an IRQ is reserved, the BIOS does not use it for embedded PCI or ISA devices. Main Advanced CAUTION Only IRQ’s 9, 10, & 11 can be reserved without conflict.
Advanced Menu Table 10: Fields, Options and Defaults for the IRQ Reservation Submenu of the PCI Configuration Submenu of the Advanced Menu Menu Field Options IRQ 9: n n IRQ 10: n n IRQ 11: n n IRQ 15: n n Default Description Available Reserved [Available] Reserves IRQ 9. Available Reserved [Available] Reserves IRQ 10. Available Reserved [Available] Reserves IRQ 11. Available Reserved [Available] Reserves IRQ 15.
LifeBook C Series BIOS CPU Features Submenu of the Advanced Menu The CPU Features Submenu configures the system processor. Main Advanced Note that this submenu only appears in certain configurations, based upon the system CPU. PhoenixBIOS Setup Utility Security Power Savings Exit Item Specific Help CPU Features Processor Serial Number: [Disabled] Intel(R) SpeedStep(TM) Technology: [Auto] Configures Processor Serial Number feature of Pentium(R) III processor.
Advanced Menu USB Features Submenu of the Advanced Menu The USB Features Submenu configures the system for use with a USB floppy drive. Main Advanced PhoenixBIOS Setup Utility Security Power Savings Exit Item Specific Help USB Features USB Floppy Disk: [Disabled] [Disabled] Legacy Floppy Emulation is disabled. [Enabled] Legacy Floppy Emulation is enabled, and USB floppy is available without a USB-aware OS.
LifeBook C Series BIOS Event Logging Submenu of the Advanced Menu The Event Logging Submenu configures event logging features for DMI events.
Advanced Menu SECURITY MENU – SETTING THE SECURITY FEATURES The Security menu allows you to set up the data security features of your notebook to fit your operating needs and to view the current data security configuration. Follow the instructions for Navigating Through the Setup Utility to make any changes. (See Navigating Through The Setup Utility on page 2 for more information.
LifeBook C Series BIOS Main Advanced PhoenixBIOS Setup Utility Security Power Boot Info Exit Item Specific Help ▲▲ Supervisor Password Is: User Password Is: Clear Clear Set Supervisor Password Set User Password Minimum User Password Length: [Enter] [Enter] [0] Password on Boot: Password on Resume: Boot from Removable Media: Floppy Disk Access: Hard Disk Security Owner Information [Disabled] [Disabled] [All] [All] Hard Disk Boot Sector: [Normal] Select Item Select Menu -/Space Change Values E
Security Menu Table 14: Fields, Options and Defaults for the Security Menu Menu Field Options Password on Boot: n n n Default Description Disabled First Boot Every Boot [Disabled] When set to DIsabled, no password is required. When set to First Boot, a password (User or Supervisor) is required after the Power On Self Test (POST) before the operating system will be read from a disk.
LifeBook C Series BIOS Hard Disk Security Submenu of the Security Menu The Hard Disk Security Submenu is for configuring hard disk security features. Main Advanced Primary Master: Primary Slave: PhoenixBIOS Setup Utility Security Power Savings Exit Hard Disk Security Item Specific Help [Disabled] [Disabled] [Disabled] The feature is disabled. [Enabled] The hard disk is locked with the password.
Security Menu Owner Information Submenu of the Security Menu The Owner Information Submenu is for setting owner information. Main PhoenixBIOS Setup Utility Security Power Savings Exit Advanced Item Specific Help Owner Information Owner Information Is: Set Owner Information Clear [Enter] Foreground Color: Background Color: [Gray] [Black] Press [Enter] key to set owner information. Up to 80 characters can be set. Available characters are ASCII codes from 32 through 126.
LifeBook C Series BIOS POWER MENU – SETTING POWER MANAGEMENT FEATURES The Power menu allows you to set and change the power management parameters. Follow the instructions for Navigating Through the Setup Utility to make any changes. (See Navigating Through The Setup Utility on page 2 for more information.
Security Menu Main PhoenixBIOS Setup Utility Security Power Boot Advanced Info Exit Item Specific Help Power Savings: Hard Disk Timeout: Display Timeout: Standby Timeout: Auto Suspend Timeout: [Customized] [Off] [Off] [4 Minutes] [15 Minutes] Suspend Mode: Auto Save To Disk: [Suspend] [Off] Resume On Modem Ring: Resume On Time: Resume Time: [Off] [Off] [00:00:00] ▲ Select Power Management Mode. Choosing modes changes system power management settings.
LifeBook C Series BIOS Table 17: Fields, Options and Defaults for the Power Menu Menu field Options Auto Suspend Timeout: n Suspend Mode: n n n Default Description Off 5 to 60 minutes [15 Minutes] Sets the length of time without any I/O activity before your notebook goes into Suspend mode. If you choose a factory combination of parameters this field will display that setting. If you choose to customize the parameters you will be able to set this yourself. Off has no inactivity suspension.
Power Menu Advanced Features Submenu of the Power Menu The Advanced Features submenu is for setting some non-time related power saving parameters. PhoenixBIOS Setup Utility Power Advanced Features Suspend/Resume Switch: Lid Closure Suspend: Lid Open Resume: Performance control: Select Item Select Menu [Enabled] [On] [On] [Fixed] Configures the Suspend/Resume switch. -/Space Change Values Enter Select Sub-Menu ▲ F1 Help ESC Exit Item Specific Help F9 Setup Defaults F10 Save and Exit Figure 18.
LifeBook C Series BIOS BOOT MENU – SELECTING THE OPERATING SYSTEM SOURCE The Boot Menu is used to select the order in which the BIOS searches sources for the operating system. Follow the instructions for Navigating Through the Setup Utility to make any changes. (See Navigating Through The Setup Utility on page 2 for more information.
Boot Menu The Boot Device Priority Submenu of the Boot Menu The Boot Device Priority Submenu is for setting the order of checking of sources for the operating system. Main Advanced PhoenixBIOS Setup Utility Security Power Savings Boot Boot Device Priority Item Specific Help +Floppy Disk Drive +Hard Disk Drive ATAPI CD-ROM Drive The top device has the highest priority.
LifeBook C Series BIOS INFO MENU - DISPLAYS BASIC SYSTEM INFORMATION The Info menu is a display only screen that provides the configuration information for your notebook. The following table shows the names of the menu fields for the Info menu and the information displayed in those fields. These fields are for information purposes only, and cannot be modified by the user.
Info Menu EXIT MENU – LEAVING THE SETUP UTILITY The Exit Menu is used to leave the setup utility. Follow the instructions for Navigating Through the Setup Utility to make any changes. (See Navigating Through The Setup Utility on page 2 for more information.) Main The following table shows the names of the menu fields for the Exit menu, the default settings and a description of the field’s function and any special information needed to help understand the field’s use.
LifeBook C Series BIOS Table 22: Fields, Options and Defaults for the Exit Menu Optional Keyboard Shortcut Default Description Load Setup Defaults Press F9 key –— Selecting Load Setup Defaults will load the factory preset default values for all menu fields, then display the message Load default configuration now? [Yes] [No]. When confirmed the setup utility will return to the Exit Menu. To return to another menu follow the directions in the Navigating Through the Setup Utility Section.