Professional Notebook EasyGuide AMILO Pro V2020 English
Are there ... ... any technical problems or other questions which you would like to be clarified? Please contact: ● Our Hotline/Help Desk (see the included Help Desk list or go to: http://www.fujitsu-siemens.com/support/helpdesk.html) ● your sales partner ● your sales outlet Additional information is provided on the Help Desk list and in the "Warranty" manual (the "Warranty" manual is included on the "Drivers & Utilities" CD provided). The latest information on our products, tips, updates, etc.
This manual was produced by cognitas. Gesellschaft für Technik-Dokumentation mbH – www.cognitas.de Published by Fujitsu Siemens Computers GmbH Order No.
Introduction Index Notebook views AMILO Pro V2020 Important notes Using your notebook for the first time Using your notebook Operating manual Security functions Connecting external devices Settings in BIOS Setup Utility Troubleshooting and tips Technical data January 2005 edition
Microsoft, MS, MS-DOS, Windows, and Windows NT are registered trademarks of Microsoft Corporation. VESA and DPMS are trademarks of Video Electronics Standards Association. PS/2 is a registered trademark of International Business Machines, Inc. Pentium is a registered trademark of Intel Corporation, USA. Acrobat Reader is a trademark of Adobe Systems Incorporated. MultiMediaCard is a registered trademark of Infineon Technologies AG Sony and Memory Stick are registered trademarks of Sony Electronics, Inc.
Contents Innovative technology ... .................................................................................................................1 Notational conventions ......................................................................................................................2 Notebook views ...............................................................................................................................3 Opened Notebook............................................................
Contents Memory card reader........................................................................................................................ 26 Using memory cards ............................................................................................................... 26 Hard disk......................................................................................................................................... 26 Optical drive ..............................................................
Innovative technology ... and ergonomic design make your AMILO Pro the ideal easy to use and reliable notebook. Your notebook is available in several different versions. Most of the sections in this manual apply to all models - any differences are pointed out separately. Some of the illustrations and features in this manual may differ from your model and are for guidance only. Your operating system (e.g.
Innovative technology ... Notational conventions The following symbols are used in this manual: ! Indicates information which is important for your health or for preventing physical damage. Failure to follow the instructions may lead to loss of data, invalidate your warranty, destroy the notebook, or endanger your life. i Indicates important information which is required to use the system properly. ► Text which follows this symbol describes activities that must be performed in the order shown.
Notebook views This chapter presents the individual hardware components of your notebook. You can obtain an overview of the displays and connections of the notebook. Please familiarise yourself with these components before you start to work with your notebook.
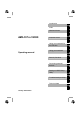
Notebook views Front 12 11 11 = Memory card slot 12 = On/Off switch for Wireless LAN Back panel 13 14 13 = Monitor port 14 = Kensington Lock device Right side panel 15 15 = 16 = 17 = 18 = 19 = 4 PC card slot PC card eject button Headphones port Audio connector Microphone jack 16 17 18 19 20 20 = 21 = 22 = 23 = 21 22 23 FireWire port USB ports DC jack (DC IN) S-Video out A26391-V2020-Z120-1-7619, edition 1
Notebook views Left side panel 24 25 26 27 28 24 = LAN port 25 = Modem port 26 = Optical drive 27 = Insert/Eject button 28 = Opening for manual ejection Under side 29 30 A26391-V2020-Z120-1-7619, edition 1 29 = Battery compartment 30 = Battery release latch 5
Important notes Here you will find essential safety information regarding your notebook. In addition, the manufacturer's notes contain helpful information about your notebook. Safety notes ! Pay attention to the information provided in the "Safety" manual and in the following security notes. Observe the sections in the manual marked with the symbol on the left. ● When connecting and disconnecting cables, observe the relevant notes in this operating manual.
Important notes ● Read the information on the ambient conditions in the chapter "Technical data" and the chapter "Using your notebook for the first time" before putting your notebook into operation and switching it on for the first time. ● When cleaning the device, please observe the relevant notes in the "Cleaning the notebook" paragraph. ● Keep this operating manual together with your notebook. If you pass on the notebook to a third party, you should also pass on the operating manual.
Important notes Manufacturer’s notes Declarations of Conformity The "Declarations of Conformity" concerning the AMILO Pro can be found at our internet address: http://www.driver-cd.com. Hereby, Fujitsu Siemens Computers, declares that the AMILO Pro is in compliance with the essential requirements and other relevant provisions of Directive 1999/5/EC. Copyright-protected technology This product incorporates copyright protection technology that is protected by method claims of certain U. S.
Important notes CE marking CE marking for devices without wireless LAN The shipped version of this device complies with the requirements of the EEC directives 89/336/EEC "Electromagnetic compatibility" and 73/23/EEC "Low voltage directive". CE marking for devices with wireless LAN This equipment complies with the requirements of Directive 1999/5/EC of the European Parliament and Commission from 9 March, 1999 governing Radio and Telecommunications Equipment and mutual recognition of conformity.
Important notes Travelling with your notebook Please follow these guidelines when travelling with your notebook. Before you travel ● Back up important data stored on your hard disk. ● Turn off the wireless module before you travel. This will help keep your notebook secure, and also prevent it from affecting sensitive equipment in hospitals, airports and other areas. ● If you wish to use your notebook during a flight, first check with the flight attendants if it is OK to do so.
Important notes Cleaning the notebook ► Switch the notebook off. ► Unplug the power adapter from the mains outlet. ► Remove the battery. ! Do not clean any interior parts yourself; leave this job to a service technician. Only use cleaning products designed for computers. Normal household cleaners and polishes can damage the markings on the keyboard and the device, the paintwork or the notebook itself. Ensure that no liquid enters the notebook. Wipe the casing with a dry cloth.
Using your notebook for the first time ! Please read the "Important notes" chapter. Before you can use your notebook for the first time you need to charge the battery and install the supplied software. Your operating system (e.g.Windows XP) and the hardware drivers have been preinstalled for you. Upon delivery, the battery can be found in the battery compartment. The battery must be charged if you want to operate your notebook with the battery.
Using your notebook for the first time Connecting the power adapter ! Please take note of the information in the section "Safety notes". The power cable supplied conforms to the requirements of the country in which you purchased your notebook. Make sure that the power cable is approved for use in the country in which you intend to use it. The mains adapter's AC cable should only be connected to a mains socket if the notebook is connected to the mains adapter.
Using your notebook This chapter describes the basics for operating your notebook. Please see the "Connecting external devices" chapter for instructions on how to connect devices such as a mouse and a printer to the notebook. ! Please take note of the information in the "Important notes" chapter. Switching the notebook on and off Switching on the notebook ► Slide the release (on front of notebook) to the right and fold up the LCD screen. ► Press the ON/OFF switch (1) to switch the notebook on.
Using your notebook Status indicators The status indicators (see chapter "Notebook views", Number 9) provide information on the states of the power supply, the drives and the keyboard functions. Power-on/battery indicator ● ● The indicator lights up green when the notebook is switched on and when the battery is fully charged. The indicator flashes yellow while the battery is being charged. This indicator is also visible with the notebook closed.
Using your notebook Keyboard i The keyboard of your notebook is subject to continuous wear due to normal use. The keyboard markings are subjected to particularly high loads. The keyboard markings can wear off in the course of using the notebook. The keyboard has been designed to provide all the functions of an enhanced keyboard. Some enhanced keyboard functions are mapped with key combinations. The following description of keys refers to Windows.
Using your notebook Caps Lock key The Caps Lock key activates uppercase mode (CapsLK indicator lit). The Caps Lock function causes all the characters you type to appear in uppercase. In the case of overlay keys, the character printed on the upper left of the key appears when that key is pressed. To cancel the Caps Lock function, simply press the Caps Lock key again. Caps Lock Shift key The Shift key causes uppercase characters to appear.
Using your notebook Key combinations The following description of key combinations refers to functions when using Microsoft Windows. Some of the following key combinations may not function in other operating systems and with some device drivers. Other key combinations are described in the relevant manuals supplied with your application programmes. Key combinations are performed as follows: ► Press and hold the first key in the combination.
Using your notebook Switching between open applications Alt + Ctrl + With this key combination you can switch between several open applications. Carrying out a warm boot Alt + Del This key combination triggers a reset and warm-boots the notebook. First hold down the Ctrl and Alt key, and then press the Del key. First the Task Manager is displayed. Then you must press all three keys again to re-boot. Backtab (Shift+Tab) + i This key combination moves the cursor back to the previous tabular stop.
Using your notebook Touchpad and touchpad buttons ! Keep the touchpad clean. Protect it from dirt, liquids, and grease. Do not use the touchpad if your fingers are dirty. Do not rest heavy objects (e.g. books) on the touchpad or the touchpad buttons. The touchpad (see chapter "Notebook views", Number 6) enables you to move the mouse pointer on the screen. You can use the touchpad to scroll. The scroll bar on the right edge of the touchpad is marked with arrows (see chapter "Notebook views" Number 7).
Using your notebook LCD screen Information on LCD monitor High-quality TFT displays are installed in notebooks from Fujitsu Siemens Computers GmbH. For technical reasons, TFT monitors are manufactured for a specific resolution. An optimal, clear picture can only be ensured in the resolution intended for the respective TFT monitor. A monitor resolution which differs from the specification can result in an unclear picture.
Using your notebook Monitor settings Setting the desktop area The screen resolution of the LCD monitor of your notebook is optimally set at the factory. Changing the font size Under Start - Control Panel - Appearance and Themes - Display - Advanced you can choose between a larger and a smaller font in the Font size field. Synchronising the display on the LCD screen and an external monitor Your notebook supports the simultaneous display on the LCD screen and an external monitor.
Using your notebook Removing and installing the battery ! Only use batteries approved by Fujitsu Siemens Computers for your notebook. Never use force when inserting or removing a battery. Make sure that no foreign bodies get into the battery connections. Removing battery ► Switch the notebook off and pull the power plug out of the mains socket. ► Close the LCD screen so that it locks into place. ► Disconnect all cables connected to the notebook.
Using your notebook PC cards A PC card slot (CardBus or PCMIA) enables the notebook to operate one type I or type II PC card. ! Consult the documentation supplied by the PC card's manufacturer and follow the instructions provided. Never use force when inserting or removing a PC card. Make sure that foreign objects do not fall into the PC card slot. Installing a PC card ► Press the eject button (see chapter "Notebook views", Number 16).
Using your notebook Memory card reader Your notebook is equipped with a memory card reader. Your memory card reader supports the following formats: • • • Secure Digital (SD™ Card) MultiMediaCard (MMC) Memory Stick (Sony®) Using memory cards i Please read the documentation supplied with the memory card for any special instructions.
Using your notebook Optical drive Your notebook is delivered with an optical drive. Depending on the variant, your notebook is equipped with a combo drive (CD-RW/DVD), a DVD+RW drive or a DVD±RW dual drive. Optical drives can either only read or both read and write different CDs or DVDs. The meaning of the respective CD and DVD types is described in the following: CD-ROM Abbreviation for Compact Disc - Read Only Memory. A CD-ROM is an optical data storage device that can contain a maximum of 700 Mbytes.
Using your notebook Combo drive (CD-RW/DVD) ! The combo drive is a Class 1 laser according to IEC 60825-1. It contains a light emitting diode (LED) which may produce a stronger laser beam than a Class 1 laser. It is dangerous to loo directly at this beam. Therefore, do not remove any drive housing parts. You can read all CD/DVD types specified above with the combo drive. You can also write CD-Rs and CD-RWs.
Using your notebook Handling CD/DVDs ! i Observe the following guidelines when handling CD/DVDs: ● Avoid touching the surface of a CD/DVD. Hold CDs/DVDs by their edges! ● Always store CDs/DVDs in their cases. This will protect CD/DVD from dust, scratches and other damage. ● Protect your CDs/DVDs from dust, mechanical vibration and direct sunlight! ● Avoid storing a CD/DVD in areas subject to high temperatures or humidity.
Using your notebook Regional codes for DVD films and DVD players DVD films and DVD players (e.g. the DVD drive of your notebook) are always provided with a regional code. The regional codes of DVD films and DVD players must match so that the DVD film can be played back.
Using your notebook Audio: Setting volume ► Set the desired volume with the key combination Fn + F5 or Fn + F6 . or To adjust the volume use the Windows volume control from the Start menu - Programs Accessories - Multimedia - Volume Control. ► Integrated 56k modem The integrated 56k modem supports all data communication applications, such as: ● Modem operation: High-speed downloads at up to 56,000 bit/s (V.90). Downward-compatible to V.34 modems.
Using your notebook Ethernet and LAN The internal LAN module of your notebook supports Ethernet-LAN (10/100 Mbps). ► Connect the LAN cable to the notebook's LAN connector Number 24). ► Connect the network cable to your LAN network connector. (see chapter "Notebook views", Wireless LAN (optional) ! The installation of a wireless LAN module not approved by Fujitsu Siemens Computers GmbH voids the permits (CE!, FCC) issued for this device. A wireless LAN is integrated in your notebook.
Security functions Your notebook has several security features that you can use to secure your system from unauthorised access. This chapter will explain how to use each function, and what the benefits are. ! Please remember that in some cases, for example, forgetting your password, you can be locked out and unable to access your data. Please note therefore the following hints: ● Make regular backups to external storage devices such as external hard drives, CD or DVD disks.
Security functions Brief overview of the security functions Security function Type of protection Preparation Kensington Lock Mechanical Mount and lock Kensington MicroSaver (accessory) BIOS password protection Password protection for BIOS Setup Utility and operating system with supervisor password. The password consists of a maximum of six alphanumeric characters. Specify a Supervisor password and, if desired, activate the password protection for the operating system in the BIOS Setup Utility.
Security functions Setting a supervisor password ► Enter the BIOS Setup Utility and go to the Security menu. ► Select the Change Supervisor Password option and press the Enter key. With Enter New Password: you are then requested to enter a password. ► Type a password and press the Enter key. With Confirm New Supervisor Password you are asked to confirm the password. ► Enter the password again and press the Enter key.
Security functions Password protection of operating system i With the supervisor password or the user password, you have assigned in the BIOS Setup Utility (see "Setting a supervisor password" section), you can also prevent booting of the operating system. Activating system protection ► Enter the BIOS Setup Utility and go to the Security menu. ► Select the Password Check option. ► Select the Always option. ► Select the Save Changes and Exit option under Exit.
Connecting external devices ! Before you connect or disconnect any devices from your notebook please read the safety notes in the “Important notes“ chapter. Always read the documentation supplied with the device you wish to connect. Never connect, or disconnect cables during a thunderstorm. Never pull on a cable when disconnecting it. Always hold the plug. Follow the steps below in order, when connecting or disconnecting devices to your notebook: Connecting devices to notebook 1.
Connecting external devices Setting the refresh rate for your external monitor The refresh rate must be correctly set so that the image does not flicker. ► Select the monitor type in the menu Start - Control Panel - Appearance and Themes - Display Settings - Advanced - Display. ► Now select the Adapter tab. ► Adjust the refresh rate and then click Apply. ! If the refresh rate set is too high, the monitor may be damaged.
Connecting external devices Connecting external audio devices Audio connector You can use the Audio port (see the "Notebook views" chapter, Number 18) to connect audio devices with an analog output to your notebook. Headphones port You can use the headphone port (see the "Notebook views" chapter, Number 17) to connect an external microphone to your notebook. Microphone jack You can use the microphone port (see chapter "Notebook views", Number 20) to connect an external microphone to your notebook.
Settings in BIOS Setup Utility In BIOS Setup Utility you can set the system functions and the hardware configuration of the notebook. When it is delivered, the notebook is set to factory default settings. You can change these settings in BIOS Setup Utility. Any changes you make take effect as soon as you save and quit the BIOS Setup Utility.
Settings in BIOS Setup Utility Operating BIOS Setup Utility i Press the F1 key to display help on the operation of BIOS Setup Utility. The description of the individual settings is shown in the right-hand window of the BIOS Setup Utility. ► Select the menu in which you want to make settings with the cursor keys. ► Press the Enter key. The menu is displayed on the screen. ► Use the cursor keys to select the option you wish to change. ► Change the option with the keys PgUp or PgDn .
Troubleshooting and tips ! Take note of the hints in the "Important notes" chapter, when you connect or disconnect cables. If a fault occurs, try to correct it as described. If you fail to correct the problem, proceed as follows: ► Make a note of the steps and the circumstances that led to the fault. Also make a note of any error messages displayed. ► Switch the notebook off. ► Contact your sales outlet or our hotline/help desk.
Troubleshooting and tips The LCD screen of the notebook remains blank Monitor is switched off ► Press a key or enter the password External monitor or television set connected ► Press the key combination Fn + F4 (selecting internal/external display). The LCD screen is difficult to read Reflection ► Turn the notebook or alter the tilt of the LCD screen.
Troubleshooting and tips The external monitor is blank or the image is unstable The wrong external monitor has been selected or the wrong screen resolution has been set for the application programme. ► ► End the application programme under Windows with Alt + F4 . If the fault continues to occur after ending the programme, switch over to the notebook's internal LCD screen with Fn + F4 . Change the following setting: Select the correct monitor or set the correct screen resolution.
Troubleshooting and tips The battery is dead ► Charge the battery. Or ► Install a charged battery. Or ► Connect the power adapter to the notebook. The printer does not print ► Make sure that the printer is switched on and is on-line (see the manuals supplied with the printer). ► Check that the cable connecting the notebook and the printer is connected properly. ► Check whether the correct printer driver is loaded (see printer documentation).
Technical data Processor: Intel Pentium M, FSB: 400 MHz Main memory: Maximum of 1 Gbyte DDR266 SO DIMM (PC2100) or DDR333 SO DIMM (PC2700) 2 slots for 256 or 512-Mbyte modules Disk drives: Hard disk drive Optical drive Electrical data Regulations complied with: CE! Maximum power draw: (notebook on with battery charging) approx. 65 W LCD screen Display diagonal: 15 inch XGA TFT/15 inch SXGA + TFT 15.4 inch WXGA TFT/15.
Technical data Ports Monitor port: 15-pin female connector Microphone jack: connector, mono Audio port: connector, stereo Video port: 4-pin mini DIN female connector USB port (Universal Serial Bus): 3x 2.0 LAN connector: Female connector, RJ-45 Modem port: Female connector, RJ-11 FireWire port: S400, 4-pin Kensington Lock Environmental conditions Environment class (3K2) Temperature ● Operation (3K2): ● Transport (2K2): 5 °C .... 35 °C -15 °C ....
Index 56k modem 31 A Acoustic warnings 46 Alt+Tab 20 Anti-theft protection 34 Audio devices, connecting 39 Audio port 4 AutoPlay function 30 B Backtab 20 Bass loudspeaker (subwoofer) 5 Battery 23 capacity 10 caring for 23 charge level 23, 24 charging 23, 46 installing 24 lifetime 23 removing 24 self-discharge 10 storing 10 warning tone 23 Battery charge metre 23 Battery compartment 5 Battery indicator 16 Battery lock 5 Beep, error message 46 BIOS Setup Utility cancel supervisor password 35 change supervisor
Index E Easy Launch keys 3, 20 Eject button, PC card 25 E-mail, Easy Launch key 20 Emergency removal, CD/DVD 29 Energy power consumption 24 saving 9 saving functions 9, 24 Energy saving mode indicator 16 Enter key 17 Error correction 43 Error message, acoustic 46 ESD 8 Ethernet LAN 32 F FireWire port 4, 39 Fn+F1 19 Fn+F3 19 Fn+F5 19 Fn+F6 19 Fn+F7 19 Fn+F8 19 Front, view 4 H Hard disk 26 Hardware, configuring 41 Headphones port 4 High-speed devices, connecting 39 I Important notes 7 Indicator Caps Lock 16
Index Modem 31 connecting 31 port 5 Monitor connecting 37, 39 drifting display 45 no screen display 45 refresh rate 38 remains blank 44 synchronising the display 23 Monitor port 4, 37 MultiMediaCard 26 N Notational conventions 2 Notebook before you travel 11 cleaning 12 first-time setup 13 not starting 45 operating 15 setting up 13 stops working 45 switching off 15 transporting 11 views 3 Notes 7 boards 8 cleaning 12 disposal 9 energy saving 9 LCD screen 22 manufacturer 9 safety 7 transporting 11 Num Lock
Index Summer time 43 Survey, security functions 34 Suspend mode switching on 19 terminating 45 Synchronisation, screen display 23 System configuration 41 System settings, BIOS Setup Utility 41 T Technical data 47 Time daylight savings 43 not correct 43 Tips 43 Touchpad 3, 21 buttons 3 cleaning 12 dragging items 21 executing commands 21 moving the pointer 21 scroll bar 3 selecting items 21 Transport 11 damages 13 52 Travel, notebook 11 Troubleshooting 43 TV set, connecting 39 U Underside, view 5 USB port