
User Manual


En-10
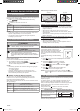
2. Remove the air lters.
Lift up the air lters' handle, disconnect the two lower tabs, and pull
out.
Air lter handle
Tabs (2 places)
3. Remove the dust in either of the following ways.
• Cleaning with vacuum cleaner.
• Washing with mild detergent and warm water. After washing, dry the
air lters thoroughly in shade.
4. Replace the air lters.
Align the sides of the air lter with the panel, and push in fully.
Make sure to the two lower tabs are returned to their holes in the
indoor unit properly.
5. Close the intake grille.
Press 4 places on the intake grille to close it completely.
NOTES: If dirt accumulates on the air lter, airow will be reduced,
operating eciency will lower, and the noise will increase.
Cleaning Ion deodorization lter and
Replacing Apple-catechin lter
1. Remove the air lters. Refer to steps 1 ~ 2
of "Cleaning air
lter".
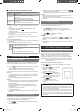
2. Remove the air cleaning lters from the air cleaning lter
holder.
Air cleaning lter
Air cleaning lter holder
3. Flush the Ion deodorization lter (light blue) with high-
pressure hot water until the surface of the lters are covered
with water.
4. Wash the Ion deodorization lter with diluent neutral
detergent.
Do not ream or rub, otherwise the deodorizing eect may decrease.
5. Rinse the Ion deodorization lter with water ow.
6. Dry the Ion deodorization lter in shade.
7. Remove the Apple-catechin lter (light green) from the air
cleaning lter holder.
8. Set the new or washed air cleaning lters into the air
cleaning lter holders.
NOTES: Use the Apple-catechin lter as soon as possible after opening
the package. The air cleaning eect decreases when the lters
are left in the opened package.
9. Install the air cleaning lter holders to the air lters.
Engage the 2 hooks at the rear of the air cleaning lter holder with
the latch at both ends of the air holder.
Hook (2 places at the rear)
Latch (2 places)
NOTES: Take care that the air cleaning lter does not project
beyond the holder.
10. Engage the six xing locations at the top and bottom of the
air cleaning lter holder with the hooks of the air lter.
Rear of the lter
Fixing location,
hook (6 places)
11. Replace the air lters and close the intake grille. Refer to
steps 4 ~ 5 of "Cleaning air lter".
Replacing Ion deodorization lter
1. Remove the air lters. Refer to steps 1 ~ 2
of "Cleaning air
lter".
2. Remove the Ion deodorization lter (light blue) from the air
cleaning lter holder.
3. Install the new Ion deodorizing lter.
After extended non-use of the unit
If you have shut down the indoor unit for 1 month or more, perform the
Fan mode operation for half a day to dry the internal parts thoroughly
before the normal operation.
Additional inspection
After long period of use, accumulated dust inside the indoor unit may
reduce the performance even if you have maintained the unit properly.
In such a case, a product inspection is recommended.
For more information, consult authorized service personnel.
Filter indicator reset (Special setting)
This function can be used if set correctly during installation. Please
consult authorized service personnel in order to use this function.
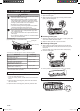
Clean the air lter when the indicator lamp show the
following:
Indicator lamp Blinking pattern
Blinks 3 times, at intervals of 21 seconds
After cleaning, reset the lter indicator by pushing
on the
indoor unit for 2 seconds or less.
9387081237_OM.indd 10 02-Apr-19 15:59:20