
Datasheet


12/12
When using on a Mac OS X 10.4
■ Please first reformat for Mac
All the data inside the HandyDrive is erased when reformat is executed.
Please backup the necessary data.
1. Remove the USB connections other than this product.
(Remove the drives besides the FireWire drive used for the start-up when using drives connected by FireWire.)
2. Start the Mac OS without connecting the HandyDrive. Connect the HandyDrive at step 5.
Log in to the Mac OS.
3. Double-click the icon of the start-up disk (Macintosh HD).
4. Double-click in the order of [Applications] → [Utilities] → [Disk Utility].
5. Connect the HandyDrive.
1. Connect the USB cable (mini-B connector) to the USB connector of the HandyDrive.
2. Connect the USB cable (A connector) to the USB connector of the main unit of the PC.
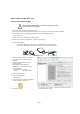
6. Select this product in the Disk Utility screen.
It may take some time until this product is
displayed.
7. Select the [Partition] tab and click the
[Options...] button.
Select [Apple Partition Map] on the
following screen and click the [OK] button.
8. Set for initialization.
[Volume Scheme] 1 Partition
[Format] Mac OS Extended
9. Click the [Partition] button.
10. Click the [Partition] button.
Initialization starts.
11. Confirm that the icon is added to the desktop
after the completion of the format.
12. Close the Disk Utility.
This screen is only an example. The display contents vary according
to the Macintosh that is used.