FCC ID: C9S-CFBIPAD (IC: 337-CFBIPAD) Report No. M040236_Cert_WLAN_BPad EMC Technologies Report Number: M040236_Cert_WLAN_BPad APPENDIX O – USER MANUAL EMC Technologies Pty Ltd – 57 Assembly Drive, Tullamarine VIC 3043 Australia www.emctech.com.
Operations Guide Revision 1.
iPAD Operations Guide Preface Thank you for purchasing the iPAD. Before using the iPAD, read this manual thoroughly so that you will be able to take full advantage of its functions. Microsoft, Windows CE are registered trademarks of Microsoft Corporation in the U.S.A. and/or other countries. Other company and product names appearing in this manual are the trademarks of their respective owners. Using the iPAD This manual contains important information required for using the iPAD safely.
iPAD Operations Guide Regulatory and Safety Information - iPAD Radio Frequency Interference Requirements – U.S.A. This device has been tested and found to comply with the limits for a Class B digital device pursuant to Part 15 of the Federal Communications Commission Rules and Regulations. These limits are designed to provide reasonable protection against harmful interference when the equipment is operated in a commercial or residential environment.
iPAD Operations Guide FCC RF Exposure Guidelines The radio module in this device has been evaluated under FCC Bulletin OET 65C and found compliant to the requirements as set forth in CFR Sections 2.1091, 2.1093, and 15.247(b)(4) addressing RF Exposure from radio frequency devices. The iPAD contains an internal low-power radio whose radiated output power is far below the FCC radio frequency exposure limits.
iPAD Operations Guide Safety This product has been certified with Underwriters Laboratories for use in the United States and Canada. Using the iPAD in Mission Critical Situations The iPAD is designed and manufactured for use in standard applications such as those for general office, personal, household use and intrinsically safe environments.
iPAD Operations Guide Table of Contents Preface................................................................................................................................ 2 Using the iPAD .................................................................................................................. 2 Changes:............................................................................................................................. 2 - Add Mercury warning Regulatory and Safety Information - iPAD...
iPAD Operations Guide 6.3 Cleaning the Reading Aperture of the Bar Code Scanner.......................... 36 6.4 Bar Code Sample Chart ................................................................................. 36 7 Magnetic Card Reader ........................................................................................... 38 8 Bluetooth.................................................................................................................. 39 9 User Action in Response to Messages........
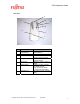
iPAD Operations Guide 1 Before Using the iPAD 1.1 Names of Parts This section shows the location of parts and provides a brief description of the functionality. Front View 7 6 8 9 1 2 2 5 4 3 1 2 Part name Magnetic card reader Trigger key 3 4 Microphone (built-in) Operations section 5 Resistive-film touch panel LCD LED 6 7 8 9 802.11b antenna (built-in) Bar code scanner Bluetooth wireless antenna (built-in) Remarks Reads magnetic cards. Used when the barcode scanner is used.
iPAD Operations Guide Rear View 3 5 5 7 2 6 4 1 NO. 1 2 3 Part name Main battery compartment Speaker (built-in) Bar code scanner 4 Compact flash slot 5 Strap hole 6 Reset switch 7 Headset jack Remarks Holds a lithium ion battery (main battery). Outputs sound. Outputs the laser beam used to read a bar code. Compact flash slot for RF card or memory. Means by which to attach a strap. Used to forcibly terminate or restart the unit. * Do not use this switch during normal operation. Accepts a 2.
iPAD Operations Guide Bottom View 1 NO. 1 Part name Cradle interface Remarks Provides the contacts used to charge the iPAD or transfer data when it is mounted on the cradle (IPAD142-01) Copyright 2003 by Fujitsu Transaction Solutions Inc.
iPAD Operations Guide Operations section 1 2 3 11 4 8 10 9 7 NO. 1 2 Part name Cursor key Function key 1 3 Function key 2 4 5 6 7 8 9 Clear key Shift key Enter key Cancel key Power key Numeric/charac ter keys × / and . (decimal point) keys Set key/Enter 10 11 6 5 Remarks Moves the cursor. Invokes a function defined by an application. Invokes a function defined by an application. [CLR] key in this manual. [SFT] key in this manual. [ENT] key in this manual. [CAN] key in this manual.
iPAD Operations Guide Operating style The iPAD is designed so that you can either hold it in one hand and operate it with your thumb or hold it in one hand and operate it with the other hand. These two styles are shown in Figures 1 and 2. Figure 3 demonstrates the iPAD while wearing the shoulder strap. Figure 1 Figure 2 Figure 3 Copyright 2003 by Fujitsu Transaction Solutions Inc.
iPAD Operations Guide 1.2 1.2.1 Batteries Batteries Battery types The iPAD has a main battery and a backup battery. Main battery: The main battery is used to back up the contents of memory during normal operation and in suspend mode. Backup battery: The backup battery is used to preserve the contents of memory if the main battery loses its charge or the main battery is being replaced. Guidelines on battery life 1.
iPAD Operations Guide 1.2.2 Charging the Main Battery Charge the main battery the first time that you use it or when the battery charge is low. You can charge the main battery with any of the following methods: Charging the main battery using the cradle Charging the main battery using two cradles Charging the main battery using a single-pack charger Charging the main battery using a single-pack charger and cradle CAUTION Do not unplug the AC adapter before charging has been completed.
iPAD Operations Guide (3) Turn off the iPAD. (4) Insert the iPAD with the main battery installed into the cradle until you hear a click. Confirm the charge light indicator turns on. Charging starts. During charging, the LED is on and is orange. When charging is completed, the LED changes to green. The charging time is about 2.5 hours. Note Gently mount the iPAD on the cradle to prevent malfunctioning of the iPAD and cradle.
iPAD Operations Guide (4) Turn off the iPAD. (5) Insert the iPAD units (with main batteries installed) into the cradles until you hear a click. Charging starts. During charging, the LED is on and is orange. When charging is completed, the LED changes to green. The charging time is about 2.5 hours. Note Gently mount the iPAD on the cradle to prevent malfunctioning of the iPAD and cradle. If the LED does not light, make sure that the iPAD is correctly mounted on the cradle. ⌦ This completes the operation.
iPAD Operations Guide Charging the main battery using a single-pack charger You can charge the main battery using a single-pack charger. Charging using this method requires a single-pack charger (CA05951-7080) and an AC adapter (CAS05306-D500). Single-pack Charger (1) Connect the AC adapter to the single-pack charger. (2) Plug the AC cable of the AC adapter into a wall outlet. (3) Mount the main battery on the single-pack charger. Charging starts. During charging, the pack charger LED is on and is orange.
iPAD Operations Guide Charging the main battery using a single-pack charger and a cradle You can simultaneously charge main batteries mounted on a single-pack charger and in the iPAD mounted on a cradle. A single-pack charger (CA05951-7080), cradle (CA05951-7139), AC adapter (CA05306D500), and a daisychain cable (CA72001-1895) are required for this operation.
iPAD Operations Guide 1.2.3 Installing and Removing the Main Battery – (CA50601-1001) Installing the main battery (1) On the rear of the iPAD, slide the battery lock switches on both sides of the lower part to the outside. (2) Slide down the battery cover to remove it. (3) Insert the main battery in the battery compartment. In this step, make sure the black ribbon is outside and not covered by the battery. (4) Install the battery cover and slide it upward to lock it.
iPAD Operations Guide iPAD’s memory. When replacing the main battery, have ready a fully charged main battery and complete the procedure within ten minutes. → The life of the backup battery is significantly reduced if the iPAD is left with the main battery removed. ⌦ This completes the operation. 1.2.4 Charging the Backup Battery The backup battery is charged from the main battery.
iPAD Operations Guide 2 Setup The iPAD is shipped with the main battery removed and the backup battery disconnected to prevent discharge. When the iPAD is first powered on the operator will be informed the contents of memory have been lost. When “Restore” is pressed, the RAM memory will be restored from the \\flashdisk folder automatically. The following screen will appear when the iPAD is powered on for the first time and these steps should be performed.
iPAD Operations Guide CAUTION The iPAD is not shipped with the main battery installed and charged. Perform setup either with the iPAD connected to the cradle or after you have charged the main battery and installed it in the iPAD. Reference Section 1.2, "Using the Battery") The backup battery is installed in the iPAD, but it has not been charged. To charge the backup battery, install a charged main battery in the iPAD. Reference Section 1.2.
iPAD Operations Guide 3 Using the iPAD 3.1 Power on/off (suspend/resume) 3.1.1 Turning on the iPAD (resume mode) With the power off, press the Power key until the LED lights in green. The iPAD is turned on, the screen light, and the LED goes off. Turning on the iPAD for the first time: The initial installation screen appears when you turn on the iPAD for the first time or you initialize the system. See the "iPAD System Users Guide" for information about performing setup.
iPAD Operations Guide For Reference You can also turn off the iPAD as follows: Tap the [Start] button, then the [Suspend] button. When power is on, the iPAD has a function that automatically turns itself off if no action is performed for a certain length of time (automatic power-off function). For more information, see the "iPAD Systems Users Guide." . 3.2 Checking the Battery Status You can check the battery status. While the iPAD is on, press the [ENT] key while holding down the [SFT] key.
iPAD Operations Guide Remaining battery charge The current main battery charge is shown as one of five levels. Note If [Insufficient charge] is displayed, the remaining battery charge is too low. Either charge the battery or replace it with a spare battery. If the charge is too low, a message is displayed on the screen and the iPAD is automatically turned off after a while. Either charge or replace the battery. After checking the battery status, tap the [×] button on the window to close it.
iPAD Operations Guide CAUTION The data in memory may be lost if you remove the main battery while the backup battery has an insufficient charge. Reference: For information about charging the backup battery, see Section 1.2.4, "Charging the backup battery." 3.3 Adjusting the Volume While the iPAD is on, press the [ENT] key while holding down the [SFT] key to bring up the [Volume and Battery] window. Next, tap [1. Volume and Brightness settings]. The [Volume and Brightness] window opens.
iPAD Operations Guide 3.4 Adjusting the Brightness of the Front Light While the iPAD is on, press the [ENT] key while holding down the [SFT] key to bring up the [Volume and Battery] window. Next, tap [1. Volume and Brightness settings]. (1) In the [Brightness] area, specify the > brightness. Tap the < and buttons to select the brightness level. The order of choices from the left is off, somewhat dark, somewhat bright, and bright. (2) Tap the [×] button on the window to close it.
iPAD Operations Guide (1) As directed on the screen, tap the center of the crosshairs (+) using a stylus. You will need to tap the center and the four corners of the screen. (2) After you have tapped all the correct locations, the crosshairs disappear and the message “Tap the screen to register save data" is displayed. Tap the screen to register the correction settings. To cancel the operation, press the [CLR] key while holding down the [SFT] key.
iPAD Operations Guide 3.6 Virtual Keyboard The screen keyboard is the keyboard that is displayed on the screen. 3.6.1 Displaying the Keyboard Open and close the screen keyboard as follows: (1) To open the screen keyboard, press the [0] key while holding down the [SFT] key. The screen keyboard appears on the lower part of the screen. (2) To close the screen keyboard, press the [0] key while holding down the [SFT] key, as you did to open it.
iPAD Operations Guide (4) Select either large or small keys. CAUTION The setting will not change if you close the screen by tapping the [×] button instead of using the [OK] button. ⌦ This completes the operation. 3.7 3.7.1 Resetting the iPAD Using the Reset Switch Use the reset switch mainly to install an application or driver or change a setting. (1) If possible, save the data that you are working on. (2) Using a stylus, press the reset switch located on the left side of the rear of the iPAD.
iPAD Operations Guide 3.7.2 Completely Resetting the iPAD Completely reset the iPAD (“cold boot”) if it is not operating correctly or if you want to prevent deterioration of the main battery when storing the iPAD for a long period. (1) Turn off the iPAD (2) On the rear of the iPAD, slide the battery lock switches on both sides of the lower part to the outside. (3) Slide down the cover to remove it. (4) Pull the black ribbon to remove the battery.
iPAD Operations Guide 4 LED Indications This chapter explains the LED indicators on the iPAD and on the single-pack charger. 4.1 iPAD LED LED indication Color Equipment status Explanation Indication iPAD is being turned on Green Lights and then goes off. The iPAD is starting up (resuming operation). Do not operate the iPAD until the LED goes off. Barcode is being read by the scanner Green Lights if the bar code is read correctly.
iPAD Operations Guide 4.2 LED on the Single-Pack Charger during Charging LED indication 5 Color Orange Indication Lights. Green Red Lights. Lights. Meaning The battery is being charged. Charging is complete. The main battery cannot be charged because it either is not correctly connected to the singlepack charger or is faulty. Either correctly connect the main battery to the single-pack charger or replace the main battery.
iPAD Operations Guide 6 Bar Code Scanner Reading aperture of bar code scanner 6.1 Using the Bar Code Scanner (1) Aim the bar code scanner of the iPAD at a bar code. (2) Press either of the trigger switches on the two sides of the iPAD. A scanning beam passes through the reading aperture of the bar code scanner. (3) Run the scanning beam across the bar code. (4) The LED lights in green if the data has been read correctly. (Note: the application needs to set the LED to do this.
iPAD Operations Guide WARNING • Do not look into the reading aperture while a scanning beam is being emitted. Doing so can injure the eyes. For Reference • • • 6.2 A scanning beam stops in about one second if you continue to press the trigger key but no bar code is detected from the reading aperture. If a bar code cannot be read, try changing the direction of the scanning beam in relation to the bar code or the distance of the iPAD from the barcode.
iPAD Operations Guide 6.3 Cleaning the Reading Aperture of the Bar Code Scanner The reading aperture of the bar code reader must always be clean when it is used. Clean the reading aperture using a dry cloth or a cloth moistened with water or a diluted neutral detergent solution. Do not use alcohol, thinner, or other volatile solvent. 6.4 Bar Code Sample Chart Use the sample chart to check whether the scanner is faulty.
iPAD Operations Guide EAN-8 EAN-13 CAUTION • This chart may become illegible due to age or improper handling of the User's Manual. Copyright 2003 by Fujitsu Transaction Solutions Inc.
iPAD Operations Guide 7 Magnetic Card Reader (1) After making sure of the orientation (magnetic stripe faces top of iPAD), insert a magnetic card. (2) Slowly move the magnetic card from left to right. Note • • A magnetic card will not be read correctly if movement stops part way, the speed of movement changes, or the card is not moved parallel with the slot. The LED can be made to light by an application when a magnetic card is read correctly.
iPAD Operations Guide 8 Bluetooth The iPAD can communicate with a server when used with a bluetooth station. The wireless communication system used is spread-spectrum communication that uses the 2.4 GHz band. This system does not require a license for wireless communications. In a store environment, the iPAD can communicate within a radius of 16 to 66 feet from the base station. (The range of communication that is possible varies significantly depending on the environment.
iPAD Operations Guide 10 Troubleshooting If you encounter any of the problems described in the following table while using the iPAD, take the indicated action before notifying your maintenance representative. Problem The iPAD cannot be turned on. User response The main battery has no charge. Replace it with a charged main battery. Reference: Section 1.2, "Using Batteries" Alternatively, charge the main battery. Reference: Section 1.2.
iPAD Operations Guide 11 Correctly Using the iPAD 11.1 Using the Main Battery To prevent deterioration, do not store the main battery for a long time when it is fully charged. For long-term storage, remove the battery from the iPAD when it is about 50% charged and store it at room temperature. If the battery has not been used for a long time, recharge it. Be careful not to short-circuit the battery terminals with a necklace or other metallic object. Do not heat the battery or throw it into a fire.
iPAD Operations Guide 11.3 Long-term Storage Store the iPAD where it will not be exposed to vibration, dust, high and low temperatures, high humidity, and direct sunlight. Storing the iPAD with the programs saved To avoid discharging of the main and backup batteries, charge the main battery once every week. Without charging, the programs and data in memory will be lost.
iPAD Operations Guide A Specifications Control section Display section Item CPU Memory OS Display type Resolution Display lighting Operations section External interface Scanner Audio Magnetic card reader Communications Specification 32-bit RISC CPU ROM: 32 MB RAM: 64 MB Flash disk: 32 MB WindowsCE. NET 3.
iPAD Operations Guide Power source Item Main battery Backup battery Operating time Charging Ambient conditions Temperature Humidity Dimensions Weight Specification Lithium ion battery (CA506011001) 1700mAh/3.
iPAD Operations Guide B Consumables The following table lists the consumables that the user must replace. Product name Lithium ion battery for iPAD100-10 MCR cleaning card Part number CA50601-1001 Service life About 500 charges and discharges, or about two years. 7737171 Replace cleaning card when errors continue to occur after the reader has been cleaned.
iPAD Operations Guide C Accessories Item Lithium ion battery Strap with a stylus pen Cleaning card Drip-proof cover (for magnetic card reader) Quantity 1 1 1 1 D Options Product name Model Cradle iPAD142-01 Single-pack charger CA05951-7080 AC adapter CA05306-D500 Daisy chain cable USB cable CA72001-1895 CA05951-5525 Specification overview Special cradle for the iPAD100-10. Unit that recharges the iPAD’s battery. The charging time is about 3 hours.
iPAD Operations Guide E Warning Indications and Symbols This user's manual uses warning indications and symbols to help users use the iPAD safely and to prevent personal injury and property damage. This manual uses warning indications and symbols in the text to indicate safety conditions. The meaning of each indication and symbol is explained below.
iPAD Operations Guide Warning Symbols Indicates the possibility of injury from an electric shock. ELECTRIC SHOCK GENERAL INHIBITION GENERAL CAUTION Indicates a condition that requires caution and a specific action that must not be performed. Indicates a condition that requires general caution. Indicates the possibility of an electric shock or fire. FIRE Indicates an action that is prohibited (prohibited action). DISASSEMBLY PROHIBITED Indicates a required action.
iPAD Operations Guide F Notes on Safety WARNING • Do not damage the power cord when you use the AC adapter, single-pack charger, or cradle. Doing so may result in an electric shock or fire. • Use only the specially designed cradle, AC adapter, and single-pack charger. If another item is used, differences in voltage or current can damage the iPAD. • If the battery is not handled correctly, the iPAD may overheat, explode, or catch fire.
iPAD Operations Guide WARNING • GENERAL INHIBITION • • • • Do not use or leave the battery near a flame, fire, stove, or other source of heat, in direct sunlight, or in a car exposed to sunlight. Do not put the battery in a microwave oven or other hot container. Charge the battery only on the special cradle or single-pack charger. Do not charge the battery by directly connecting it to a wall outlet or cigarette lighter in a car. Do not charge the battery near a flame, fire or under a hot sun.
iPAD Operations Guide CAUTION GENERAL INHIBITION GENERAL CAUTION • Turn off the iPAD before cleaning it. • Do not clean the iPAD using a damp or chemically treated cloth, and do not use thinner or other volatile chemical. Doing so may cause the iPAD to malfunction. • Do not remove the battery without turning off the iPAD. • Do not unplug the AC adapter or singlepack charger until charging has been completed. Doing so may cause the battery to be improperly charged.
iPAD Operations Guide GENERAL CAUTION • Always keep the magnetic card reader and magnetic cards clean. If dust, oil, or water gets on them, an error occurs or the magnetic head malfunctions or deteriorates. • Do not lubricate the magnetic card reader. • If you drop an object into the magnetic card reader slot, use tweezers or a similar means to extract it. • Keep magnetic cards and the magnetic card reader away from magnets or magnetic objects. Magnetism will destroy data on a magnetic card.
iPAD Operations Guide G Conventions Used in the Manual Symbols Symbol Note For reference Circled numbers (such as (1) and (2)) Meaning Indicates a precaution or information you need to note. Be sure to read these items. Indicates useful information. Indicates the steps, starting with (1), in a procedure. Indicates the result for an operation. Indicates the end of a series of operations.