
User's Manual
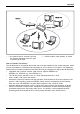

Table Of Contents
- FUJITSU Tablet STYLISTIC Q775
- Contents
- Declarations of conformity
- Fujitsu Contact Information
- Ports and controls
- Important notes
- First-time setup of your device
- Working with the Tablet PC
- Status indicators
- Switching the Tablet PC on
- Switching the Tablet PC off
- Handwriting recognition
- Touchscreen
- Select display orientation (portrait or landscape format)
- Using fingers
- Using the stylus
- Tablet buttons
- Webcam
- Rechargeable battery
- Using the energy saving functions
- Memory cards
- SIM card
- Wireless LAN/Bluetooth/4G/LTE/NFC wireless components
- Ethernet and LAN (only with performance docking cradle, keyboard docking station or power keyboard docking station)
- GPS
- Accessories for your Tablet PC (optional)
- Your performance docking cradle (optional)
- Keyboard docking station or power keyboard docking station (optional)
- Ports on the keyboard docking station or power keyboard docking station
- Connecting the Tablet PC to the keyboard docking station or power keyboard docking station
- Separating the Tablet PC from the keyboard docking station or power keyboard docking station
- Removable rechargeable battery for the power keyboard docking station (optional)
- Intermediary VESA Mount Plate (optional)
- Hand strap (optional)
- Shoulder strap (optional)
- Folio case (optional)
- Security functions
- Connecting external devices
- Settings in BIOS Setup Utility
- Starting the BIOS Setup Utility
- BIOS Setup Utility operation
- Exiting BIOS Setup Utility
- Exit Saving Changes - save changes and exit BIOS Setup Utility
- Exit Discarding Changes - Reject changes and exit BIOS Setup Utility
- Load Setup Defaults – load default values
- Discard Changes - Discard Changes without exiting BIOS Setup Utility
- Save Changes - save changes without exiting the BIOS Setup Utility
- Save changes and power off
- Troubleshooting and tips
- Executing a reset
- Help if problems occur
- Recovering your Factory Image
- The Tablet PC's date or time is incorrect
- Battery indicator does not illuminate
- The Tablet PC's touchscreen remains dark
- The display on the Tablet PC's touchscreen is difficult to read.
- The external monitor remains blank
- The external monitor is blank or the image is unstable
- The cursor does not correctly follow the stylus movements
- Stylus input not working
- The Tablet PC does not start after switch on
- The Tablet PC stops working
- The printer does not print
- The wireless connection to a network does not work
- The battery discharges too quickly
- Smart Card reader is not recognized
- SmartCard PIN forgotten
- User and/or supervisor Smart Card lost
- SmartCard lost
- Acoustic warning
- Error messages on the screen
- Technical data
- Manufacturer’s notes
- Declarations of conformity
- FCC and IC Regulatory Information
- Regulatory Notes and Statements
- Wireless LAN, Health and Authorization for use
- Regulatory Information/Disclaimers
- Federal Communications Commission and Industry Canada statement:
- Déclaration d’Industrie Canada
- FCC Interference Statement
- FCC Radio Frequency Exposure statement
- Déclaration de la FCC/d’Industrie Canada sur l’exposition aux radiofréquences
- Export restrictions
- Restrictions concernant l’exportation
- Canadian Notice
- Avis pour le Canada
- Regulatory Notes and Statements
- Appendix
- Index

Appendix
Recovering Your Recovery Image Using Recovery and Utility
(for new hard drive or non-boot
able hard drive)
If you have installed a new hard drive or your hard drive is not bootable, perform the following steps.
Note: You will n eed the Bootable disk and Recovery Image disk set for this recovery.
1. Power on your system. When the Fujitsu logo appears on the screen, press the
Enter
key.
2. Insert the bootable disk in y our DVD drive, then click OK.
3. Highlight the CD/DVD option from the Boot Menu and press
Enter
.
4. Select CD/DVD boot mode: Select UEFI Mode, if applicable and press
Enter
.
While the files are being loaded from the disk, the Fujitsu logo screen appears
followed by a progress bar at the bot tom of the screen.
5. Choose your language, if necessary.
6. Three tool options appear: D iagnostics, Recovery and Utility.SelectRecovery.
• For Window s 8.1: Select Restore full hard drive
• For Windows 7: Select Restoring the Factory Image (full hard drive recovery)
7. Click Next to confirm full hard drive restoration. All data on HDD w ill be deleted.
8. Agree to E ULA by selecting Agree option and clicking Next.
9. Click Next on the Recovery Disk C heck scree n to verify that the bootable
disk has been inserted into the optical drive.
10. T he Checking for Recovery Disk screen appears fo llowed by the prompt to insert the
first disk. Click OK to continue. Repeat this step for all disks. After all recovery disks
have been checked and the check has been completed, click Next.
11. Follow the prompt to reinsert the first recovery disk and click Next.
12. Click OK when you r ece ive the final warning informing you that all data on drive
C will be lost. This starts the recovery process.
13. F ollow the prompts to insert the next recovery disks and click OK.
14. Afte r the copying of the image to the HDD completes the restore process is
complete, click Finish to restart the system. T he computer will restart automatically
and then go through the first boot process.
15. F ollow the steps listed in “Auto Installation support for essential acce ss
software from backup location” section.
16. D ownload FSDM (Fujitsu Software Download Manager) from support site and download
all the software applicable to the model an d OS using F SD M .
17. F ollow the steps listed in “Auto Installation support for essential acce ss
software downloaded from support website.
118 Fujitsu