
AGU9RLF Operation Manual


En-6
PREPARATION
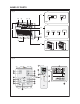
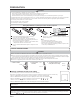
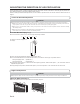
Remote Controller Holder
CAUTION
●
If there is a curtain or a wall between the remote control and the receptor, the signal will not reach it.
●
When the receptor receives strong light, the air-conditioner may not operate correctly.Avoid direct exposure to sunlight, and keep the signal-
receiving part away from lights and À at panel television screens.The signal may not be received in rooms with instantaneous À uorescent lights
(such as inverter type ones). In such cases, please consult at the store where you purchased the product.
●
Please place the remote control in a place which will not be affected by heat from direct sunlight and home heaters.
●
Please do not apply strong shocks to the remote controller or pour water on it.
3 To remove the Remote Con-
troller (when use at hand).
1 Mount the Holder. 2 Set the Remote
Controller.
Screws
Insert
Press in
Slide up
Pull out
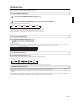
Remote controller custom code setting
Use the following steps to select the custom code of the remote controller.
(Note that the air conditioner cannot receive a custom code if the air conditioner has not been set for the custom code.)
1. Press the START/STOP button until only the clock is displayed on the remote controller display.
2. Press the MODE button for at least ¿ ve seconds to display the current custom code (initially set to
).
3. Press the SET TEMP. (
/ ) button to change the custom code between ĺ ĺ ĺ .
Match the code on the display to the air conditioner custom code.
4. Press the MODE button again to return to the clock display. The custom code will be changed.
If no buttons are pressed within 30 seconds after the custom code is displayed, the system returns to the original clock display. In this case, start
again from step 1.
The air conditioner custom code is set to A prior to shipment.
Contact your retailer to change the custom code.
The remote controller resets to custom code A when the batteries in the remote controller are replaced. If you use a custom code other than
custom code A, reset the custom code after replacing the batteries. If you do not know the air conditioner custom code setting, try each of the
custom codes ( ĺ ĺ ĺ ) until you ¿ nd the code which operates the air conditioner.
CAUTION
• To prevent malfunction or damage of the remote controller:
- Place remote controller at where will not be exposed to direct sunlight or excessive heat.
- Remove batteries if the product is not going to be used for an extended period.
- Exhausted batteries must be removed immediately, and be disposed according to the local laws and regulations of your region.
• If leaking battery À uid comes in contact with your skin, eyes, or mouth, immediately rinse with plenty of clean water, and consult your physician.
• Obstacles such as a curtain or wall between the remote controller and the indoor unit may affect the appropriate signal transmission.
• Do not apply strong shocks to the remote controller.
• Do not pour water on the remote controller.
• Do not attempt to recharge dry batteries.
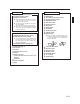
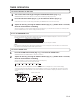
Battery (R03/LR03/AAA × 2) loading and remote controller preparation
1
4
2
3
5
7
6
8
5
Press CLOCK ADJUST button to start clock setting.
6
Set the time by pressing SELECT button.
Each time you press the button, the value increases or
decreases 1 minute. With pressing and holding the button, the
value increasesor decreases 10 minutes.
* By pressing the TEMP. (∧∨) buttons, the time indicator can be
changed from a 24-hour to a 12-hour clock.
7
Press the CLOCK ADJUST button again to complete the clock
setting.
8
Press the °F / °C button to select the preferred temperature unit.
(Factory setting is °F.)
Notes:
• Use speci¿ ed type of battery only.
• Do not use new battery and used battery together.
• Batteries can be used about 1 year in ordinary use.
• If the remote control range noticeably got shorten, replace the bat-
teries, and press RESET button.
9378532076_OM.indb 6 9/24/2013 4:35:26 PM