
AOU45RLXFZ Installation Manual


En-7
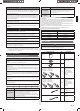
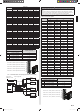
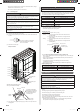
When there is an obstruction in the upper space:
[Unit: in. (mm)]
(1) When there are obstacles at the
rear and above.
Max. 20 (500)
12 (300) or
more
40 (1000) or
more
(2) When there are obstacles at the rear, sides,
and above.
40 (1000) or
more
20 (500) or
more
8 (200) or
more
10 (250) or
more
Max. 20 (500)
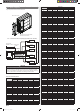
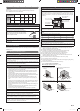
4. 2. 2. Multiple outdoor unit installation
• Provide at least 250 mm of space between the outdoor units if multiple units are
installed.
• When routing the piping from the side of an outdoor unit, provide space for the piping.
• No more than 3 units must be installed side by side.
When 3 units or more are arranged in a line, provide the space as shown in the
following example when there is an obstruction in the upper space:
When the upper space is open:
[Unit: in. (mm)]
(1) When there are obstacles at the
rear only.
12 (300) or
more
10 (250) or
more
(2) When there are obstacles at the front
only.
10 (250) or
more
60 (1500) or
more
(3) When there are obstacles at the front and rear.
20 (500) or more
60 (1500) or more
10 (250) or
more
When there is an obstruction in the upper space:
[Unit: in. (mm)]
• When there are obstacles at the rear and above.
60 (1500) or
more
20 (500) or
more
Max. 12 (300)
60 (1500) or
more
8 (250) or
more
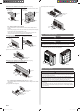
4. 2. 3. Outdoor units installation in multi row
[Unit: in. (mm)]
* The following settings are not recommended in case of cooling in a low outside
temperature.
(1) Single parallel unit arrangement
20 (500) or more
24 (600) or more
60 (1500) or more
119 (3000) or more
(2) Multiple parallel unit arrangement
20 (500) or more
24 (600) or more
60 (1500) or more
138 (3500) or more
10 (250) or more
10 (250) or more
10 (250) or
more
60 (1500) or
more
20 (500) or
more
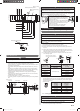
4. 3. Transportation of the unit
WARNING
Do not touch the fi ns. Otherwise, personal injury could result.
CAUTION
When carrying the unit, hold the handles on the right and left sides and be careful. If
the outdoor unit is carried from the bottom, hands or fi ngers may be pinched.
• Be sure to hold the handles on the sides of the unit. Otherwise, holding the suction
grille on the sides of the unit may cause deformation.
Handle
Handle
Handle
4. 4. Drain installation
CAUTION
• Perform drain work in accordance with this Manual, and ensure that the drain water
is properly drained. If the drain work is not carried out correctly, water may drip down
from the unit, wetting the furniture.
• When the outdoor temperature is 32 °F (0 °C) or less, do not use the accessory
drain pipe and drain cap. If the drain pipe and drain cap are used, the drain water in
the pipe may freeze in extremely cold weather. (Reverse cycle model only).
• As the drain water fl ows out of the outdoor unit during heating operation, install the
drain pipe and connect it to a commercial 5/8 in. (16 mm) hose. (Reverse cycle
model only)
• When installing the drain pipe, plug all the holes other than the drain pipe mounting
hole in the bottom of the outdoor unit with putty so there is no water leakage. (Reverse
cycle model only)
9380545101-06_IM_3L.indb 79380545101-06_IM_3L.indb 7 2018/6/20 14:01:522018/6/20 14:01:52