
Scanner User Manual


fi-4220C2 Image Scanner Getting Started 12
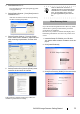
2. Start QuickScan Pro™.
From the [Start] menu select [Programs]-[Quick-
Scan]-[QuickScan].
3. Select [Select Scanner...] from [Scan] menu in
QuickScan Pro™.
And select fi-4220C2 from the list of [Scanner:],
and then click the [OK] button.
4. Select [Preview Settings...] from the [Scan]
menu. Set the scan resolution, paper size and
other scanning requirements, and then click
[OK].
5. Select [Preview Scan] from the [Scan] menu.
And then the document is scanned.
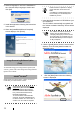
If the scanning completes without any trouble, the
installation performed successfully.
Error Recovery Guide
If you did not install together the Error Recovery Guide
with the driver, please proceed with the procedures
given below for installing it.
Error Recovery Guide is a software that displays trou-
bleshooting information on screen if any scanner error
occurs.
1. Insert the Setup CD-ROM in your CD drive.
The <SETUP DISK STARTUP SCREEN> will be dis-
played.
2. Click [Install Products].
3. Click [Error Recovery Guide] on the next screen.
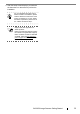
HINT
Refer to "QuickScan Overview" or
"QuickScan Help" for information about
QuickScan Pro™ functions and opera-
tions. On the [Start] menu, point to
[Programs]-[QuickScan] and click the
file.