fi-5120C/fi-5220C Image Scanner P3PC-1312-02EN Getting Started fi-5120C/fi-5220C Image Scanner Getting Started
CONTENTS ■ Regulatory Information ........................................................ ii ■ Note, Liability ....................................................................... iii ■ Safety Precautions ................................................................ v Chapter1 PREPARING THE SCANNER.................................. 1 1.1 Checking the Contents of the Scanner Package............. 1 1.2 Names and Functions of Parts.......................................... 1 1.3 Operator Panel........
INTRODUCTION Thank you for purchasing the fi-5120C/fi-5220C Duplex Color Scanner product. This document describes how to handle fi-5120C/fi5220C Duplex Color and basic operation methods. Before you start using fi-5120C/fi-5220C Duplex Color be sure to thoroughly read this manual to ensure correct use. The "Operator’s Guide" is stored on the Setup Disk.
■ Note, Liability •Do not breathe the chemical liquid contained in the scanner lamps. BEFORE USING THIS PRODUCT, PLEASE READ THIS MANUAL CAREFULLY. IF THIS PRODUCT IS NOT USED CORRECTLY, UNEXPECTED INJURY CAN OCCUR TO USERS OR BYSTANDERS. Keep this manual in a safe place so that it can be easily referred to during use of this product.
Manufacturer PFU LIMITED International Sales Dept., Imaging Business Division, Products Group Solid Square East Tower, 580 Horikawa-cho, Saiwai-ku, Kawasaki-shi Kanagawa 212-8563, Japan Phone : (81-44) 540-4538 R Warning Label The glass surface inside the ADF becomes hot during the operation. Be careful not to touch the glass surface inside the ADF. All Rights Reserved, Copyright© PFU LIMITED 2006. About Maintenance The user must not perform repairs on this scanner.
■ Safety Precautions Do not install the device in locations that has oil smoke, steam, humidity, and dust. WARNING Do not damage the AC cable. A damaged AC cable may cause fire or electric shock. Do not place heavy objects on AC cables, or pull, bend, twist, heat, damage or modify AC cables. Do not use damaged AC cables or power plugs, or install any cables or power plugs to loose wall sockets. Use only specified AC cables and connector cables. Use only specified AC cables and connector cables.
CAUTION Do not install the scanner on unstable surfaces. Make sure that the scanner is installed on a flat, level surface and that none of its parts extend beyond the surface top, such as a desk or table. Do not install the scanner on unstable surfaces. Install the scanner on a level surface that is free of vibration to prevent it from falling. Install the scanner on a strong surface that will support the weight of the scanner and other devices. Do not block the ventilation ports.
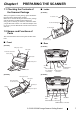
PREPARING THE SCANNER Chapter1 1.1 Checking the Contents of the Scanner Package When you open the scanner package, please handle the main unit and its attachments carefully. Make sure it contains all the parts listed in the package contents list that is included in the package box. If any parts are missing or defective, contact the dealer you purchased the scanner or an authorized Fujitsu scanner service provider. Handle the scanner and accessories with care.
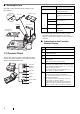
■ Removable Parts Name Parts that can be removed from the scanner are displayed below. Can be removed ADF paper chute Function Number display Indicates the function Number and error status. Buttons Function Changes the Function activated by the Send to button (*). Send to Launches the linked application software (*). Pick roller Scan Pad ASSY Sheet guide LED [fi-5220C only] Function Document cover Power button Turns the scanner ON and OFF. - Lights when the scanner is turned ON.
Chapter2 INSTALLATION OF THE SCANNER 2.1 Installing the Scanner ADF paper chute 1. Place the scanner at its installation site. Tab For details on the scanner's dimensions and required installation space, refer to "fi-5120C/fi5220C Operator’s Guide" "7.2 Installation Specifications" in the Setup CD-ROM. For fi-5120C, go to Step 3. 2. Unlock the Shipping lock.
2.2 Connecting the Scanner to Your PC When running Windows 95 or Windows NT 4.0, connect the SCSI interface cable. When running Windows 98, Windows Me, Windows 2000, or Windows XP, connect either the USB interface cable or the SCSI interface cable. ATTENTION This scanner is provided with two interfaces: Ultra SCSI and USB 2.0 /1.1. Connect only one of the USB or SCSI interface cable. Windows 95 and Windows NT 4.0 do not support USB interface.
HINT The factory default setting for SCSI ID is "5". If the SCSI ID of another SCSI device is set to the same ID, change either the scanner's SCSI ID or SCSI ID of the other SCSI device. Set the SCSI ID using the SCSI ID switch on the back of the scanner. ATTENTION • There are two types of FUJITSU TWAIN 32: One of the following driver software will be installed automatically according to your Operating System (OS).
4. Insert the Setup CD-ROM into the CD drive. ⇒ appears. ATTENTION 8. Select a language used for installation on [Choose Setup Language] window and click [OK]. This screen may not appear when the "Autoplay" setting of your PC is off. In this case, run "Install.exe" in this CD-ROM directly from the "Explorer" or "My Computer". 5. Click [INSTALL PRODUCTS]. 9. Install the application following the instructions on the window. 10.
■ Installing ScandAll 21 "Scandall 21" is an image capturing software that complies with the TWAIN standard. ATTENTION 5. Install the application following the instructions on the window. 6. When the [InstallShield Wizard Complete] window appears, click [Finish] When using Windows NT 4.0, Windows 2000 or Windows XP, log on as a user with "Administrator" privileges (privileges of the administrator of your PC). 1. Insert the Setup CD-ROM into the CD drive. ⇒ appears. 2.
HINT For Windows 98, Windows Me, Windows 2000, Windows XP: For FUJITSU ISIS Scanner Driver [FUJITSU fi-5120C/fi-5220Cdj] For Windows 95, Windows NT 4.0: [FUJITSU TWAIN32] 5. Select [To View...] from the [Scan] menu. 6. Set scanning resolution, document size, etc. on the [TWAIN driver] window (for setting details of scanning) and click the [Scan] button. ■ Preparation Confirm the following items before installing the driver application.
4. Insert the "Setup CD-ROM" into the CD drive. ⇒ appears. ATTENTION 8. Select a language used for installation on [Choose Setup Language] window and click [OK]. This screen may not appear when the "Autoplay" setting of your PC is off. In this case, run "Install.exe" in this CD-ROM directly from the "Explorer" or "My Computer". 5. Click [INSTALL PRODUCTS]. 9. Install the application following the instructions on the window. 10.
2. Click [INSTALL PRODUCTS]. 5. Enter the required information, then click [Next >] button. 3. Click [QuickScan PRO (Trial)] on the window below. ATTENTION "QuickScan Pro™" included in the Setup CD-ROM is a Trial version. For further use after the expiration of its evaluation period of up to 30 launches, it is necessary to purchase a fully functional version of QuickScan Pro™. (When you install the evaluation version, do not change the Serial Number already displayed.) 6.
4. Select [Preview Settings...] from the [Scan] menu. Set the scan resolution, paper size and other scanning requirements, and then click [OK]. Error Recovery Guide The Error Recovery Guide is a software that displays troubleshooting information on screen if any scanner error occurs. If you did not install the Error Recovery Guide when installing the scanner driver, install it following the procedure below. 1. Insert the Setup CD-ROM in your CD drive. The will be displayed. 2.
6. When the [InstallShield Wizard Complete] screen displays, click [Finish]. ATTENTION This window is not displayed automatically when the "Auto play" setting of your computer is deactivated. In this case, please run "Auto play.exe" of this CD-ROM directly using the "Explore" or "My computer". 2. Select the language and Click [OK] button.
5. Follow the instructions to install the software. HINT Select "How to install" on the "Adobe Acrobat" window to learn more about Adobe Acrobat installation. Refer to "Adobe Acrobat Help" about how to use Adobe Acrobat. ■ Uninstalling Supplied Programs Follow the procedure below to uninstall supplied programs. Windows XP screenshots are used in this section as examples. The windows and operations may slightly vary, if your OS is other than Windows XP.
5. Click the [Change/Remove] or [Remove] button. 6. When the confirmation dialogbox appears, Click the [OK] or [Yes] button. ⇒ This executes the uninstallation. ATTENTION 14 Screen displays may vary slightly according to the operation system (OS) you are using. Follow the on screen instructions of the OS. Example: When the OS Windows 2000 • "Add or Remove Programs" - "Add/ Remove Applications" • [Changel/Remove] button - [Add/ Remove] button.
Appendix1 TROUBLESHOOTING ■ Troubleshooting checklist Symptom Scanner does not turn on. Check this item Remedy Have you pressed the power button on? Push the power button in to turn the scanner. Are the AC cable and AC adapter properly connected to the scanner? Correctly connect the AC cable and the AC adapter. Are you using the correct AC cable and AC adapter supplied with the scanner from the manufacture? You must use the AC adapter and cable supplied with your scanner by the manufacture.
Symptom Paper is not fed (pick error occurs frequently, or document stops midway). The generated images are elongated. There is a shadow on the leading edge of the generated image. AP-2 Check this item Remedy Do the documents satisfy the "Document Quality" and the "Multi feed Detection Conditions" in the chapter 6 of the fi-5530C Operator’s Guide? Use the documents that satisfy the "Document Quality" and the "Multi feed Detection Conditions" in the chapter 6 of the fi-5530C Operator’s Guide.
■ Temporary error Indication ■ Device alarm (Non-Temporary error) Meaning Indication Meaning U0 Shipping lock error (fi-5220C) U1 Paper feed error E0 Flatbed motor malfunction. U2 Multi feed error E1 U4 The ADF cover is opened. Trouble in the optical system (Flatbed). U6 Print cartridge not installed (fi-5120C) E2 Trouble in the optical system (front). E3 Trouble in the optical system (back). E4 The motor’s fuse has blown out. E6 Trouble in the operator panel.
Appendix2 DAILY CARE WARNING The glass surface inside the ADF becomes hot during the operation. Before you clean inside the scanner, turn off its power and unplug the AC adapter from the outlet. Wait for at least 15 minutes. Do not turn off the scanner when you clean the Feed rollers. ■ Parts to Clean and When Part to clean Pad ASSY Pick roller Standard Cleaning Cycle Clean these parts after every 1,000 scans.
Appendix3 REPLACING CONSUMABLES WARNING The glass surface inside the ADF becomes hot during the operation. Before replacing the consumables, turn its power off and unplug the AC adapter from the outlet. Wait at least 15 minutes. The illustration below demonstrates the locations of the replacement parts. Refer to "Chapter 4 Replacing Consumables" fi-5120C/fi-5220C Operator’s Guide on the Setup CD-ROM.
fi-5120C/fi-5220C Image Scanner Getting Started P3PC-1312-02EN Date of issuance: June 2006 Issuance responsibility: PFU LIMITED Copying of the contents of this manual in whole or in part and copying of the scanner application is forbidden under the copyright law. z The contents of this manual are subject to change without notice. z PFU LIMITED.