P3PC-1342-02EN
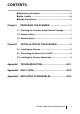
CONTENTS ■ Regulatory Information ........................................................ ii ■ Note, Liability ....................................................................... iii ■ Safety Precautions ................................................................ v Chapter1 PREPARING THE SCANNER.................................. 1 1.1 Checking the Contents of the Scanner Package............. 1 1.2 Names of Parts ................................................................... 1 1.
INTRODUCTION Thank you for purchasing the fi-5530C Duplex Color Scanner. This document describes how to use fi-5530C and basic operation methods. Before you start using fi-5530C be sure to thoroughly read this manual to ensure correct use. The "Operator’s Guide" stored on the Setup CD Rom provides useful and detailed information on Operations when you would like to use advanced features, Daily Care for maintenance of the scanner, and Replacing Consumables to maintain conditions for smooth scanning.
■ Note, Liability •Do not put the substance contained in the lamp READ ALL OF THIS MANUAL CAREFULLY BEFORE USING THIS PRODUCT. IF THIS PRODUCT IS NOT USED CORRECTLY, UNEXPECTED INJURY MAY BE CAUSED TO USERS OR BYSTANDERS. Also, keep this manual in a safe place so that it can be easily referred to during use of this product.
Adobe Acrobat A TRIANGLE symbol indicates that special care and attention is required. The drawing inside the triangle shows the specific caution. Adobe® Acrobat® All the descriptions in this manual assume the usage of Adobe Acrobat bundled with this product. However, Adobe Acrobat may be upgraded without notice. If the descriptions differ from the screens actually displayed, refer to the Acrobat’s “Help”. Manufacturer A CIRCLE with a diagonal line inside shows action which users may not perform.
■ Safety Precautions Turn the scanner OFF if it is damaged. If the scanner is damaged for any reason, disconnect immediately the power plug in order to turn out the scanner. Contact the store where you purchased the scanner. WARNING Do not damage the AC cable. Do not put liquids inside the scanner. A damaged AC cable may cause fire or electric shock. Do not place heavy objects on AC cables, or pull, bend, twist, heat, damage or modify AC cables.
CAUTION Do not install the scanner on unstable surfaces. Make sure that the scanner is installed on a flat, level surface and that none of its parts extend beyond the surface top, such as a desk or table. Do not install the scanner on unstable surfaces. Install the scanner on a level surface that is free of vibration to prevent it from falling. Install the scanner on a strong surface that will support the weight of the scanner and other devices.
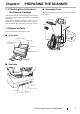
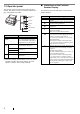
Chapter1 PREPARING THE SCANNER 1.1 Checking the Contents of the Scanner Package When you unpack the scanner package, make sure that the package contains all the parts on the list included in the package. If any parts are missing or defective, contact your scanner dealer or an authorized FUJITSU scanner service provider. Handle the scanner and accessories with care. ■ Removable Parts The following shows the parts that can be removed from the scanner. ADF paper chute Sheet guide Pad ASSY Pick roller 1.
1.3 Operator panel The operator panel is located on the right side of the scanner. The panel consists of a Function Number Display, four buttons and a LED. Function No. display Function Send to Scan Power button LED . Name Function Function Number Display Indicates the state of the scanner. The meaning of the numbers and alphabets indicated are explained later in this section. Buttons Function Changes the Function activated by the Send to button (*).
INSTALLATION OF THE SCANNER Chapter2 2.1 Installing the Scanner 1. Place the scanner at its installation site. For details on the scanner's dimensions and required installation space, refer to the fi-5530C Operator’s Guide "7.2 Installation Specifications" on the Setup CD-ROM. 2. Attach the ADF paper chute. Hold the ADF paper chute and insert its tabs into the corresponding slots in the scanner as shown in the figure below. The Side guides of the ADF paper chute have to face up.
2. Connect the other end of the USB interface cable to your PC. ATTENTION • Be sure to use the USB cable which • • comes with this scanner as an accessory. Correct operation with commercially available cables is not guaranteed. When connecting to an USB hub, use the first stage USB hub that is closest to the computer. If you use the second or later hub stages, the scanner may not operate correctly. If you connect the scanner with USB 2.
2.3 Installing the Scanner Application For scanning documents with this scanner, both scanner driver and image capturing application software (called "application" hereafter) must be installed on your PC. The following scanner drivers and applications are provided: • Scanner Driver: FUJITSU TWAIN 32 Scanner Driver FUJITSU ISIS Scanner Driver • Scanning application: ScandAll 21 (for FUJITSU TWAIN 32) QuickScan ProTM (for FUJITSU ISIS) FUJITSU TWAIN32 V8 • When using Windows 95 or Windows NT 4.
5. Click [INSTALL PRODUCTS]. 9. Install the application following the instructions on the window. 10. When the [InstallShield Wiizard Complete] window appears, click [Finish]. 6. Click [TWAIN Driver] on the window below. Your computer will be restarted and the scanner will be detected. Do not remove the Setup CD-ROM from the CD drive until your PC has completely restarted. ATTENTION 7. Error Recovery Guide Installation window appears.
2. Click [INSTALL PRODUCTS]. ATTENTION For finishing the installation, it may be necessary to restart your computer. Follow the instructions on the window. ■ Confirming Installation 1. Load the documents on the scanner. For details on how to set documents, refer to the "1.2 Loading Documents on the ADF for Scanning" in the fi-5530C Operator’s Guide provided in the CD-ROM. 3. Click [ScandAll 21] on the window below. 2.
6. Set scanning resolution, document size, etc. on the [TWAIN driver] window (for setting details of scanning) and click the [Scan] button. • Connect the scanner correctly to your PC. For details on how to connect the scanner, refer to "2.2 Connecting the Scanner to Your PC" on page 3. HINT ■ Installing the FUJITSU ISIS Scanner Driver Windows XP screenshots are used in this section as examples. The windows and operations may vary slightly depending on your OS. HINT 1.
9. Install the application following the instructions on the window. 5. Click [INSTALL PRODUCTS]. 10. When the [InstallShield Wiizard Complete] window appears, click [Finish]. Your computer will be restarted and the scanner will be detected. Do not remove the Setup CD-ROM from the CD drive until your PC has completely restarted. ATTENTION Depending on the OS, the following operations may be necessary.
3. Click [QuickScan PRO (Trial)] on the window below. ■ Confirming Installation 1. Load the documents on the scanner. For details on loading documents, refer to "1.2 Loading Documents on the ADF for Scanning" in the fi-5530C Operator's Guide on the Setup CDROM. 2. Start QuickScan ProTM. From [Start] menu select [Programs]-[QuickScan]-[QuickScan]. 3. Select [Select Scanner...] from [Scan] menu in QuickScan ProTM. 4. Continue to install the application following the instructions on the window.
5. Select [Preview Scan] from the [Scan] menu. And then the document is scanned. If the scanning completes without any trouble, the installation was performed successfully. HINT 3. Click [Error Recovery Guide] on the next window. 4. Select a language used for the installation in the "Choose Setup Language" window and click [OK]. Refer to "QuickScan Overview" or "QuickScan Help" for information about QuickScan functions and operations.
3. Select "Install Adobe Acrobat". Adobe® Acrobat® Install Adobe Acrobat from the "Adobe Acrobat CD-ROM" provided with this scanner. ATTENTION Adobe Acrobat bundled with this scanner is not supported by Microsoft Windows 95, Microsoft Windows 98 /98 Second Edition, Microsoft Windows NT4.0, Microsoft Windows Me. Adobe Acrobat is required for displaying the manuals stored in the CD-ROM. * Installation of Adobe Acrobat is not necessary if it has already been installed in your PC. HINT 4.
■ Uninstalling Supplied Programs ATTENTION ATTENTION Notes for using Adobe Acrobat When scanning a paper document and converting the image to PDF using Adobe Acrobat, unexpected images may be output when: 1. Setting "Edge Shadow Removal" in Acrobat, and setting "Digital Endorser" or "Black Background" options in the TWAIN driver at the same time. Letter strings embedded in the image or the background may be missed.
5. Click the [Change/Remove] or [Remove] button. 6. When the confirmation dialogbox appears, Click the [OK] or [Yes] button. ⇒ This executes the uninstallation. ATTENTION 14 Screen displays may vary slightly according to the operation system (OS) you are using. Follow the on screen instructions of the OS. Example: When the OS Windows 2000 • "Add or Remove Programs" - "Add/ Remove Applications" • [Changel/Remove] button - [Add/ Remove] button.
Appendix1 TROUBLESHOOTING ■ Troubleshooting checklist Symptom Scanner does not turn on. Check this item Remedy Have you pushed the power button? Push the power button. Are the AC cable and AC adapter properly connected to the scanner? Correctly connect the AC cable and the AC adapter. Disconnect the AC cable and the AC adapter from the scanner, then connect them again.
Symptom Paper is not fed (pick error occurs frequently, or document stops midway). The generated images are elongated. There is a shadow on the leading edge of the generated image? AP-2 Check this item Remedy Do the documents satisfy the "Document Quality" and the "Multi feed Detection Conditions" in the chapter 6 of the fi-5530C Operator’s Guide? Use the documents that satisfy the "Document Quality" and the "Multi feed Detection Conditions" in the chapter 6 of the fi-5530C Operator’s Guide.
■ Temporary error Indication ■ Device alarm (Permanent error) Meaning Indication Meaning U1 A paper feed error occurred. E2 Trouble in the optical system (front). U2 A multi feed error occurred. E3 Trouble in the optical system (back). U6 The print cartridge is not set. E4 The motor fuse has blown out. E6 Trouble in the operator panel. E7 Trouble occurred in the internal memory (EEPROM). E8 The SCSI interface fuse has blown out. E9 An error in the image memory.
Appendix2 DAILY CARE WARNING When operating the scanner, the ADF’s inside glass becomes very hot. Before you clean inside the scanner, turn off its power and unplug the AC adapter from the outlet. Wait for at least 15 minutes. Do not turn off the scanner when you clean the Feed rollers or Eject rollers. ■ Locations and Cycle for Cleaning Part to clean Pad ASSY Standard Cleaning Cycle Clean these parts after every 5,000 scans.
Appendix3 REPLACING CONSUMABLES WARNING During its operation, the inside glass of the ADF becomes very hot . Before replacing the consumables, turn its power off and unplug the AC adapter from the outlet. Wait at least 15 minutes. The following illustrations show the locations of the consumables. Refer to "Chapter 4 Replacing Consumables" fi-5530C Operator’s Guide on the Setup CD-ROM.
fi-5530C Image Scanner Getting Started P3PC-1342-02EN Date of issuance: June, 2006 Issuance responsibility: PFU LIMITED Copying of the contents of this manual in whole or in part and copying of the scanner application is forbidden under the copyright law. z The contents of this manual are subject to change without notice.