P3PC-1362-01EN fi-553PR Imprinter Operator's Guide
Contents Introduction................................................................................................................................................. 1 1. Preparations............................................................................................................................................ 4 1.1. Checking the Package Contents.........................................................................................................................................4 1.2.
Introduction Thank you for purchasing the fi-553PR Imprinter option for fi-5530C Color Image Scanner. It helps you to organize your documents by printing a name, date, time or a serial number on the back side of the scanned document. This guide explains how to install and use the Imprinter. This guide also contains important information such as procedures for Print Cartridge replacement. Keep this guide in convenient and safe place so that you can refer to it whenever necessary.
Bescheinigung des Herstellers / Importeurs Symbols Used In This Manual This manual uses the following symbols in explanations in addition to warning indications Für den fi-553PR wid folgendes bescheinigt: This symbol alerts operators to particularly important information. Be sure to read this information. ATTENTION • In Übereinsstimmung mit den Bestimmungen der EN45014(CE) funkentstört • Maschinenlärminformationsverordnung 3. GPSGV, 06.01.
Safety Precautions FOLLOW THESE INSTRUCTIONS AND BE SURE TO HEED ALL WARNINGS AND CAUTIONS DESCRIBED BELOW. WARNING Do not touch the power plug with wet hands. Doing so might cause electric shock. A damaged AC cable may cause fire or electric shock. Do not place heavy objects on AC cables, or pull, bend, twist, heat, damage or modify AC cables. Also, do not use damaged AC cables or power plugs, and AC cables or power plugs when the wall socket is loose.
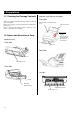
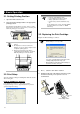
1. Preparations 1.1. Checking the Package Contents Front Side When you unpack the Imprinter package, make sure that all parts are included. Refer to the package contents list included in the Imprinter package box. If any components are missing, please contact the store where you purchased the Imprinter. ADF(Automatic Document Feeder) Cover ADF Paper Chute Operator panel ・ Function No. display ・ [Function] button ・ [Send to] button ・ [Scan] button ・ Power button 1.2.
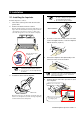
2. Installation ATTENTION 2.1. Installing the Imprinter ● Be careful not to put the Scanner on the Fix Tabs or hitting it hard against them. You may damage the Fix Tabs. ● Be careful not to pinch your finger. Install the Imprinter as follows: 1. Turn off the Scanner power and disconnect the power cable. 2. Remove the Stacker from the scanner. Raise the Stacker upright as shown below while placing your fingers under the arms.
7. Connect the power cable to the scanner. 2.2. Mounting the Print Cartridge ATTENTION Do not touch the metal part of the Print Cartridge nor put the tape back again. 7. Put the Print Cartridge into the holder as below. Mount the print cartridge as follows: ATTENTION When installing or replacing the Print Cartridge, be careful not to insert it out of place. 1. Confirm that the scanner is turned off. 2. Grab both ends of the Print Section Cover, pull and turn it towards you to open the cover.
2.3. Operation Test There are following print test patterns: HINT After installing the Imprinter, check if the printing operation can be done in the Offline Print Test mode of the scanner. Test pattern 1(c) (Horizontal): ABCDEFGHIJKLMNOPQRSTUVWXYZ[\]^_`0000 0000 1. While pressing [Function] button on the operator panel, press button. Test pattern 2 (2) (Horizontal): abcdefghijklmnopqrstuvwxyz{|}~ 00000000 Keep pressing [Function] button. Test pattern 3 (3) (Horizontal): !”#$%&()*+,-.
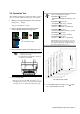
3. Basic Operation 3.1. Setting Printing Position 1. Open the Print Section Cover. 2. Move the Print Cartridge Holder to an appropriate printing position. HINT Available items are: • • • • Position to start printing (Y offset) Font orientation (Horizontal or vertical) String to print (Max. 40 characters) Counter Setup (column, add/subtract, step, etc.
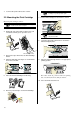
3. Pinch the Arm with your fingers as shown below and release the Arm. 8. Move the Print Cartridge Holder to an appropriate printing position. The holder should be positioned where the printing area of document (Section 6) will pass under it. 4. Remove the old Print Cartridge. ATTENTION When printing close to document edge, be careful about the position so that characters may not be printed off of the document. 9. Close the Print Section Cover. 5. Remove the protection tape on the new Print Cartridge.
Click the [OK] button. A confirmation screen appears. Then click the [OK] button. 3. Open the ADF cover. Ö The Ink remain counter is reset to 100%. ADF Cover For Windows 95, Windows NT 4.0 c Right-click the icon in task bar and select [Option]. Imprinter Cover d Click the [Device Setting] tab. e Click the [Clear] button on [Remaining Ink]. 3. Remove the jammed documents. 4. Close the ADF cover. ADF Cover Imprinter Cover Click the [OK] button. A confirmation screen appears.
4. Daily Care 4.1. Cleaning the Print Cartridge 4.2. Cleaning the Imprinter Ink or stains stuck to the nozzle surface of the Print Cartridge or leaving the Imprinter unused for a while may cause poor print quality due to blocked ink emission holes in the nozzle. If your Imprinter has these types of trouble, clean the nozzle surface of the Print Cartridge. While you use the Imprinter frequently, ink sticks to the Imprinter base and that makes the paper dirty.
4.3. Cleaning the Rollers When ink or paper dust is stuck on the Imprinter feed roller surfaces, documents may not feed smoothly. To prevent feed problems, clean the roller surfaces regularly. Recommended cleaning cycle is every 5,000 sheets. Actual cleaning cycle may be shorter depending on usage and documents. HINT 1. Open the Imprinter Cover while the scanner is turned on. 2. With lint-free cloth, gently wipe off the dirt or dust to clean the roller surfaces.
5. Error Messages If the Function Number Display shows the following alternately, the Imprinter requires some intervention by customer.. Function Function Description: The Print Cartridge is not installed. How to solve: Open the Print Section Cover and confirm that the Print Cartridge is installed correctly. Function Function Description: A problem occurred to the Imprinter. How to solve: cOpen the Print Section Cover and confirm that the Print Cartridge is installed correctly.
6. Specifications Item Printing Method Print Timing Printing Characters Maximum number of characters per line Specification Thermal inkjet printing Post printing Alphabet : A to Z, a to z Numeric Characters : 0, 1 to 9 Symbols : ! ” $ # % & ’ ( ) * + , - . / : ; < = > ? @ [ \ ] ^ _ ` { | }¯ 40 characters (When using 8 digits counter: 43 characters) Font orientation Normal: 0º, 180º (horizontal), 90º, 270º (vertical) Narrow: 0º, 180º (horizontal) Character size Normal : Height 2.91 × width 2.82mm / 0.