P3PC-1422-03EN
CONTENTS ■ Regulatory Information ........................................................ ii ■ Note, Liability ....................................................................... iii ■ Safety Precautions ................................................................ v Chapter1 PREPARING THE SCANNER.................................. 1 1.1 Checking the Contents of the Scanner Package............. 1 1.2 Names of Parts ................................................................... 1 1.
INTRODUCTION Thank you for purchasing the fi-5900C Duplex Color Scanner. This document describes how to use fi-5900C and basic operation methods. Before you start using fi-5900C be sure to thoroughly read this manual to ensure correct use. The "Operator’s Guide" stored on the Setup CD-ROM provides useful and detailed information on Operations when you would like to use advanced features, Daily Care for maintenance of the scanner, and Replacing Consumables to maintain conditions for smooth scanning.
consumption. It is an open system in which business proprietors can participate voluntarily. The targeted products are office equipment such as computers, monitors, printers, facsimiles, copiers, scanners, and multifunction devices. Their standards and logos are uniform among participating nations. ■ Note, Liability READ ALL OF THIS MANUAL CAREFULLY BEFORE USING THIS PRODUCT. IF THIS PRODUCT IS NOT USED CORRECTLY, UNEXPECTED INJURY MAY BE CAUSED TO USERS OR BYSTANDERS.
Where there is no distinction between the different versions of the above operating system, the general term "Windows " is used. Adobe Acrobat Adobe® Acrobat® All the descriptions in this manual assume the usage of Adobe Acrobat bundled with this product. However, Adobe Acrobat may be upgraded without notice. If the descriptions differ from the screens actually displayed, refer to the Acrobat’s “Help”.
■ Safety Precautions Turn the scanner OFF if it is damaged. If the scanner is damaged for any reason, turn off the scanner and unplug the AD cable before contacting the store you purchased the scanner. WARNING Do not damage the AC cable. Do not put liquids inside the scanner. A damaged AC cable may cause fire or electric shock. Do not place heavy objects on AC cables, or pull, bend, twist, heat, damage or modify AC cables.
CAUTION Do not install the scanner on unstable surfaces. Make sure that the scanner is installed on a flat, level surface and that none of its parts extend beyond the surface top, such as a desk or table. Do not install the scanner on unstable surfaces. Install the scanner on a level surface that is free of vibration to prevent it from falling. Install the scanner on a strong surface that will support the weight of the scanner and other devices. Do not block the ventilation ports.
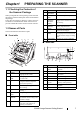
PREPARING THE SCANNER Chapter1 1.1 Checking the Contents of the Scanner Package When you unpack the scanner package, make sure that the package contains all the parts on the list included in the package. If any parts are missing or defective, contact your scanner dealer or an authorized FUJITSU scanner service provider. Handle the scanner and accessories with care. 1.2 Names of Parts This section describes the names of parts. No.
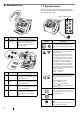
■ Removable Parts 1.3 Operator panel The operator panel is located on the right side of the scanner. The panel consists of a Function Number Display, buttons and a LED. Function number display 1 Function Hopper Height Function Function Hoppe r Heig ht Thin Power Hoppe r Heig ht Thickn ess Thick Thin Send Powe r Thickn ess to Scan Thick Send Paper Thickness to Scan Thin Thick Send to No.
HINT Operator Panel Overlays are available in French, German, Italian, Spanish, Chinese, Russian and Korean. To change the overlay, open the plastic cover. ■ Indications on the Function Number Display The following shows the indications on the Function Number Display. No. Descriptions Lights only one time upon turning on the scanner. Indicates that the scanner has been turned ON and is being initialized. Thin Sen nd tto Scan Indicates that initialization has been completed successfully.
Chapter2 INSTALLATION OF THE SCANNER 2.1 Installing the Scanner 1. Place the scanner at its installation site. For details on the scanner's dimensions and required installation space, refer to the fi-5900C Operator’s Guide, chapter "10. Scanner Specifications". ATTENTION 2.2 Connecting the Scanner to Your PC When running Windows 95 or Windows NT 4.0, connect the scanner using the SCSI interface.
3. Press the "I" side of the main power switch to turn on the scanner. OFF 3. Set the SCSI ID using the SCSI ID switch on the back of the scanner. ON The SCSI ID is initially set to "5" at the factory. If the SCSI ID of another SCSI device is set to the same ID, either change the scanner's SCSI ID or SCSI ID of the other SCSI device. ■ Connecting the SCSI interface When using the scanner with a SCSI interface, the following SCSI cable and SCSI card must be purchased.
3. When using the SCSI cable, set the SCSI ID using the SCSI ID switch on the back of the scanner. The following applications also come with fi-5900C. They will provide you more convenient and advanced usage. (Refer to step 3 in "Connecting the SCSI interface" on page 5.) • Error Recovery Guide The Error Recovery Guide is a software that displays troubleshooting information on screen if any scanner error occurs.
ASPI Manager V4.01 or later is required (the generally comes with SCSI board products). ■ Installing the FUJITSU TWAIN32 Scanner Driver Windows XP screenshots are used in this section. The windows and operations may vary slightly depending on your OS. HINT 1. Open the hopper. 5. Insert the Setup CD-ROM into the CD drive. ⇒ appears.
8. Image Processing Software Option installation windows appears. The Image Processing software is an optional software that provides advanced binarization image processing to the scanner dirver. ATTENTION Selecting [Yes] in the Image Processing Software Option installation window will automatically execute the installation. Clic the [OK] button on the confirmation message that appears when the installation is complete. After that the TWAIN driver installation is started. 9.
HINT For Windows 98, Windows Me, Windows 2000, Windows XP: [FUJITSU Fi-5900Cd] For Windows 95, Windows NT 4.0: [FUJITSU TWAIN 32] 5. Select [To View...] from the [Scan] menu. 6. Select scanning resolution, document size, etc. on the [TWAIN driver] window and click the [Scan] button. ATTENTION ■ For finishing the installation, it may be necessary to restart your computer. Follow the instructions in the Window. Confirming Installation 1. Load documents on the scanner.
For FUJITSU ISIS Scanner Driver ATTENTION ■ Preparation Confirm the following items before installing the application. • Take out the Setup CD-ROM from its package, but do not insert the Setup CD-ROM into the CD driver yet. • Connect the scanner correctly to your PC. HINT When using Windows NT 4.0, Windows 2000 or Windows XP, log on as a user with "Administrator" privileges. ⇒ If the scanner is automatically detected, [Found New Hardware Wizard] or [Add/ Remove Hardware Wizard] dialog box will appear.
7. The Error Recovery Guide Installation window appears. ATTENTION The Error Recovery Guide is a software that displays troubleshooting information on screen if any scanner error occurs. Although this software’s installation is highly recommended, it can be installed later if you do not install it in this step. ATTENTION When you select [Yes] for installing Error Recovery Guide, the [Choose Setup Language] window appears. Select a language and follow the instructions in the Window.
4. Enter required information, then click [Next >]. ATTENTION "QuickScan ProTM" included in the Setup CD-ROM is an trial version. For further use after expiration of the trial period (up to 30 launches), it is necessary to purchase a fully functional version of QuickScanTM Pro. (When you install the trial version, do not change the Serial Number already displayed.) 6. Select [Preview Scan] from the [Scan] menu. And then the document is scanned. 5.
2. Click [INSTALL PRODUCTS] and then click [Error Recovery Guide]. Adobe Acrobat is required for displaying the manuals stored in the CD-ROM. * Installation of Adobe Acrobat is not necessary if it has already been installed in your PC. HINT 1. Insert the Adobe Acrobat CD-ROM into the CD-ROM drive. ⇒ The CD-ROM is automatically detected and the "Adobe Acrobat" window appears. ATTENTION 3. Select a language used for the installation in the "Choose Setup Language" window and click [OK].
ATTENTION Support and User registration for Adobe products: Refer to the technical support information stored in the [Customer Support] folder on Adobe Acrobat CD-ROM. (Note that free person-to-person support is not available for this is bundled product.) ■ Uninstalling Supplied Programs 5. Follow the instructions to install the software. HINT Select "How to install" on the "Adobe Acrobat" window to learn more about Adobe Acrobat installation.
• When uninstalling Software Operation Panel, select "Software Operation Panel". ATTENTION When uninstalling Adobe Acrobat, refer to the installation procedure described in the Adobe Acrobat CD-ROM. 5. Click the [Change/Remove] or [Remove] button. 6. When the confirmation dialogbox appears, Click the [OK] or [Yes] button. ⇒ This executes the uninstallation. ATTENTION Screen displays may vary slightly according to the operation system (OS) you are using. Follow the on screen instructions of the OS.
Appendix 1 TROUBLESHOOTING ■ Troubleshooting checklist Symptom Scanner does not turn on. Check this item Remedy Have you pushed the power button on the front of the scanner? Push the power button. Have you pushed the main power switch at the back of the scanner? Push the Main power switch of the scanner. Then push the power button. Is the AC power cable properly connected to the scanner? Correctly connect the AC power able to the scanner adapter. Disconnect the AC power cable, then connect it again.
Symptom Paper is not fed (pick error occurs frequently, or document stops midway). The generated images are elongated. There is a shadow on the leading edge of the generated image. Check this item Remedy Do the documents satisfy the "Document Quality" and the "Multifeed Detection Conditions" in the chapter 5 of the fi-5900C Operator’s Guide? Use the documents that satisfy the "Document Quality" and the "Multifeed Detection Conditions" in chapter 5 of the fi-5900C Operator’s Guide.
■ Temporary error Indication ■ Device alarm (Permanent error) Meaning Indication Meaning U1 A paper feed error occurred. E0 Hopper or Stacker error U2 A multi feed error occurred. E2 Optical system error (front) U4 The ADF cover or the pre-imprinter cover is opened. E3 Optical system error (back) E4 The motor fuse has blown out. U6 The print cartridge is not set. U8 One of the following error occurred: 1. The document sensors are dirty. 2. The stacker is full. 3.
Appendix 2 DAILY CARE WARNING During its operation, the inside glass of the ADF becomes very hot. Before you clean inside the scanner, turn off its power and unplug the AC adapter from the outlet. Wait for at least 15 minutes. Do not turn off the scanner when you clean the Feed rollers or Eject rollers. ■ Locations and Cycle for Cleaning Part to clean Pad Standard Cleaning Cycle Clean these parts after every 10,000 scans.
Appendix 3 REPLACING CONSUMABLES WARNING During its operation, the inside glass of the ADF becomes very hot. Before replacing the consumables, turn its power off and unplug the AC adapter from the outlet. Wait at least 15 minutes. The following illustrations show the locations of the consumables. Refer to "Chapter 5 Replacing Consumables" fi-5900C Operator’s Guide on the Setup CD-ROM.
■ Pick roller ■ Separator roller Pick roller Separator roller ■ Brake roller Pad Cover Brake roller Cover fi-5900C Image Scanner Getting Started AP-6
fi-5900C Image Scanner Getting Started P3PC-1422-03EN Date of issuance: June, 2006 Issuance responsibility: PFU LIMITED Copying of the contents of this manual in whole or in part and copying of the scanner application is forbidden under the copyright law. z The contents of this manual are subject to change without notice.