P3PC-1442-01EN
Contents Introduction................................................................................................................................................. 1 1. Preparations............................................................................................................................................ 4 1.1 Names of Component Parts .................................................................................................................................................4 2.
Introduction Thank you for purchasing the fi-590PRF Imprinter option for fi-5900C Color Image Scanner. This guide explains how to install and use the imprinter. (For further details about the functions and operations of fi-5900C Image Scanner, refer to the “fi-5900C Image Scanner Operator’s Guide” included in fi-5900C Setup CD-ROM.) This guide also contains other important information, such as procedures for replacement of consumables.
Bescheinigung des Herstellers / Importeurs Für den fi-590PRF wid folgendes bescheinigt: • In Übereinsstimmung mit den Bestimmungen der EN45014(CE) funkentstört Symbols Used In This Manual This manual uses the following symbols in addition to warning indications This symbol alerts operators to particularly important information. Be sure to read this information first before proceeding. ATTENTION • Maschinenlärminformationsverordnung 3.
Safety Precautions FOLLOW THESE INSTRUCTIONS AND BE SURE TO HEED ALL WARNINGS AND CAUTIONS DESCRIBED BELOW. CAUTION The following describes important cautions. Make sure that the scanner is installed on a flat, level surface and that none of its parts extend beyond the surface top, such as a desk or table. WARNING Do not touch the power plug with wet hands, since doing so can cause electric shocks. Do not install the scanner on unstable surfaces.
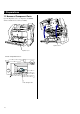
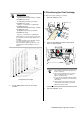
1. Preparations 1.1 Names of Component Parts Open the Imprinter cover to see Imprinter (fi-590PRF) which is installed in the scanner (fi-5900C).
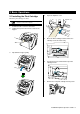
2. Basic Operations 2.1 Installing the Print Cartridge 4. Mount the print cartridge as follows: ATTENTION Imprinter cover When installing or replacing the print cartridge, be careful not to insert it out of place. 1. Confirm that the scanner is turned off. 2. Hold the blue part located on the center of the hopper. 3. Open the imprinter cover. 5. Move the Print cartridge holder to where the cartridge can be inserted easily. 6. Turn the blue lever toward left and open the cartridge holder. 7.
. Remove protection tape from the print cartridge. 2.2 Operating Test After installing the imprinter, test to see if printing can be performed on the Offline Print Test mode. 1. While pressing the [Hopper Height] button ( or ) on the operator panel, switch on the scanner. Continue pressing on the [Hopper Height] button. ATTENTION 9. Do not touch the metal part of the cartridge nor put the tape back again.
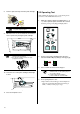
2.3 Positioning the Print Cartridge HINT Print test patterns Test pattern 1 (Horizontal): ABCDEFGHIJKLMNOPQRSTUVWXYZ[\]^_`00000000 To Position the print cartridge for printing: 1. Open the imprinter cover. Test pattern 2 (Horizontal): abcdefghijklmnopqrstuvwxyz{|}~ 00000000 Imprinter cover Test pattern 3 (Horizontal): !”#$%&'()*+,-.
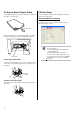
2.4 How to Use the Paper Guide 2.5 Print Setup Use the Paper Guide to prevent paper jams due to curling of the edges, as shown below. You can configure settings for the imprinter by using the scanner driver dialog box. FUJITSU TWAIN driver (Example) Click [Option] button. In [Option] dialog box, choose [Imprinter (Endorser)] tab and specify the Imprinter settings. Feed direction Set the print cartridge to the right side and place the Paper Guide in the left area as shown in the illustration below.
2.6 Replacing the Print Cartridge CAUTION 4. Turn the blue lever toward left and open the cartridge holder. 5. Take out the Print cartridge from the holder. 6. Take the new Print Cartridge out of its pouch and detach the protection tape from the Print Cartridge. Make sure that you turn off the scanner power and unplug the power cable from the outlet. If the cartridge replacement is done with power turned on, it may cause electric shock or imprinter failure.
8. Turn the lever on the print cartridge toward right to fix it. 9. Close the imprinter cover. 10. Reset the Ink Remain Counter. You must reset the Ink Remain Counter whenever you replace the print cartridge. c On the [Start] menu, select [Programs]-[Scanner Utility for Microsoft Windows]-[Software Operation Panel]. d Select the [Device Setting] tab. e Click the [Clear] button at the [Remaining Ink (Pre)] button. Ö The Ink remain counter will reset to 100%.
3. Daily Care 3.1 Cleaning the Print Cartridge 3.2 Cleaning the Imprinter Poor quality prints can occur due to blocked ink emission holes in the nozzle. Leaving the imprinter unused for long periods can also cause emission holes to become blocked. When the emission holes are blocked, clean the nozzle surface of the print cartridge.
ÖThe cover is slowly opened. 4. 5. Reinstall the print cartridge. 6. Hold the ADF cover with both hands and press it down slowly. Wipe the following parts using a cloth moistened with Cleaner F1 or isopropyl alcohol. HINT For details on cleaning the scanner, refer to “fi-5900C Operator’s Guide”. Glasses of Upper transport unit and Transport path Glass of the Upper transport unit Transport path Bottom of the print cartridge Imprinter head 12 | Press the ADF cover until it is fixed.
4. Error Messages The following numbers or letters on the Function Number Display indicates a malfunction in the imprinter. Description: The Imprinter cover or ADF cover is open. How to solve: Close the Imprinter cover or ADF cover firmly. Description: The print cartridge is not installed. How to solve: Open the Imprinter cover and confirm that the print cartridge is installed correctly. Description: A problem occurred to the Imprinter.
5. Specifications Item Printing Method Print Timing Printing Characters Maximum number of characters per line Print orientation Character size Character pitch Font style Character width Specification Thermal inkjet printing Pre printing (front side) Alphabet : A to Z, a to z Numeric Characters : 0, 1 to9 Symbols : ! ” $ # % & ’ ( ) * + , - .
Item Printing area Specification Reference Point Head movable range Feeding direction Pre-printing area (front side) Unit: mm * The document stains with ink when printing in the shaded areas (shown in the illustration). Therefore, correct printing operations in such areas are not guaranteed.