7701_01_E.book 1 ページ 2007年3月22日 木曜日 午後2時38分 English USER’S MANUAL FULL HD DISPLAY P37FT05AEB P65FT00AEB Before using the display, read this manual carefully so that you know how to use the display correctly. Refer to this manual whenever questions or problems about operation arise. Be sure to read and observe the safety precautions (see the separate "Safety Precautions" manual). Keep this manual where the user can see it easily. * Installation and removal require special expertise.
7701_01_E.book 2 ページ 2007年3月22日 木曜日 午後2時38分 CONTENTS INFORMATION ................................................................... 3 ACCESSORIES .................................................................. 4 TRADEMARK INFORMATION ................................................. 4 INSTALLATION .................................................................. 5 TOPPLING PREVENTION ....................................................... 6 ATTACHING THE FERRITE CORES.............................
7701_01_E.book 3 ページ 2007年3月22日 木曜日 午後2時38分 English INFORMATION • Receptacle Make sure that the power cord’s grounding wire is grounded. The display comes with a 3-prong power plug; one prong is connected to the grounding wire. If you have only a 2-hole receptacle, you will need to have it replaced. Contact your dealer for more information. • Have the display inspected and cleaned by your dealer at regular intervals.
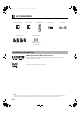
7701_01_E.book 4 ページ 2007年3月22日 木曜日 午後2時38分 ACCESSORIES □ Safety Precautions □ User’s Manuall □ Remote Control □ Large ferrite core □ Small ferrite core See P. E-6 for the installation procedure. See P. E-6 for the installation procedure. □ AA Battery (2) □ Power Cord (for 65” model) TRADEMARK INFORMATION HDMI (High-Definition Multimedia Interface) HDMI , the HDMI logo and High-Definition Multimedia Interface are trademarks or registered trademarks of HDMI licensing LLC.
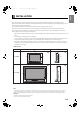
7701_01_E.book 5 ページ 2007年3月22日 木曜日 午後2時38分 English INSTALLATION To prevent the display’s internal components from overheating, make sure that the display is installed in a well-ventilated location. Be sure to use the Fujitsu General Limited’s optional stand, wall-mounting unit or the other mounting unit when installing the display. Also, be sure that your dealer performs the installation. See the appropriate instruction manual for additional information on the mounting hardware you select.
7701_01_E.book 6 ページ 2007年3月22日 木曜日 午後2時38分 INSTALLATION (Continued) TOPPLING PREVENTION • There is the danger of the display being toppled by an earthquake or other unexpected shock. To use the display confidently, take toppling prevention measures. Install reinforcing hooks (commercial product) at the four threaded holes at the back of the display and secure to a TV stand or pillar using strong wire (commercial product). ATTACHING THE FERRITE CORES • The ferrite cores are used to reduce noise.
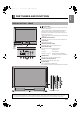
701_01_E.book 7 ページ 2007年3月22日 木曜日 午後2時38分 English PART NAMES AND FUNCTIONS DISPLAY SECTION – FRONT / I power button If this button is pressed when the power indicator lamp is off, the indicator lamp will light. The power can be turned on and the standby mode selected by using the remote control or the control panel of the display. If this button is pressed when the power indicator lamp is lit, the indicator lamp will go out.
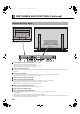
7701_01_E.book 8 ページ 2007年3月22日 木曜日 午後2時38分 PART NAMES AND FUNCTIONS (Continued) DISPLAY SECTION – BACK Back of the display (for 37” model) Back of the display (for 65” model) External speaker output terminal (EXT. SP) (for 65” model) Connect this terminal to the optionally available speaker. When connecting a cable, attach a ferrite core to the cable. (See P. E-6.) *See the speaker instruction manual for more information. Expansion terminal (EXP.
ページ 2007年3月22日 木曜日 午後2時38分 English 7701_01_E.book Digital audio output terminal (AUDIO OUTPUT DIGITAL) Connect this terminal to the digital audio input terminal of the audio amplifier. Digital audio signals are output in PCM format. Analog audio output terminal (AUDIO OUTPUT ANALOG) Connect this terminal to the analog audio input terminal of the audio amplifier.
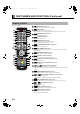
7701_01_E.book 10 ページ 2007年3月22日 木曜日 午後2時38分 PART NAMES AND FUNCTIONS (Continued) REMOTE CONTROL For details, see page Î. (Power button) Î E-18 Press to switch between Power ON and Off (Standby). y (LIGHT button) Press to light the buttons of the remote control. When no operation is performed, lighting of the buttons goes off after 8 seconds. R (FINE MODE button) Î E-23 Press to switch the Picture Mode. ! (WIDE button) Î E-23 Press to switch the screen size.
ページ 2007年3月22日 木曜日 午後2時38分 English 7701_01_E.book ( ) ~ (GUIDE button) Î E-20 Press to display the EPG (Electronic Program Guide) menu. K (MUTE button) Î E-18 Press to temporarily mute the audio. To return the audio to normal, press this button once again, or press the O or P . * c, d, a, or b (Adjustment buttons) Î E-20–E-22, E-26–E-43 Press to select the adjustment item or adjust the value in the Menu screen, and to use in the teletext broadcasting.
7701_01_E.book 12 ページ 2007年3月22日 木曜日 午後2時38分 USING THE REMOTE CONTROL PUTTING BATTERIES IN THE REMOTE CONTROL (1) To remove the cover, slide it outwards while pressing it down. (2) Place two AA batteries in the remote control. Make sure that the batteries are properly oriented. (3) Close the cover until it snaps into place. PRECAUTIONS • To prevent malfunction, do not apply any form of severe shock to the remote control.
ページ 2007年3月22日 木曜日 午後2時38分 English 7701_01_E.book EFFECTIVE RANGE FOR THE REMOTE CONTROL When using the remote control, be sure to point it directly at the display’s signal receiver. Make sure that there are no obstacles between the remote control and the display’s signal receiver.
7701_01_E.book 14 ページ 2007年3月22日 木曜日 午後2時38分 BASIC CONNECTION AND PREPARATION OF THE SYSTEM • Before this display can be operated for the first time, the connections and settings below must be completed. (for 65” model) To 3-pin receptacle VHF/UHF antenna Back of the display * For best reception (of terrestrial signal), an outdoor antenna (OTA) is recommended. CONNECTIONS TO THE DISPLAY 1. Connect the antenna line. 2. Connect the speakers.
ページ 2007年3月22日 木曜日 午後2時38分 English 7701_01_E.book TO WATCH PAY-TV (When there is a CI Module and Smart Card) * To watch pay-TV broadcasts, conclude a contract with the pay-TV carrier before connecting/installing this product. Consult your payTV carrier for more information. 1. Insert the Smart Card at CI Module. 2. Turn off the power and insert the CI Module. The CI Module and Smart Card are supplied when the contract is concluded with the pay-TV carrier.
7701_01_E.book 16 ページ 2007年3月22日 木曜日 午後2時38分 CONNECTING TO EXTERNAL EQUIPMENT • Before external equipment is connected, all the power cables must be unplugged. • For the terminal names, see P. E-8. • If the equipment to be connected is equipped with HDMI output terminal and component video output terminal, it is recommended to connect to one side or the other. (If the HDMI output is connected, an Audio signal cable does not need to be connected.
ページ 2007年3月22日 木曜日 午後2時38分 EXAMPLE OF CONNECTING EXTERNAL EQUIPMENT • Connect the Video signal cable to the HDMI input terminal, Component Video input terminal, or SCART terminal. • If the equipment to be connected is equipped with HDMI out put terminal and Component Video output terminal, it is recommended to connect to only one of the terminals. • If the HDMI input or SCART input is connected, an Audio signal cable does not need to be connected.
7701_01_E.book 18 ページ 2007年3月22日 木曜日 午後2時38分 BASIC OPERATIONS Power ON 1 2 VOL (Volume) Press /I to the ON state. Press O to increase the volume. The power lamp lights up. (See P. E-7.) Press P to reduce the volume. Press . The power is turned on, and the power lamp changes from “Red” to “Green.” Select the Video, RGB, or TV mode to enable ordinary operation. Power OFF (Standby State) 1 Press when the power is “ON”.
7701_01_E.book 19 ページ 2007年3月22日 木曜日 午後2時38分 TV/DTV VIDEO Press #. Select the TV mode to watch analog TV broadcasts (ATV) and digital terrestrial TV broadcasts (DTV). 1 2 English WATCHING TV, VIDEO, OR PICTURES ON PC You can select from VIDEO1 mode to VIDEO6 mode. Press ". The video modes corresponding to each input terminal are as follows. Each time this button is pressed, analog TV and digital terrestrial TV are switched to each other.
7701_01_E.book 20 ページ 2007年3月22日 木曜日 午後2時38分 WATCHING DIGITAL TERRESTRIAL TV TV/DTV FAV/LIST Displays the Favourite Channel List and the Channel List acquired by Auto Scan. Displays digital terrestrial TV broadcasts. 1 Press ". 2 Switch to the channel you want to watch. Select digital terrestrial TV broadcast (DTV). When “DTV” was displayed at the top right side of the screen, it is digital terrestrial TV broadcast. Press |.
ページ 2007年3月22日 木曜日 午後2時38分 English 7701_01_E.book Digital terrestrial TV teletext or subtitle can be watched. 1 Press Displayed the information for the channel currently being viewed. L. Displays the Carrier Name, Channel Name, Signal Quality, Signal Strength, Now (present program content), and Next (next program content) as in the figure below. When } is pressed again, the display goes off. Français 1 }.
7701_01_E.book 22 ページ 2007年3月22日 木曜日 午後2時38分 WATCHING ANALOG TV • Displays the teletext page program. TV/DTV The teletext page program is displayed when 3 digit number Selects and displays analog broadcast. 1 2 Press ". Selects analog TV (ATV). Analog broadcast is indicated by “A” at the beginning of the channel No. displayed when the broadcast was switched. Switch to the channel you want to watch. There are the following 2 switching methods: • Use 1 to 9 and 0 to select the channel.
7701_01_E.book 23 ページ 2007年3月22日 木曜日 午後2時38分 Listening mode NIGHT PICTURE MEMORY Press S. When the NIGHT mode is used when watching TV, even low volume sounds can be heard clearly. This function is convenient when watching TV at night. This button can be used to recall the settings of the picture memories 1 – 8. Each time this button is pressed, the setting changes as follows.
7701_01_E.book 24 ページ 2007年3月22日 木曜日 午後2時38分 OTHER BASIC OPERATIONS (Continued) Zoom1/Zoom SCREEN SIZE Normal Displaying normal size picture (i.e. a 4:3 aspect ratio). Horizontally extended picture Wide1 • Video mode (SD signal) Zoom1 Enlarges horizontally extended pictures equally in all directions to maintain the aspect ratio constant. Zoom2 Picture of normal size Wide1 Displays natural-looking pictures of normal size on the wide screen.
7701_01_E.book 25 ページ 2007年3月22日 木曜日 午後2時38分 English ADJUSTMENT MENU (E-32) POSITION/SIZE (E-33) FEATURES (E-34) Picture Memory (E-31) Default Treble Bass Balance Loudness Sound Mode Position (E-32) (E-32) (E-32) (E-32) (E-32) (E-33) Size (E-33) Default Adjustment (E-34) On Screen Menu (E-34) Input Terminal (E-35) Others (E-36) (E-28) (E-28) (E-28) (E-28) (E-28) Color Temp. User Color Temp.
7701_01_E.book 26 ページ 2007年3月22日 木曜日 午後2時38分 BASIC PROCEDURES OF ADJUSTMENT MENU • Shown below is the basic procedure used to change the options on the ADJUSTMENT MENU. (Ex.: Adjusting tint setting (Tint)) 4 Press a or b to select “Tint”. • Selecting the adjustment mode for adjustment or setting. (The items to be adjusted or set are stored for each adjustment mode.) 1 Press Y . “Tint” selected in the PICTURE menu screen 5 Press d or Z, and press c or d to change Tint values.
ページ 2007年3月22日 木曜日 午後2時38分 ADJUSTING TO A DESIRED PICTURE (PICTURE MENU) • Picture-related items can be set and adjusted in the Picture Adjustment Screen. See BASIC PROCEDURES OF ADJUSTMENT MENU on P. E-26 for the basic procedures. Signal Contrast Press d to increase the input signal contrast. Press c to reduce the input signal contrast. Press Z to store. Drive Contrast Tint Press d to change the tint to a more greenish color. Press c to change the tint to a more purplish color. Press Z to store.
7701_01_E.book 28 ページ 2007年3月22日 木曜日 午後2時38分 ADJUSTING TO A DESIRED PICTURE (PICTURE MENU) (Continued) Precision Setting Even more advanced picture quality adjustments can be made as required. Image Enhance This performs detailed image quality settings. • Image Identify (RGB) This function discerns between the natural image display section and the text display section, and performs correction to enable an optimized display for each. Each time c or d is pressed, the setting is switched.
ページ 2007年3月22日 木曜日 午後2時38分 English 7701_01_E.book [y (targeting yellow)] This enables correction with respect to specific color hues within the image. Corrects the Color and Tint for yellow. Independent correction of the hue of skin colors, blue skies, and so on, enables a more brilliant display. CCorrects the Color and Tint for green. Deutsch Color Tuning [g (targeting green)] [c (targeting cyan)] Corrects the Color and Tint for cyan.
7701_01_E.book 30 ページ 2007年3月22日 木曜日 午後2時38分 ADJUSTING TO A DESIRED PICTURE (PICTURE MENU) (Continued) • Jaggies Filter • High Point Level This function alleviates the phenomenon where jagged diagonal lines can be seen when interlace signals are input, thus enabling a smoother motion picture display. Sets the upper limit value of the ambient brightness detected by the ambient sensor. Each time c or d is pressed, the setting is switched. Press d to raise the upper limit value.
ページ 2007年3月22日 木曜日 午後2時38分 English 7701_01_E.book Improves color smearing, blurring, and dot noise when watching PAL signal TV and Video. Set to OFF when the image is unnatural. < On < Off < Picture Memory Eight groups of picture adjustment settings can be stored, enabling you to quickly switch to your desired group of settings for watching program. Deutsch PAL 3D Y/C [On]: Enable 3D Y/C separation Press Z to store.
7701_01_E.book 32 ページ 2007年3月22日 木曜日 午後2時38分 ADJUSTING TO DESIRED AUDIO (AUDIO MENU) • You can make changes to all audio adjustment options in the AUDIO Menu. See P. E-26 for the basic procedures. • The changes you make will be stored for the selected input mode. Therefore, you need to select a desired input mode before making any changes. Loudness Corrects the balance between bass and treble for easy listening even with weak volume.
ページ 2007年3月22日 木曜日 午後2時38分 ADJUSTING SCREEN POSITION AND SIZE (POSITION/SIZE MENU) • You can make changes to all screen adjustment options in the POSITION/SIZE Menu. • See P. E-26 for the basic procedures. Vertical position (Vertical) a: Moves the screen picture up. b: Moves the screen picture down. Press Z to store. POSITION/SIZE Menu screen • The changes you make will be stored for the selected input mode. Therefore, you need to select a desired input mode before making any changes.
7701_01_E.book 34 ページ 2007年3月22日 木曜日 午後2時38分 OTHER SETTINGS (FEATURES MENU) FEATURES setup screen has the following 4 options. See Page E-26 for the basic procedures. [Adjustment]: Can make a fine adjustment of pictures such as Dot Clock, Clamp Position. [On Screen Menu]: Can make a display setting such as OSD, Language. [Input Terminal]: Can make an input terminal setting such as Video Input. (See P. E-35.) [Others]: Used to make Screen Orbiter and other settings. (See P. E-36–E-37.
ページ 2007年3月22日 木曜日 午後2時38分 English 7701_01_E.book Press Z to store. Video input You can change the settings for indications for the VIDEO inputs. Select the desired indication in accordance with the connected equipment. Each time c or d is pressed, the setting is switched. (In the case of VIDEO1) < Video1 < DVD1 < DVD2 < VCR1 < VCR2 < GAME < Camcorder < STB < Satellite < Cable TV < Press Z to store. Input Terminal Deutsch D-SUB Input screen appears. (2) Select the signal system to receive.
7701_01_E.book 36 ページ 2007年3月22日 木曜日 午後2時38分 OTHER SETTINGS (FEATURES MENU) (Continued) Others Auto Off-NO SIG. (1) You can make to the standby state automatically when the no signal state continued during set up time. “Auto Off-NO SIG.” selection screen Press a or b to select the “Time”. Press c or d to select the amount of time before the standby state starts. < Off < 1 min. < 15 min. < 45 min. < 60 min.
ページ 2007年3月22日 木曜日 午後2時38分 English 7701_01_E.book < Auto < VGA < WVGA < 480P < XGA < WXGA < SXGA < SXGA+ < [Auto]: The optimum display is obtained automatically for input signals. [Others]: The optimum resolution setting is fixed for each signal. Press Z to store. * In Auto mode, the resolution of VGA, WVGA, 480P, XGA, WXGA, SXGA and SXGA+ may not be automatically distinguished. Switch to the fixed display when the image is not displayed properly.
7701_01_E.book 38 ページ 2007年3月22日 木曜日 午後2時38分 INITIALIZATION OF USER ADJUSTMENT VALUE You can restore the values of the adjustment/setting made in the MENU to factory settings. 1 Press Y . 4 Press Z. • Displays the message of whether to proceed with the initialization. The main menu screen will appear. Displays the message of whether to proceed the initialization 2 Press a or b to select “Display Menu” and press d or Z. 5 6 Press a or b to select the “Yes”. Press Z.
7701_01_E.book 39 ページ 2007年3月22日 木曜日 午後2時38分 • The setting shown below is the setting for analog TV broadcasts. First, press " and select the analog TV mode. (See P. E-22.) • System Each time c or d is pressed, the TV SYSTEM is switched. < West Euro (standard BG reception) < East Euro (standard DK reception) < UK (standard I reception) < France (standard LL’ reception) < Press Y . 1 The “TV Menu” will appear.
7701_01_E.book 40 ページ 2007年3月22日 木曜日 午後2時38分 DIGITAL TV MODE SETTING (TV MENU) The setting shown below is the setting for terrestrial DTV broadcasts. First, press " and select the terrestrial TV mode. (See P. E-20.) 1 2 3 LANGUAGE SETUP Press Y . The “TV Menu” will appear. Press a or b to select “TV Menu” and press d or Z. Press a or b to select the items for setting. It is switched as shown as below.
ページ 2007年3月22日 木曜日 午後2時38分 English 7701_01_E.book * The Sort menu may not be displayed depending on the broadcast station. TV / Radio Switch the TV and Radio list display. 5 When (TV/Radio) is pressed, TV channel list and Deutsch CHANNEL MANAGER Español Radio channel list are switched. Français SYSTEM INSTALLATION “CHANNEL MANAGER” selection screen Fav, Lock, Delete 3: Delete Clears the channels acquired by Auto Scan so they cannot be watched.
7701_01_E.book 42 ページ 2007年3月22日 木曜日 午後2時38分 DIGITAL TV MODE SETTING (TV MENU) (Continued) SYSTEM CONFIGURATION Time Setup • Time Mode • Password change The password can be changed by entering the passwords in Old Password, New Password, Confirm Password order. Make a note so as not to forget the modified password. It is switched each time c or d is pressed. Auto < Manual Normally use at Auto. • UTC Offset UTC Offset becomes effective when “Manual” was selected by Time Mode.
ページ 2007年3月22日 木曜日 午後2時38分 English 7701_01_E.book • Add/Edit operation procedure “EDIT/EVENT TIMER” Add screen • Channel (Channel Name): After pressing c or d , select the channel using a or b and set by • Date (Start Day): pressing Z. Set using the numeric keypad. Digital terrestrial TV images and sounds can be output to an external connected device at the set time. • Start (Start Time): Set using the numeric keypad.
7701_01_E.book 44 ページ 2007年3月22日 木曜日 午後2時38分 OPTIONS Desktop Stand unit P-TT6500 (for 65” model) Swivel P-TT3700 (for 37” model) Speaker (1 set of 2 speakers) P-SP2000 (for attaching to the display, for 65” model) * The speakers can be also used mounting on the optional “Desktop Stand unit (P-TT6500 type)”. * When installing an option, make sure that all installation requirements for that option (as given in the relevant instruction manual) are met.
7701_01_E.book 45 ページ 2007年3月22日 木曜日 午後2時38分 English MAIN SUPPORTED SIGNALS Input the signal you want to store and adjust to a desired screen according to “ADJUSTING SCREEN POSITION AND SIZE”. When the adjustment has been made, it is automatically stored. Thus, when the display receives the same signal later, pictures will be displayed in accordance with the adjustment value most recently stored. Main corresponding signals (RGB mode) 640 x 480 37.50 75.00 VGA 75 Hz 640 x 480 43.27 85.
7701_01_E.book 46 ページ 2007年3月22日 木曜日 午後2時38分 CLEANING Precautions Be sure to remove the power plug from the receptacle before cleaning the display. Be sure not to clean the display using a cloth dampened with volatile solvents, such as benzene or thinner. Such solvents can harm the display’s cabinet, the filter at the screen front, and the remote control. They can also cause paint to come off these sections. Cleaning the Screen Clean the screen gently with a soft cloth. The screen surface is fragile.
7701_01_E.book 47 ページ 2007年3月22日 木曜日 午後2時38分 English MAINTENANCE • Degraded colors/tints • Improper screen position/size • No audio • If “Out of range” appears, the display is receiving a signal whose picture or signal cannot be reproduced by the display. • The screen turns to black and white. • If “Error message Condition 1” appears, the fan is defective. • If “Error message Condition 2” appears, the display’s internal components are extremely hot.
7701_01_E.book 48 ページ 2007年3月22日 木曜日 午後2時38分 SPECIFICATIONS WIDE DISPLAY Model Type Screen size Aspect ratio Number of pixels Weight Outer dimensions Power supply Current rating External equipment terminals P37FT05AEB Liquid crystal display panel 37” wide screen: 81.9 cm (W) x 46.1 cm (H) (94.0 cm diagonal) 32.3 inch (W) x 18.2 inch (H) (37 inch diagonal) 16:9 (wide) 1920 (H) x 1080 (V) 36 kg / 79.4 lbs 91.4 (W) x 66.5 (H) x 23.0 (D) cm 36.0 (W) x 26.2 (H) x 9.