
User Manual
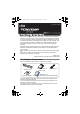
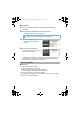


Table Of Contents
- Checking the Components
- Read the Safety Precautions
- Symbols Used in This Manual
- Referring to the Operator's Guide
- Installing the Software
- Connecting the ScanSnap
- Scan Test
- Contact for Inquiries
- Warning Indications Used in This Document
- For Safe Use
- Precautions
- Disclaimer of Liability
- Regulatory Information
- Maintenance

7
Scan Test
For details on documents that can be scanned with the ScanSnap and how to load
documents, refer to "ScanSnap Overview" in the Operator's Guide.
1. Insert a document straight into the
feeding section of the ScanSnap,
with the scanning side facing up.
D The document is pulled in until it is set
inside the ScanSnap.
2. Press the [Scan/Stop] button to
start scanning.
If scanning does not start, refer to
"Troubleshooting" in the ScanSnap
Manager Help.
3. Press the [Scan/Stop] button to finish scanning.
D The Quick Menu appears.
4. In the Quick Menu, click the icon of the application to link with
ScanSnap Manager.
D The selected application is started.
Confirm that ScanSnap Manager is linked with the application that was selected
from the Quick Menu.
In Windows
®
7, the ScanSnap Manager
icon is displayed in the menu which
appears when you click on the
taskbar.
To have the ScanSnap Manager icon
always displayed on the taskbar, drag
the icon and drop it onto the taskbar.
S1100_GS-SP.book Page 7 Thursday, September 16, 2010 11:45 AM