
User's Manual


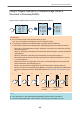
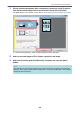
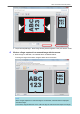

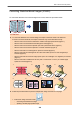
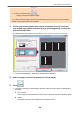
Table Of Contents
- Contents
- About This Manual
- Setting Up the ScanSnap
- ScanSnap Overview
- What You Can Do with the ScanSnap
- Parts and Functions
- Charging the Battery (iX100)
- Overview of the Software Related to the ScanSnap
- ScanSnap Manager Icon
- Right-Click Menu
- ScanSnap Setup Window
- Turning the ScanSnap On or Off
- Screens and Operations on the Touch Panel (iX1500)
- Attaching the Receipt Guide (iX1500)
- Connecting the ScanSnap via Wireless LAN (iX1500)
- Preparations for Connecting the ScanSnap via Wireless LAN (iX1500)
- Connecting the ScanSnap to a Wireless LAN (iX1500)
- Connecting the ScanSnap to a computer or mobile device via Wireless LAN (iX1500)
- Connecting the ScanSnap to a Computer in Access Point Connect Mode (iX1500)
- Connecting the ScanSnap to a Mobile Device in Access Point Connect Mode (iX1500)
- Connecting the ScanSnap to a Computer Directly in Direct Connect Mode (iX1500)
- Connecting the ScanSnap to a Mobile Device in Direct Connect Mode (iX1500)
- Connecting the ScanSnap via Wireless LAN (iX500/iX100)
- Preparations for Connecting the ScanSnap via Wireless LAN (iX500/iX100)
- Connecting the ScanSnap to a Wireless LAN (iX500/iX100)
- Connecting the ScanSnap to a Computer or Mobile Device via Wireless LAN (iX500)
- Connecting the ScanSnap to a computer or mobile device via Wireless LAN (iX100)
- Connecting the ScanSnap to a Computer in Access Point Connect Mode (iX100)
- Connecting the ScanSnap to a Mobile Device in Access Point Connect Mode (iX100)
- Connecting the ScanSnap to a Computer Directly in Direct Connect Mode (iX100)
- Connecting the ScanSnap to a Mobile Device in Direct Connect Mode (iX100)
- Reconnecting to a Wireless Access Point Using the ScanSnap WPS Button (iX500/iX100)
- Wireless Settings for the ScanSnap (iX1500)
- Registering a Certificate/ Checking the Wireless LAN Settings (iX1500)
- Changing the Wireless LAN Connection Method (iX1500)
- Reconnecting the ScanSnap to Another Wireless Access Point (iX1500)
- Changing the Connection Method from Access Point Connection to Direct Connection (iX1500)
- Changing the Connection Method from Direct Connection to Access Point Connection (iX1500)
- Changing the Frequency for Connecting the ScanSnap (iX1500)
- Turning Off the Wireless LAN Connection (iX1500)
- Resetting the Wireless LAN Settings (iX1500)
- Access Point Connect Settings (iX1500)
- Authenticating a Wireless Access Point with a Client Certificate (iX1500)
- Authenticating a Wireless Access Point with a User ID and Password (iX1500)
- Authenticating a Wireless Access Point with an External ID (iX1500)
- Setting an IP Address for the ScanSnap (iX1500)
- Using a DNS Server for the Internet Connection (iX1500)
- Using a Proxy Server for the Internet Connection (iX1500)
- Scanning Documents
- Scanning Documents with iX1500
- Documents to Scan (iX1500)
- Scanning Documents (iX1500)
- Scanning Long Pages (iX1500)
- Scanning Documents of Different Widths or Lengths in One Batch (iX1500)
- Scanning Small Size Documents such as Receipts in One Go (iX1500)
- Scanning Documents Larger Than A4 or Letter Size (iX1500)
- Scanning Documents Such as Photographs and Clippings (iX1500)
- Scanning Documents with iX500
- Scanning Documents with iX100
- Documents to Scan (iX100)
- Scanning Documents (iX100)
- Scanning Documents by Inserting Two Documents at a Time or by Inserting the Next Document While the Current Document Is Being Scanned (iX100)
- Scanning Documents Larger Than A4 or Letter Size by Directly Inserting Them in the ScanSnap (iX100)
- Scanning Documents Larger than A4 or Letter Size with the Carrier Sheet (iX100)
- Scanning Documents Such as Photographs and Clippings (iX100)
- Scanning Documents with SV600
- Documents to Scan (SV600)
- How to Place Documents (SV600)
- Scanning Documents (SV600)
- Scanning Books (SV600)
- Scanning Multiple Documents at Once (SV600)
- Scanning Books Using Page Turning Detection (SV600)
- Scanning Documents Using Timed Mode (SV600)
- Scanning Documents with Two ScanSnaps Connected to a Computer (SV600)
- Scanning Documents with S1300i
- Scanning Documents with S1100i
- Documents to Scan (S1100i)
- Scanning Documents (S1100i)
- Scanning Documents by Inserting Two Documents at a Time or by Inserting the Next Document While the Current Document Is Being Scanned (S1100i)
- Scanning Documents Larger Than A4 or Letter Size by Directly Inserting It in the ScanSnap (S1100i)
- Scanning Documents Larger than A4 or Letter Size with the Carrier Sheet (S1100i)
- Scanning Documents Such as Photographs and Clippings (S1100i)
- Scanning Documents with iX1500
- What You Can Do with Related Software
- Useful Usages
- Managing Paper Documents by Folder on a Computer with ScanSnap Home
- Managing Paper Documents by Folder on a Computer with ScanSnap Organizer
- Saving Business Card Data to a Computer with ScanSnap Home
- Saving Business Cards to a Computer with CardMinder
- Saving Receipt Data to a Computer
- Creating a Photo Album and Saving it to a Computer
- Correcting Scanned Images (SV600)
- Uninstalling Software/Troubleshooting during Uninstallation
- Cleaning the ScanSnap
- Consumables for the ScanSnap (iX1500/iX500/S1300i)
- Appendix
- About Customer Support and Maintenance

Correcting Distorted Book Images (SV600)
To correct the distortion of a scanned image from a book, follow the procedure below.
ATTENTION
l To correct the distortion of a scanned image, the shape of the book needs to be detected.
If a book is scanned as follows, the shape of the book may not be detected correctly.
- When a book to be scanned is held down outside of the appropriate areas (Figure 1)
- When a book is scanned without the Background Pad (Figure 2)
- When a book to be scanned is spread open and is placed face-down (Figure 3)
- When a book to be scanned is placed in a vertical orientation (Figure 4)
- When a book that is not rectangular or square is scanned (Figure 5)
- When a book that has a background color other than white (such as a comic magazine) is
scanned (Figure 6)
- When a book that has a narrow margin space (such as a catalogue or a magazine) is scanned
(Figure 7)
- When a book that is smaller than A5 size (148 × 210 mm/5.83 × 8.27 in.) in a double-page
spread is scanned (Figure 8)
1
5 6 7 8
2 3 4
l Follow the procedure below to perform multiple book image correction for one page.
1. Edit in book image correction mode ( ).
- Correcting a distorted book image
- Splitting a double-page spread image
When a Book Is Scanned (SV600)
379