
User's Manual

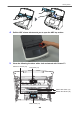
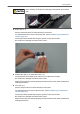
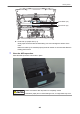

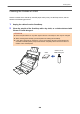
Table Of Contents
- Contents
- About This Manual
- Setting Up the ScanSnap
- ScanSnap Overview
- What You Can Do with the ScanSnap
- Parts and Functions
- Charging the Battery (iX100)
- Overview of the Software Related to the ScanSnap
- ScanSnap Manager Icon
- Right-Click Menu
- ScanSnap Setup Window
- Turning the ScanSnap On or Off
- Screens and Operations on the Touch Panel (iX1500)
- Attaching the Receipt Guide (iX1500)
- Connecting the ScanSnap via Wireless LAN (iX1500)
- Preparations for Connecting the ScanSnap via Wireless LAN (iX1500)
- Connecting the ScanSnap to a Wireless LAN (iX1500)
- Connecting the ScanSnap to a computer or mobile device via Wireless LAN (iX1500)
- Connecting the ScanSnap to a Computer in Access Point Connect Mode (iX1500)
- Connecting the ScanSnap to a Mobile Device in Access Point Connect Mode (iX1500)
- Connecting the ScanSnap to a Computer Directly in Direct Connect Mode (iX1500)
- Connecting the ScanSnap to a Mobile Device in Direct Connect Mode (iX1500)
- Connecting the ScanSnap via Wireless LAN (iX500/iX100)
- Preparations for Connecting the ScanSnap via Wireless LAN (iX500/iX100)
- Connecting the ScanSnap to a Wireless LAN (iX500/iX100)
- Connecting the ScanSnap to a Computer or Mobile Device via Wireless LAN (iX500)
- Connecting the ScanSnap to a computer or mobile device via Wireless LAN (iX100)
- Connecting the ScanSnap to a Computer in Access Point Connect Mode (iX100)
- Connecting the ScanSnap to a Mobile Device in Access Point Connect Mode (iX100)
- Connecting the ScanSnap to a Computer Directly in Direct Connect Mode (iX100)
- Connecting the ScanSnap to a Mobile Device in Direct Connect Mode (iX100)
- Reconnecting to a Wireless Access Point Using the ScanSnap WPS Button (iX500/iX100)
- Wireless Settings for the ScanSnap (iX1500)
- Registering a Certificate/ Checking the Wireless LAN Settings (iX1500)
- Changing the Wireless LAN Connection Method (iX1500)
- Reconnecting the ScanSnap to Another Wireless Access Point (iX1500)
- Changing the Connection Method from Access Point Connection to Direct Connection (iX1500)
- Changing the Connection Method from Direct Connection to Access Point Connection (iX1500)
- Changing the Frequency for Connecting the ScanSnap (iX1500)
- Turning Off the Wireless LAN Connection (iX1500)
- Resetting the Wireless LAN Settings (iX1500)
- Access Point Connect Settings (iX1500)
- Authenticating a Wireless Access Point with a Client Certificate (iX1500)
- Authenticating a Wireless Access Point with a User ID and Password (iX1500)
- Authenticating a Wireless Access Point with an External ID (iX1500)
- Setting an IP Address for the ScanSnap (iX1500)
- Using a DNS Server for the Internet Connection (iX1500)
- Using a Proxy Server for the Internet Connection (iX1500)
- Scanning Documents
- Scanning Documents with iX1500
- Documents to Scan (iX1500)
- Scanning Documents (iX1500)
- Scanning Long Pages (iX1500)
- Scanning Documents of Different Widths or Lengths in One Batch (iX1500)
- Scanning Small Size Documents such as Receipts in One Go (iX1500)
- Scanning Documents Larger Than A4 or Letter Size (iX1500)
- Scanning Documents Such as Photographs and Clippings (iX1500)
- Scanning Documents with iX500
- Scanning Documents with iX100
- Documents to Scan (iX100)
- Scanning Documents (iX100)
- Scanning Documents by Inserting Two Documents at a Time or by Inserting the Next Document While the Current Document Is Being Scanned (iX100)
- Scanning Documents Larger Than A4 or Letter Size by Directly Inserting Them in the ScanSnap (iX100)
- Scanning Documents Larger than A4 or Letter Size with the Carrier Sheet (iX100)
- Scanning Documents Such as Photographs and Clippings (iX100)
- Scanning Documents with SV600
- Documents to Scan (SV600)
- How to Place Documents (SV600)
- Scanning Documents (SV600)
- Scanning Books (SV600)
- Scanning Multiple Documents at Once (SV600)
- Scanning Books Using Page Turning Detection (SV600)
- Scanning Documents Using Timed Mode (SV600)
- Scanning Documents with Two ScanSnaps Connected to a Computer (SV600)
- Scanning Documents with S1300i
- Scanning Documents with S1100i
- Documents to Scan (S1100i)
- Scanning Documents (S1100i)
- Scanning Documents by Inserting Two Documents at a Time or by Inserting the Next Document While the Current Document Is Being Scanned (S1100i)
- Scanning Documents Larger Than A4 or Letter Size by Directly Inserting It in the ScanSnap (S1100i)
- Scanning Documents Larger than A4 or Letter Size with the Carrier Sheet (S1100i)
- Scanning Documents Such as Photographs and Clippings (S1100i)
- Scanning Documents with iX1500
- What You Can Do with Related Software
- Useful Usages
- Managing Paper Documents by Folder on a Computer with ScanSnap Home
- Managing Paper Documents by Folder on a Computer with ScanSnap Organizer
- Saving Business Card Data to a Computer with ScanSnap Home
- Saving Business Cards to a Computer with CardMinder
- Saving Receipt Data to a Computer
- Creating a Photo Album and Saving it to a Computer
- Correcting Scanned Images (SV600)
- Uninstalling Software/Troubleshooting during Uninstallation
- Cleaning the ScanSnap
- Consumables for the ScanSnap (iX1500/iX500/S1300i)
- Appendix
- About Customer Support and Maintenance

Cleaning the Inside of iX500
Scanning repeatedly may cause dust and paper dust to accumulate inside the ScanSnap resulting in
a scanning error.
As a guideline, the inside of the ScanSnap should be cleaned every 1,000 sheets scanned. Note
that this guideline varies depending on the types of documents you scan. For instance, it may be
necessary to clean the scanner more frequently when you scan documents on which the toner is not
sufficiently fused.
l Before cleaning the ScanSnap, you must turn off the ScanSnap and unplug
the power cable from the AC outlet. Not doing so may cause fire or electrical
shock.
l Do not place internal parts such as the brake roller and the pick roller within
reach of small children. Doing so may cause injury.
l The glass inside becomes very hot while the ScanSnap is being used.
Before you clean the inside of the ScanSnap, you must unplug the power
cable from the AC outlet and leave the ScanSnap for 15 minutes or more.
Do not use aerosol spray or spray that contains alcohol to clean the scanner.
Paper dust and other dust blown up by strong air from the spray may enter the
inside of the scanner which may cause scanner failure or malfunction.
Also note that sparks generated by static electricity may cause a fire.
ATTENTION
l Do not use water or mild detergent to clean the inside of the ScanSnap.
l It may take a long time for Cleaner F1 to dry if an excessive amount is used. Moisten the cloth with
moderate quantity.
Wipe off the cleaner completely to leave no residue on the cleaned parts.
HINT
To check the number of sheets scanned with the ScanSnap, see [Total Page Count] in the [ScanSnap
Manager - Check consumable status] window.
To open the [ScanSnap Manager - Check consumable status] window, right-click the ScanSnap
Manager icon
in the notification area located at the far right of the taskbar, and select [Check
consumable status] from the "Right-Click Menu" (page 86).
1. Clean the following items:
l Brake roller
l Idler roller
l Glass
l Pick roller
l Ultrasonic sensor
Cleaning iX500
430