Contents Introduction .........................................................1 Conventions ........................................................6 Safety Precautions ..............................................8 Chapter 1 Preparation .......................................12 1.1 Checking the Contents of the Package .......... 12 1.2 Names and Functions of Parts ....................... 13 Chapter 2 Connecting the ScanSnap ...............15 2.1 Installing the Supplied Software .....................
Introduction Thank you for purchasing our Color Image Scanner, ScanSnap S300M (hereinafter referred to as "the ScanSnap"). The ScanSnap S300M is a color image scanner capable of double-sided scanning in both monochrome and color. It is complete Office Solution, which helps you improve productivity and solve scanning problems in your office.
•You can send off the scanner image by e-mail or output the scanned image to the printer immediately after scanning! Without starting applications, you can attach the scanned image to e-mail or make copies of the scanned image by outputting it to the printer. (*The ScanSnap S300M Scanner does NOT comply with TWAIN or ISIS standards.) Manufacturer PFU LIMITED International Sales Dept.
ScanSnap and the Manuals The ScanSnap S300M consists of: Component Specification S300M Color image scanner ScanSnap Manager ScanSnap's driver to scan and save documents Cardiris Software for recognizing business cards (OCR) Following manuals are prepared for you: Manual Description ScanSnap S300M Getting Started (This manual) Provides basic information to install and use the ScanSnap.
Regulatory Information FCC declaration This equipment has been tested and found to comply with the limits for a Class B digital device, pursuant to Part 15 of the FCC Rules. These limits are designed to provide reasonable protection against harmful interference in a residential installation. This equipment generates, uses, and can radiate radio frequency energy and, if not installed and used in accordance with the instruction manual, may cause harmful interference to radio communications.
Bescheinigung des Herstellers / Importeurs Für den S300M wid folgendes bescheinigt: • • In Übereinsstimmung mit den Bestimmungen der EN45014(CE) funkentstört Maschinenlärminformationsverordnung 3. GPSGV: Der höchste Schalldruckpegel beträgt 70 dB (A) oder weniger, gemäß EN ISO 7779. Dieses Gerät wurde nicht für die Benutzung in unmittelbarer Umgebung starker Lichtquellen (z. B. Projektoren) konzipiert.
Conventions Warning Indications Used in This Manual WARNING This sign warns the operator that improper use, indicated with this sign, may cause death or severe injury of the operator or people in the vicinity, if not followed. CAUTION This sign warns the operator that improper use, indicated with this sign, may cause minor injury of the operator, or damage to equipment or property, if not followed.
Screen Examples in This Manual The screen examples in this manual are subject to change without notice in the interest of product improvement. If actual screens differ from those used as examples in this manual, operate by following the actual ones referring to the User's Manual of the ScanSnap. The screenshots used in this manual are for the ScanSnap Manager and the Cardiris applications. About Maintenance Repairs should be done by properly trained repair technicians.
Safety Precautions FOLLOW THESE INSTRUCTIONS AND BE SURE TO HEED ALL WARNINGS AND CAUTIONS DESCRIBED BELOW. WARNING The following describes important warnings. Do not touch the power plug, or connect/disconnect the power or USB bus power cable with wet hands. Doing so might cause electric shock. A damaged power or USB bus power cable may cause fire or electric shock. Do not place heavy objects on the power or USB bus power cable, or pull, bend, twist, heat, damage or modify it.
If you detect heat coming from the device or detect other problems such as smoke, strange smells or noises, immediately turn off the scanner, and disconnect its power plug from the power outlet, or unplug the USB bus power cable from the computer. Make sure that the smoking has stopped, and then contact the store where you bought the scanner or an authorized FUJITSU scanner service provider.
Do not leave the scanner in the direct sunlight, at high temperature such as in a car in the scorching sun, or near heating apparatus. Doing so might cause excessive heat to build up inside the scanner, causing heating, deforming, or melting of the scanner parts (e.g., cover), and raising the temperature inside the scanner, which could result in fire or scanner trouble. Install the scanner in a well-ventilated location.
When handling the paper, be careful not to cut your fingers by the paper.
Chapter 1 Preparation This chapter describes necessary preparations before using the ScanSnap. ATTENTION Do not connect the ScanSnap to your computer before installing "ScanSnap Manager." If the ScanSnap is connected before installing ScanSnap Manager, it will not operate correctly. For the installation of ScanSnap Manager, refer to page 15. 1.
1.2 Names and Functions of Parts When you unpack the ScanSnap package, make sure that all parts are included. Refer to the package contents list included in the ScanSnap package box. CAUTION To avoid danger of suffocation, keep the packaging materials away from small children’s reach and prevent them from putting the materials in their mouths or putting them on their heads. ■ Front View Paper chute Open this cover when using the ScanSnap. ⇒ Opening the cover turns ON the ScanSnap.
■ Rear View USB connector Connect a USB cable here. Power connector Adhesive label Reminds you that the supplied software has to be installed first. After installing ScanSnap Manager onto your computer, remove this label to connect the ScanSnap to your computer. Connect either the Power cable or USB bus power cable. Security cable slot You can plug a commercially available security cable into this slot (anti-theft). For the Document Specification, refer to "3.
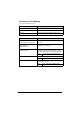
Chapter 2 Connecting the ScanSnap This chapter describes how to connect the ScanSnap to your computer. 2.1 Installing the Supplied Software Before connecting the ScanSnap to your computer, install the following software on your computer. Software Mac OS X v10.1 Mac OS X v10.2 (*1) Mac OS X v10.3 Mac OS X v10.4 Mac OS X v10.5 ScanSnap Manager (Driver) – 3 3 3 3 Cardiris – – 3(*2) 3 3 (3: Supported, –: Not supported) *1) When the operating system you are using is Mac OS X v10.2.8.
4. Scroll down and read License Agreement to the end. Then click the [Continue] button, and install Cardiris, by following instruction on the screen. By default, Cardiris is installed on the Applications Folder. 5. After installation, Mac OS X restarts, and the Cardiris icon appears on the Dock menu. 6. Check that Cardiris can be started by clicking the Cardiris icon. After confirming the application startup, exit Cardris. ATTENTION This operation is required for ScanSnap interaction with Cardiris.
4. After the installation is complete, eject the CD-ROM from the CD-ROM drive. ⇒ The ScanSnap Manager icon HINT appears on the Dock menu. The status of the ScanSnap Manager icon will change from to after connecting the ScanSnap to your computer. The displayed icon in the Dock menu varies depending on the cable connection you made. • Power cable connection: • USB bus power cable connection: This guide uses examples for power cable connection.
2.2 Connecting the ScanSnap When the installation of the above programs is complete, connect the ScanSnap to your computer. ATTENTION Install ScanSnap Manager, and then restart your computer, before connecting the ScanSnap to your computer.
ATTENTION • When using the USB bus power cable, your computer must have two USB ports; one for power feeding, the other for USB cable connection. • When connecting with the USB bus power cable via a USB hub, use a powered hub equipped with an AC adapter. • When the ScanSnap is connected with the USB bus power cable, the scanning speed becomes slow. Double-sided color documents of A4 or letter in size can be scanned at a speed of: Power-cable-connected: Approx.
ATTENTION • Be sure to use the supplied AC adapter and AC cable. • Be sure to use the supplied USB cable. The operation with any commercially available USB cable is not guaranteed. • If only the USB cable is used, the ScanSnap does not operate. Be sure to use two types of cables, Power and USB cables, to connect the ScanSnap to your computer. • When connecting to a USB hub, be sure to use the first stage USB hub that is closest to the computer.
• Be sure to use the supplied USB bus power cable. • Be sure to use the supplied USB cable. The operation with any commercially available USB cable is not guaranteed. • If only the USB cable is used, the ScanSnap does not operate. Be sure to use two types of cables, the USB bus power and USB, to connect the ScanSnap to your computer. Or, use a powered hub equipped with an AC adapter, and connect both cables to the same hub.
3. The connection of the ScanSnap is complete. HINT The ScanSnap Manager icon in the Dock menu is displayed as . The displayed icon in the Dock menu varies depending on the cable connection you made. • Power cable connection: • USB bus power cable connection: This guide uses examples for power cable connection.
Chapter 3 How to Use the ScanSnap This chapter describes basic operation of the ScanSnap. 3.1 Scanning Documents With the ScanSnap, you can turn paper office documents on your desk into digital files, save them, attach them to e-mail, and print them just by pressing a single button. The scanned image can be viewed on the screen using the application (Preview). Two typical usages are: • Create digital backups of general office documents in PDF format.
2. Change the scanning settings on the "ScanSnap Manager - Scan and Save Settings" window. You can update your last-saved settings for scanning when [Settings] is selected. There are six tabs used to configure the scan options at maximum (The number of tabs displayed and items that can be configured vary depending on the operation mode.) 3. Click the [Apply] button to finish the configuration. ⇒ The new settings are enabled. 3.
3. Press the [SCAN] button. ⇒ Scanning is started. ⇒ The ScanSnap Quick Menu appears after scanning. 4. HINT Select a desirable action in the ScanSnap Quick Menu for the image of the scanned document. The scanning method above is for the case where the "Quick Menu Mode" is applied. If you switch to the "Profile Mode," you will be able to perform the scanning operation with the specified application without the ScanSnap Quick Menu displayed.
3.4 Scanning Business Cards using Cardiris 1. Select "Cardiris" in the "Select a Profile" window which pops up when clicking the ScanSnap Manager icon ATTENTION 2. . In Quick Menu Mode, ScanSnap cannot interact with Cardiris. Load the document onto the ScanSnap and press the [SCAN] button. - Load the business cards face down. - When scanning more than one business card, set them together. - Adjust the side guides so that they are touching the edges of the business card.
3. Check the image data of the scanned business cards in the Cardiris window. [Card Style] button [Format] button [Send] button Card image Card toolbar Recongition result The images of each business card are displayed on the right. A list of already scanned business cards is displayed on the left. Under the image, the recognized characters are displayed. HINT 4.
6. On the "Format:" pop-up menu, select "Address Book." 7. Click the [OK] button. 8. Click the [Send] button or select [Process] - [Send] on the menu bar. ⇒ The Address Book window appears, and the recognized characters of all scanned business cards in the card toolbar are registered in Address Book. 9. On the menu bar, select [Cardiris] - [Quit Cardiris] to quit Cardiris. HINT • The recognition result of scanned business cards can be output as text or vCard format.
Chapter 4 Troubleshooting This chapter describes common problems during the usage of the ScanSnap and how to remedy them. 4.1 Troubleshooting Checklist Before you ask for repair service, please check the following items. If you cannot solve the problem even after checking the following items, contact the store where you purchased the ScanSnap, or contact an authorized FUJITSU scanner service provider. For troubleshooting errors caused during operation, refer to "7.
Symptom Scanning does not start. Scanning does not start. Check This Item Remedy Is ScanSnap Manager for the ScanSnap S300M installed in your computer? Install ScanSnap Manager for the ScanSnap S300M. (See "Installing the Supplied Software" (page 15).) Is the USB cable correctly connected? Connect the USB cable correctly. When using a hub, check the hub's power supply. When using a USB bus power cable, use a powered USB hub equipped with an AC adapter.
Symptom Check This Item Remedy The ScanSnap is not recognized, though ScanSnap Manager is installed. Did you connect the ScanSnap to your computer before installing ScanSnap Manager? Have the "ScanSnap Manager" started? If your operating system is Mac OS X v10.2, in the "System Preferences" window, select "Login Items" - "Add" to add "ScanSnap Manager."If your operating system is Mac OS X v10.3, v10.4, or V10.
4.2 Clearing Paper Jams 1. Remove the document on the paper chute. 2. Open the ADF while pulling the Cover open lever. 3. Remove the jammed document. 4. Close the ADF. ⇒ You should hear the ADF click when it returns to its original position.
Chapter 5 Daily Care This chapter describes how to clean the ScanSnap. WARNING • Before you clean the ScanSnap, unplug the power cable from the power outlet, or the USB bus power cable from the computer to prevent from fire or electric shock. • To avoid injuries, do not place the internal parts (such as the Pad ASSY and pick roller) in areas where small children can reach. 5.1 Cleaning Materials Cleaning Materials Parts No.
5.3 Cleaning Inside of the ScanSnap Clean inside of the ScanSnap with a cloth moistened with Cleaner F1. In an alternating succession of scanning documents, the accumulated paper-powder and dust inside the ScanSnap causes a scanning error. As a guideline, clean the ADF every 200 sheets of documents. Note that this guideline varies according to the type of documents you are scanning.
Chapter 6 Consumables This chapter describes how to replace and purchase consumables and regular replacement parts. WARNING • Before you replace the consumables of the ScanSnap, unplug the power cable from the power outlet, or the USB bus power cable from the computer to prevent from fire or electric shock. • To avoid injuries, do not place the internal parts (such as the Pad ASSY and pick roller) in areas where small children can reach.
Use only the consumables specified by PFU LIMITED. HINT Use the following procedure to check the target values for replacement and usage information of consumables. 1. Click and hold the ScanSnap Manager icon in the Dock menu. 2. Click [Check consumable supplies] on the menu. ⇒ The "ScanSnap Manager - Check consumable status" window appears. This window indicates how many times consumables have been used. Replace consumables using "Target value to change supplies" as guidelines.
For information on how to replace the Pad ASSY and the pick roller, refer to "9.2 Replacing the Pad ASSY" and "9.3 Replacing the Pick Roller" respectively in the "ScanSnap S300M Operator’s Guide." The contents of this manual are subject to change without notice. This manual may not be reproduced, adapted or translated without prior written permission. READ THIS ENTIRE MANUAL CAREFULLY BEFORE USING THIS PRODUCT. IF THIS PRODUCT IS NOT USED CORRECTLY, UNEXPECTED INJURY MAY BE CAUSED TO USERS OR BYSTANDERS.