P3PC-1532-01EN Color Image Scanner S500 Getting Started SC AN PO W ER Please read this guide before connecting the scanner to your PC.
Contents Introduction ........................................................................................................................................................... 1 1. Preparation ........................................................................................................................................................ 5 1.1. Checking the Contents of the Package.........................................................................................................................
Introduction Thank you for purchasing the ScanSnap S500 Color Image Scanner product. ScanSnap S500 is a color image scanner able to scan double-sided documents. It is a complete Office Solution designed to improve your productivity and to solve scanning problems in your office. ScanSnap product has the following features.
Provides basic information to install and use the ScanSnap. ScanSnap S500 Operator’s Guide (PDF manual included in ScanSnap Setup CD-ROM): Provides detailed information about the installation of the ScanSnap software and hardware, operation of the scanner hardware and ScanSnap Manager. CardMinder User’s Guide (PDF manual included in ScanSnap Setup CD-ROM): Provides detailed information on how to use CardMinder.
safety is required, for example, in the control of nuclear reactions at nuclear power facilities, automatic flight control of aircraft, air traffic control, operation control in mass-transport systems, medical equipment for sustaining life, and missile firing control in weapons systems, and when provisionally the safety in question is not ensured. The user should use this product with adopting measures for ensuring safety in such high-safety applications.
Safety Precautions FOLLOW THESE INSTRUCTIONS AND BE SURE TO HEED ALL WARNINGS AND CAUTIONS DESCRIBED BELOW. WARNING The following describes important cautions. Do not touch the power plug with wet hands. Doing so might cause electric shock. A damaged AC cable may cause fire or electric shock. Do not place heavy objects on AC cables, or pull, bend, twist, heat, damage or modify AC cables. Also, do not use damaged AC cables or power plugs, and AC cables or power plugs when the wall socket is loose.
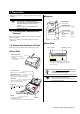
1. Preparation This chapter describes necessary preparations before using ScanSnap. Buttons Do not connect the scanner to your PC before installing “ScanSnap Manager”. If the scanner is connected before installing ScanSnap Manager, it will not operate correctly. Refer to Chapter 2 for the installation of ScanSnap Manager. [SCAN] button Starts scanning. [POWER] button Turns on/off the power supply. SCAN POWER Power lamp Indicates the scanner status.
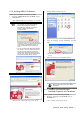
2. Connecting ScanSnap This chapter describes how to connect ScanSnap to your PC. 2.1.1. Installing Adobe Acrobat Please prepare the Adobe Acrobat CD-ROM. 2.1. Installing the Supplied Software Before connecting the scanner to your computer, please install the following software on your PC. ①. Adobe Acrobat (Application) ②. ABBYY FineReader (Application) ③. ScanSnap Manager (Driver) ④. ScanSnap Organizer (Application) ⑤. CardMinder (Application) Adobe Acrobat is not supported by Windows 98 and Windows Me.
2.1.2. Installing ABBYY FineReader 3. Double-click the [Setup.exe] icon. 4. Select the language for this installation and click [OK]. Please prepare the ABBYY FineReader CD-ROM. 1. Insert the “ABBYY FineReader CD-ROM” into the CD-ROM drive. The “ABBYY FineReader for ScanSnap” screen appears. • If Windows Service Pack 2 is installed in your computer, you may see the following window when inserting the CD-ROM described above. Click the [Yes] button to show the “ABBYY FineReader for ScanSnap” screen.
HINT 2. This window is not displayed automatically when the "Auto play" setting of your computer is disabled. In this case, run “Setup.exe” of this CD-ROM directly using the “Explore” or “My computer”. (When reinstalling the programs, the following 2 windows will not appear.) Click the [Install Products] button. [Set the document face-down and scan (Recommended)] Selects loading the document face-down and upside-down on the scanner.
2. Insert the connectors of the AC adapter to the scanner inlet and a power outlet. For Windows Me The new hardware is detected and the installation will be completed automatically. For Windows 2000 When [Digital Signature not Found] appears, click the [Yes] button. Outlet For Windows XP 1) When [Found New Hardware Wizard] window appears, select “No, not this time” and click the [Next >] button. Inlet 2.2.2. Connecting the USB cable Follow the procedure below to connect the USB cable.
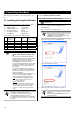
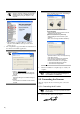
3. How to Use ScanSnap Selects the application for viewing/editing the scanned images. This chapter describes basic operation of ScanSnap. 3.1. Scanning Documents [Save] Specifies the folder and file name to save the scanned images. With “ScanSnap” you can turn paper office documents on your desk into digital files and save them just by pressing a single button. The scanned image can be viewed on the screen using the supplied applications (Adobe Acrobat, CardMinder).
When the scanning is completed, Adobe Acrobat starts and displays the scanned images. HINT 3. • ● You can also use another application to display scanned images. ● Pressing [SCAN] button, the documents are ● scanned in the “Duplex” mode. To scan the document in the Simplex” mode, change this setting using the ScanSnap Manager S . The ScanSnap scanner is able to scan documents using various settings.
Set the Carrier Sheet onto the scanner. ・ Place the top of the sheet with the black & white printed pattern downwards and load it in the direction of the arrow. 4. The following window appears. Select a business card from the Data list. Check the data in the Recognition result field of this window. Correct the data if there is any recognition mistake. [Microsoft Outlook] button $CEM 5. ・ It is not possible to scan multiple sheets continuously. Load the sheets one by one and scan. 6.
3.6. ScanSnap Organizer ScanSnap Organizer is an application that manages the thumbnail display of image files such as PDF and JPEG files. Files scanned in ScanSnap can be viewed without opening them. You can also create folders, and arrange files for these folders for different purposes. Also, for files with multiple pages, you can check the images by turning the pages on the thumbnail displayed.
4. Troubleshooting This chapter describes common problems during the usage of ScanSnap and how to remedy them. 4.1. Troubleshooting Checklist Before you ask for repair service, please check the following items. If you cannot solve the problem even after checking the following items, contact the store where you purchased the scanner, or contact an authorized FUJITSU scanner service provider. Symptom The scanner cannot be turned on.
Symptom The generated image shifts or is distorted. The image scanned is too light or too dark. Lines on the document are blurred. (Example: Ruled lines on a table cannot be seen.) Scanning speed is very slow. Multi-feeds (*4) occur frequently. Check This Item Is the document loaded correctly? Is the "Brightness (Black and White scanning only)" setting on [Option...
Symptom Check This Item Remedy Scanned images are not displayed on the screen (when “Allow automatic blank page removal" is enabled). When "Allow automatic blank page removal" is enabled, almost blank documents with only a few characters may be accidentally recognized as blank pages and removed from scanned image data. Have you scanned a document written in small letters? Right click "ScanSnap Manager" icon on the task bar, select [Setting...] - [Scanning] tab and click the [Option...] button.
HINT Please note, that the folder C:\Windows\Inf may be hidden. To confirm the above given two files and remove them, please select from the menu bar of the [Explorer] - [Tools] - [Folder Options...] and select then the [View] tab. In this tab, please check if the checkbox of [Show hidden files and folders] under [Hidden files and folders] is marked. After marking this checkbox and applying the setting, the hidden C:¥Windows¥Inf folder becomes visible and you can check if the S500.inf and S500.
5. Daily Care This chapter describes how to clean the ScanSnap scanner. CAUTION WARNING The glass surface inside the ADF becomes hot during the scanner operation. Before you start cleaning the inside of the scanner, disconnect the AC adapter from the outlet, and wait at least 15 minutes to let the scanner cool down. Fire/Electric Shock Before cleaning the scanner, disconnect the AC adapter from the power outlet. ● Never use water or neutral detergent to clean the inside of the scanner.
Pad ASSY (x1) Clean the Pad ASSY downward. When cleaning the Pad ASSY, take care to prevent the cloth from catching on the pick spring. Glass (x2 on the ADF cover and the opposite side) Clean lightly. Pick roller (x1) Clean lightly taking care not to scratch and damage the surface of the roller. Take particular care when cleaning the Pick roller as black debris on the roller adversely affects the pickup performance.
6. Consumables/Carrier Sheet This chapter describes how to replace and purchase consumables and regular replacement parts. 6.2. Replacing the Pad ASSY Replace the Pad ASSY following the procedure below. WARNING Fire/Electric Shock Before you replace the consumables of this scanner, disconnect the AC adapter from the outlet to turn off the scanner. 1. Remove the documents on the Paper chute cover. 2. Open the ADF cover while pulling the Cover open lever. 6.1.
5. Close the ADF cover 3. Adjust the Side guide to the “A5” size. ADF cover A5 A5 4. You should hear the ADF cover click into position when it returns to its original position. Remove the Sheet guide. Pinch the handle on the Sheet guide to remove it. Sheet guide Handle Claw 6. Turn on the scanner. ScanSnap Manager icon changes from to S . 7. Right click the "ScanSnap Manager" icon S on the task tray, and select [Check consumable supplies] from the menu. 8.
If the around the pick roller is dirty by paper -powder, it may cause a scanning error. Please remove the dirt using a dry cloth with dollop of Cleaner F1. * Don't use water, mild detergent or air-spray. 7. 10. Fix the Pick roller bushing (left) by rotating it in the direction of the arrow. Pick roller bushing Pick roller Remove the Pick roller from the shaft. Pull out the shaft from the Pick roller while lifting up its tab.
14. Right click the "ScanSnap Manager" icon S on the task tray, and select [Check consumable supplies] from the menu. 15. In the “Check consumable status” window, click the [Reset] button of the Pick Roller Count. 6.4. Purchasing the Carrier Sheet If the “Carrier Sheet” bundled in this product cannot be used for scanning due to damage or wear-and-tear, you can purchase just the Carrier Sheet separately. As a guideline, it is recommended to replace the Carrier Sheet every 500 scans.