
User's Guide


29
Using Your Stylistic ST5000
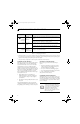
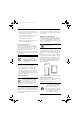
3. Insert the DIMM module in the socket at an angle
and push it down until it locks into place as shown in
Figure 2-9. Note that the DIMM module is keyed to
prevent it from being inserted backwards.
Figure 2-9. Installing a DIMM Module
4. Reinstall the cover and screws that you removed in
step 2.
5. Confirm that the DIMM module is recognized by the
system. To do so, run BIOS Setup. The size of the
DIMM module should be displayed in the Info menu
in BIOS Setup.
The DIMM module is installed in the Tablet PC and you
can now use the system.
Removing a Memory Module
To remove a DIMM module:
1. Ensure that the Tablet PC is off. To do so, carry out
the Shut Down command in the Start menu. (Do not
attempt to remove or install a DIMM module when
the system is in Suspend mode or running.)
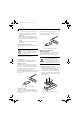
2. Remove the screws from the cover plate on the back
of the Tablet PC and remove the cover plate as shown
in Figure 2-8.
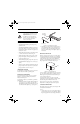
3. Spread the fingers on the socket that lock the DIMM
module in place until the DIMM module is loose.
Figure 2-10. Removing a DIMM Module
4. Remove the DIMM module from the socket.
The DIMM module is now removed from the Tablet PC.
See "Installing a Memory Module" to install a new DIMM
module.
Ocampa3_UG.book Page 29 Monday, August 23, 2004 9:25 AM