
Service Manual


SERVICE PARTS INFORMATION 15
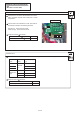
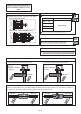
Outdoor Unit Electronic Expansion Valve
(EEV1)
Check Point 2 : Check Coil of EEV1
Remove connector, check each winding resistance of Coil.
If Resistance value is abnormal, replace EEV1.
Read wire
46 ± 4
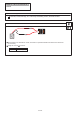
Check Point 1 : Check Connections
Check connection of connector (CN116)
(Loose connector or open cable)
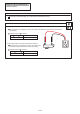
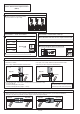
Check Point 4 : Check Voltage from Controller PCB
Remove Connector and check Voltage (DC12V).
>>
If it does not appear, replace Controller PCB.
Check Point 3 : Check Noise at start up
Turn on Power and check operation noise.
>> If an abnormal noise does not show, replace Controller PCB.
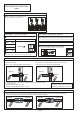
Pipe (In) Pipe (Out)Pipe (In) Pipe (Out)
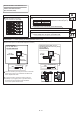
Check Point 6 : Check Strainer
Strainer normally does not have temperature difference between inlet and outlet as shown in (1), but if there is a difference
as shown in (2), there is a possibility of inside clogged. In this case, replace Strainer.
(1) (2)
Pipe (In)
Pipe (Out)
CLOSE
Pipe (In)
Pipe (Out)
OPEN
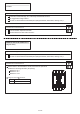
Check Point 5 : Check Opening and Closing Operation of Valve
When EEV1 is closed,
it has no temp. difference between Inlet and Outlet.
If it is open, it has a temp. difference between Inlet and Outlet.
Outlet temp. is near Low-pressure saturated temp.
DC
Yellow - Red
Orange - Red
Blue - Red
White - Red
12V
Note : Check the EEV1 in the state of 4-way1 valve is ON.
In the following cases, even if EEV1 is closed, there may be a difference in temp.
- On comp. start-up
- Just after swiching the 4-way valve1
- Just after swiching the EEV1 (Open --> Close)
Note
If valve opening is 12~51pls,
the check of temp. cannot be performed.
Check temp. at the other valve opening.
CN160CN116
CN116
CN117
04-108
Resistance value 68 F(20
°
C)
°