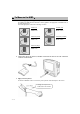
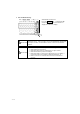
− To Measure the NIBP− 1. Select the appropriate cuff type for the patient. According to the AHA (American Heart Association) guideline, the appropriate cuff width is 40% of the arm circumference. Select the appropriate cuff from the following selections. Infant Cuff CUF-7105 Width 8.5cm Pediatric Cuff CUF-7104 Width 10.5cm Adult Cuff (small) CUF-7103 Width 11cm Adult Cuff (medium) CUF-7102A Width 14.5cm Adult Cuff (large) CUF-7101 Width 17cm 2.
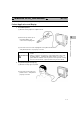
Align the cuff height and heart position to eliminate an error caused by the blood weight. It is most appropriate to measure with the patient lying down and arms naturally extended. Check Point 4. Start the measurement. Pressing the NIBP START/STOP key will start inflating the cuff pressure and starts the measurement. Upon completion, the measured value will be displayed inside the NIBP parameter key.
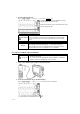
Procedure for Periodic Measurement 1. Press the NIBP parameter key on the home display. The NIBP setup menu will be displayed. 2. Press the Auto Mode key on the NIBP setup menu. The interval time setup menu will be displayed. 3. Select an interval time. Press the key for the desired interval. Check that the key LED is lighted for the selected interval. The measurement will automatically start at the selected interval.
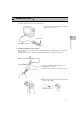
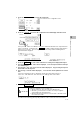
− To Measure the BP − 1. Connect the 2ch BP conversion cable to the monitor and interface cable. 2 channels of BP can be measured on this monitor. Connect the monitor and the interface cable via 2ch BP conversion cable. 3 2ch BP Conversion Cable 2. Assemble the BP measurement device. The following procedure explains the case when BP transducer (COBE CDX series, No.041-575504) is used. If using other transducers, refer to the operation manual for the corresponded transducer.
(3) Inject the heparin 1000 units to saline bag, mix thoroughly and puncture the infusion line through the same hole. Set the saline bag to pressure bag, and hang from the infusion device. Fill saline to about 1/3 of the drip. (4) After loosening the zero-port plug, push the flash button to perform priming to remove air bubbles. (5) Verify that all air bubbles are removed, and tighten the zero-port plug. Turn on the zero-port plug side of the open-air three-way cock.
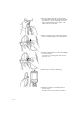
2. Perform zero balance. (1) Loosen the zero-port plug on open-air three-way cock one-half turn. (2) Press the BP parameter key on the home display. The display will proceed to BP setup menu. 3 To Measure the BP (3) Press the BP Zero key on the BP setup menu. Zero balance will start. (4) Turn off the zero-port plug side of the open-air three-way cock. (5) Connect the catheter to the end of monitoring line. The preparation for measurement is complete.
3. Start the BP monitoring. Start the BP measurement. Press the Home key. Verify that the BP waveform and each measurement value is displayed on the home display. If the SYS value is abnormally high, or DIA is abnormally low, a resonance may be the cause. If the resonance can not be eliminated by adjusting the C A U T I O N blood pressure filter, check the BP line and use a thick, short, and hard catheter. The zero balance procedure is required for the following case.
− To Measure the CO2 Concentration − (DS-7141) The DS-7141 incorporates CO2 measuring unit. Patient Application and Display 1. For intubated patient (1) Attach the airway adapter to respiration circuit. 3 (3) Connect the other end of the sampling tube to the patient monitor. Verify that all the tubes are properly connected. ? Use the specified sampling tube and nasal prong manufactured by Oridion. ? Always consider the circumference of the intubation tube when using WARNING the airway adapter.
3. Start the CO2 measurement. Press the Home key. Verify that the CO2 waveform and EtCO2 numeric data are displayed on the monitor. Stable measurement can be achieved after about 20 minutes from power ON. When measuring CO2 concentration of a patient treated with mouth-tomouth resuscitation, Jackson-Rees circuit, Mapleson D circuit of which W A R N I N G CO gas may mix in, the value may be displayed lower than the actual 2 value.
3. Press the Configuration 4. Press the CO2 Cal. key on the CO2 setup menu. Proceed to the CO2 configuration menu. key on the CO2 configuration menu and display calibration menu. 3 <Preparing for calibration> <Start calibration> 5. Press the Start Cal key and conduct calibration according to the displayed messages. 6. The message, “Feed CAL. GAS” will be displayed. Press the injection button and inject the calibration gas. 7. The message, “Calc. Gas can be removed” will be displayed.
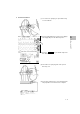
− To Measure the Temperature − 1. Select an appropriate type of probe for the patient.
2. Connect the probe to the patient monitor. 3 To Measure the Temperature 3. Attach the probe to the patient. ● Body Surface Attach the probe to the location shown on illustration, and fixate with surgical tape. ● Rectum (1) Attach the probe cover to the probe end. (2) Insert the probe into the rectum about 3~7 cm. (3) Fix on the probe to inner thigh with surgical tape.
4. Check that the temperature is displayed. Press the Home key. Check that the temperature measurement is displayed on the home display.