
Installation Instructions


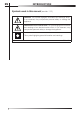


3 INSTALLATION MATERIAL
:der i uqer era s l a i retam gniwol lof eht , y l tcer roc rehsawhs id eht l l atsn i oT
; )10-3 .g fi A . fer ( rev i rdwercs spi l l ihP •
• spirit level (ref. B fi g. 3-01);
• tape measure (ref. C fi g. 3-01);
• compass saw (ref. D fi g. 3-01);
• pencil (ref. E fi g. 3-01);
• fi le (ref. F fi g. 3-01);
• 13 mm open-ended wrench (ref. G fi g. 3-01);
• plumbing pliers (ref. H fi g. 3-01);
• drill (ref. I fi g. 3-01);
• safety gloves (ref. L fi g. 3-01).
Fig. 3-01
A
B
C
D
E
F
G
H
I
L
3.1 Kit supplied with dishwasher
The kit supplied with the dishwasher comprises:
• 1 adhesive steam guard (depending on the model) (ref. A fig. 3-02);
• 1 steel adhesive steam guard (depending on the model) (ref. B fig. 3-02)*;
• 1 template for door panel (ref. C fig. 3-02);
• 2 hooks for door panel (ref. D fig. 3-02);
• 8 screws for securing the door panel hooks (ref. E fig. 3-02);
• 2 screws for securing the door (ref. F fig. 3-02);
• 4 screws for fixing the dishwasher to the adjacent walls (ref. G fig. 3-02);
• 2 upper fixing screws (ref. H fig. 3-02);
• 2 screw caps (ref. I Fig. 3-02);
H
* The adhesive protection is suitable for kitchens with worktops that do not allow the
steel protection to be fixed with screws (e.g.:+ marble or masonry), but it can be also
used with other materials.
Fig. 3-02
EN
8
INSTALLATION INSTRUCTION