F6DW24 SS1 F6DW24 FI1
EN CONTENTS Contents 1 INTRODUCTION ...................................................................................................................................... 3 2 DESCRIPTION OF THE CONTROLS ................................................................................................... 5 2.1 Upper panel ........................................................................................................................... 5 2.2 Setting the washing program and switching on and off .....
EN 2
EN INTRODUCTION 1 INTRODUCTION Thank you for choosing Fulgor Milano. To use this dishwasher correctly and safely, please read this manual carefully. The manual is divided into sections giving you a step-by-step guide all your appliance’s functions. The enclosed information is complete with detailed illustrations. Following the cleaning instructions provided here will keep dishwasher performance at peak levels in the long term.
EN INTRODUCTION Symbols used in this manual DANGER. 5IJT TZNCPM IJHIMJHIUT JOGPSNBUJPO BOE XBSOJOHT XIJDI JG OPU PCTFSWFE NBZ DPNQSPNJTF QFSTPOBM TBGFUZ PS EBN BHF UIF BQQMJBODF DANGER OF ELECTROCUTION.
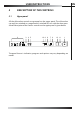
EN USER INSTRUCTIONS 2 DESCRIPTION OF THE CONTROLS 2.1 Upper panel All the dishwasher controls are grouped on the upper panel. The dishwasher can only be switched on, programmed, switched off, etc. with the door open. A brief description of the various controls on the upper panel is given below. 2 3 end 4 5 10 9 8 7 6 12 11 1 Sanitized 1/2 160°F The panel shown is indicative, programs and options may vary depending on model.
EN USER INSTRUCTIONS 1 2 3 4 5 6 7 8 9 10 11 12 2.2 On/off button Press to power the appliance. Program indicator lights These show which program is selected and whether there are any faults (Troubleshooting). Program indicator lights These show which program is selected and whether there are any faults (Troubleshooting). Add salt indicator light Shows the appliance is low on salt. Add rinse aid indicator light (only fitted on some models) Shows the appliance has run out of rinse aid.
To select the most suitable program for the dishes to wash consult the following table which specifies the most appropriate type of washing sequence depending on the kind of dishes and how dirty they are. Dishes with light soil, washed immediately after use. Wash at 38°C (100.4°F) Rinse at 50°C (112°F) Glass china and mixed dishes with light soil. Wash at 45°C (113°F) Cold rinse Rinse at 70°C (158°F) Dry Half load dishes with normal soil, washed immediately after use.
SOAK
EN USER INSTRUCTIONS Only SVO UIF TPBL QSPHSBN XJUI IBMG MPBET 5P SVO QSPHSBNT 6, 7, 8, 9, 10 TFMFDU UIF SFRVJSFE TUBOEBSE QSPHSBN BOE UIFO QSFTT UIF quick time option button SFG "GUFS VTJOH UIF BCPWF UBCMFT UP DIPPTF UIF NPTU TVJUBCMF XBTIJOH DZDMF QSPHSBN UIF BQQMJBODF Before starting a washing program, make sure that: t 5IF XBUFS TVQQMZ WBMWF JT open t The correct amount of detergent IBT CFFO BEEFE UP UIF dispenser UP BEE EFUFSHFOU TFF TFD t 5IF TQSBZ BSNT BSF BCMF UP SPUBUF freel
EN USER INSTRUCTIONS :LSLJ[PUN HUK Z[HY[PUN [OL WYVNYHT • Press the program selection button (ref. 3 ) several times until the indicator light corresponding to the required program turns on (ref. 2) • If required, press the relative buttons to select any complementary functions (e.g.: “extra drying”, “program delay”; see para 2.2.7 “options”); • Close the door; the program will start after about 2 seconds and the relevant indicator light will ash throughout the cycle (program running signal).
EN USER INSTRUCTIONS *HUJLSPUN [OL J\YYLU[ WYVNYHT • To cancel the current program, open the door and press and hold down the program selection button (ref. 3) for a few seconds until the indicator lights of the fourth and fth programs turn on (ref. pr. 4, pr. 5 fig. below). • Close the door again. • After about 1 minute, the dishwasher terminates the cycle and the indicator lights of the fourth and fth programs (ref. pr. 4, pr. 5 g. below) start ashing.
EN USER INSTRUCTIONS :^P[JOPUN VMM At the end of the program, the dishwasher emits a short beep and the indicator lights of the fourth and fth program (ref. pr. 4, pr. 5) ash below. Turn off the appliance by opening the door and pressing the on/off button (ref.1) end 1/2 FIG.
EN USER INSTRUCTIONS 2.3 Additional functions 2.3.1 Adjusting the water softener N.B.: a different washing program from soak must be used to make the following adjustment Press and hold down the program delay button (11) until the preset value appears followed by a dot (normally 3.). Release the button and then press it again until the required value is displayed, as indicated in the table (see tab. 2-03). The 6 possible adjustment levels will appear in this sequence: 3., 4., 5., 0., 1., 2..
EN USER INSTRUCTIONS N.B.: the display indicates the water hardness adjustment and the program delay. A dot (.) after the number means that the water hardness adjustment is being displayed. If no dot (.) appears, the program delay is being displayed. 2 2 1/2 3 3 10 9 8 10 9 8 4 5 4 5 end Sanitized end Sanitized 7 6 7 6 12 11 12 11 1 1 160°F 1/2 160°F FIG. 2-05 Water hardness table tab.
EN USER INSTRUCTIONS 3 • • • • • ENERGY SAVING AND ENVIRONMENTAL CONSIDERATIONS Always try to run the dishwasher fully loaded. Do not pre-rinse the dishes under a running tap. Use the most suitable washing program for each type of load. If available, connect the dishwasher to a hot water system with a temperature of up to 60°C (140°F). When possible, skip the drying cycle by opening the door after washing: the air and the residual heat will dry the dishes naturally. 3.
EN USER INSTRUCTIONS ;96<)3,:/66;05. The dishwasher can signal a number of malfunctions by turning on various indicator lights, as described below FAULT DESCRIPTION end E1 1/2 end E2 1/2 end E3 1/2 end E4 1/2 end E5 1/2 Light off 16 Acquastop failure The anti- ooding system has tripped (only for models tted with this feature). Activates in case of water leaks. Contact the technical assistance service. Safety level The system limiting the water level in the dishwasher has tripped.
EN USER INSTRUCTIONS FAULT end E6 1/2 end E7 1/2 end E8 1/2 DESCRIPTION Water pump-out malfunction The appliance does not pump out the water or does so incorrectly. Make sure the drain hose is not kinked or crushed and that the siphon and lters are not clogged. If the problem persists, contact the technical assistance service. Turbine ow-regulator malfunction (only for models tted with this feature) The appliance is unable to precisely measure the quantity of incoming water.
EN USER INSTRUCTIONS 5 OPERATING INSTRUCTIONS BEFORE STARTING TO USE THE APPLIANCE, MAKE SURE YOU HAVE READ AND UNDERSTOOD ALL THE WARNINGS CONTAINED IN CHAPTER “IMPORTANT SAFETY INSTRUCTION4”. 0ODF UIF EJTIXBTIFS IBT CFFO DPSSFDUMZ JOTUBMMFE QSFQBSF GPS VTF BT GPMMPXT t t t 5.
EN USER INSTRUCTIONS SA LT A • • • • • When using the dishwasher for the first time, in addition to the salt it is also necessary to add one liter of water to the container. Each time the salt container is refilled, make sure that the cap (ref. A fig. BCPWF) is securely closed.
EN USER INSTRUCTIONS 5. Using the rinse-aid and detergent dispensers 5IF EFUFSHFOU BOE SJOTF BJE EJTQFOTFST BSF TJUVBUFE PO UIF JOOFS QBSU PG UIF EPPS the detergent dispenser SFG " GJH CFMPX JT PO UIF MFGU BOE UIF rinseaid dispenser SFG # GJH CFMPX JT PO UIF SJHIU A B WITH THE EXCEPTION OF THE SOAK PROGRAM, BEFORE EVERY WASHING CYCLE IT IS NECESSARY TO ADD THE REQUIRED AMOUNT OF DETERGENT TO THE DETERGENT DISPENSER.
EN USER INSTRUCTIONS 5. .
EN USER INSTRUCTIONS t t t t t 5P BEKVTU UIF SJOTF BJE TFUUJOH SPUBUF UIF EJTQFOTFS DPWFS SFG " QSFWJPVT GJHVSF UISPVHI B RVBSUFS UVSO JO BO BOUJDMPDLXJTF EJSFDUJPO BOE SFNPWF JU 5IFO VTF B TDSFXESJWFS UP SPUBUF UIF SJOTF BJE TFMFDUPS UP UIF EFTJSFE QPTJUJPO 3FQMBDF UIF DPWFS SFG " QSFWJPVT GJHVSF CZ UVSOJOH JU JO B DMPDLXJTF EJSFDUJPO VOUJM JU JT GVMMZ DMPTFE 5IF BNPVOU PG SJOTF BJE NVTU CF JODSFBTFE JG UIF XBTIFE EJTIFT BQQFBS EVMM PS GFBUVSF DJSDVMBS TUBJOT *G PO UIF PUIFS IBOE UIF EJTIF
EN USER INSTRUCTIONS A t t t t t t t t B 8IFO B QSPHSBN XJUI IPU QSFXBTI JT TFMFDUFE TFF QSPHSBN UBCMF JO UIF i%F TDSJQUJPO PG $POUSPMTw NBOVBM FYUSB EFUFSHFOU NVTU CF QMBDFE JO UIF DBWJUZ SFG " PS # GJH BCPWF EFQFOEJOH PO NPEFMT Only VTF EJTIXBTIFS TQFDJGJD EFUFSHFOUT 'PS PQUJNBM XBTIJOH SFTVMUT JU JT JNQPS UBOU UP VTF B HPPE RVBMJUZ EFUFSHFOU 5IF EFUFSHFOU QBDLT NVTU CF TFBMFE BOE TUPSFE JO B ESZ QMBDF UP QSFWFOU UIF GPS NBUJPO PG MVNQT XIJDI NBZ OFHBUJWFMZ affFDU XBTIJOH
EN USER INSTRUCTIONS t 8IFO VTJOH EFUFSHFOU UBCT QMBDF UIFN JO UIF DVUMFSZ CBTLFU 5IF EJTQFOTFS IBT CFFO EFTJHOFE GPS QPXEFS PS MJRVJE EFUFSHFOU "T UIF DPWFS EPFT OPU PQFO DPNQMFUFMZ E VSJOH UIF XBTIJOH DZDMF U BCT BSF OPU G VMMZ SFMFBTFE EJTTPMWFE 5IJT DPVME HFOFSBUF UIF GPMMPXJOH QSPCMFNT SJOTF DZDMF THE INTRODUCTION O F DETERGENT INTO T HE R INSE A ID D ISPENSER, EVEN IN LIQUID FORM, WILL DAMAGE THE DISHWASHER "/% 70*% 8"33"/5: $07&3"(& '03 "/: 3&-"5&% 3&1"*34 5.
EN USER INSTRUCTIONS M AKE SURE that the items being washed are dishwasher-safe.
EN USER INSTRUCTIONS 5.4
EN USER INSTRUCTIONS 5.4.1 3V^LY YHJR The lower rack receives the full force of the lower spray arm, and should therefore be used for the “toughest” items with a heavier degree of soiling. All types and combinations of loads are permitted, provided that the dishes, pots and pans are arranged with all the soiled surfaces exposed to the water jets coming from the bottom.
EN USER INSTRUCTIONS Loading the lower rack Carefully load at plates, soup plates, dessert and serving dishes, positioning them vertically. Pots, pans and their covers must be loaded upside down. When loading soup plates and dessert bowls, be sure to leave a gap between them.
EN USER INSTRUCTIONS 5. .2 *\[SLY` IHZRL[ The basket h as removable top grids i nto which items of c utlery s hould be inserted to keep them properly spaced and allow water to pass between them effectively. T he t op g rids a nd c entral l id a re i n the bag o f accessories. The central lid functions as a lid only. The top grids can be detached and used separately. The cutlery should be arranged in an orderly manner inside the basket, with the handles pointing downwards.
EN USER INSTRUCTIONS 5. .3
EN USER INSTRUCTIONS Loading the upper rack Load plates facing forward; cups, bowls etc. must always be facing downwards. The left-hand side of the rack can be loaded with two layers of cups and glasses. The centre can be filled with plates and side-plates, fitted upright into the supports provided.
EN USER INSTRUCTIONS Adjusting the upper rack be level on both sides. To below below to he below below with the rack loaded, but in this case when lowering the rack it should be held steady with one hand to avoid knocking the dishes.
EN USER INSTRUCTIONS 6 6.
EN USER INSTRUCTIONS t supply valve g below t g below p e Do not over - tighten - only snug to the point that the dishwasher seals the connection. Over tightening can damage the washer and cause leaking.
EN USER INSTRUCTIONS 6.
EN USER INSTRUCTIONS 6.
EN USER INSTRUCTIONS 6.5 • • • • General warnings and recommendations for correct maintenance Clean the filters under running water (at room temperature) using a stiff brush. When removing the filter, take care that there are no food residues on it. If any residues fall into the washing pit (ref. A fig. below), they might block hydraulic components or clog the spray arm nozzles.
EN WARNINGS 6.
EN WARNINGS 39
EN WARNINGS 7 IMPORTANT SAFETY INSTRUCTION4 (Save thFTF instructions) THIS MANUAL FORMS AN INTEGRAL PART OF THE APPLIANCE: IT MUST ALWAYS BE KEPT INTACT TOGETHER WITH THE DISHWASHER. BEFORE USING THE APPLIANCE, CAREFULLY READ ALL THE INSTRUCTIONS CONTAINED IN THIS MANUAL. INSTALLATION MUST BE PERFORMED BY A QUALIFIED TECHNICIAN, IN COMPLIANCE WITH THE REGULATIONS IN FORCE.
EN WARNINGS BEFORE PROCEEDING WITH INSTALLATION, DISCONNECT THE MAINS POWER SUPPLY FROM THE WORK AREA. DO NOT USE EXTENSION CORDS, ADAPTORS OR SHUNT CONNECTIONS IN ORDER TO AVOID THE POSSIBILITY OF OVERHEATING OR BURNING WITH CONSEQUENT FIRE HAZARD. DURING INSTALLATION, TAKE CARE NOT TO INJURE YOURSELF ON THE SHARP EDGES OF THE APPLIANCE; WEAR SAFETY GLOVES. 5)& "11-*"/$& .
EN WARNINGS DO NOT INHALE OR SWALLOW DETERGENT AS THIS MAY CAUSE BURNS AND/OR PERMANENT DAMAGE TO THE NOSE, MOUTH AND THROAT, AND EVEN LEADING TO SUFFOCATION; KEEP DETERGENT AWAY FROM YOUR EYES. IF ONE OF THE ABOVE SITUATIONS OCCURS, SEEK MEDICAL ASSISTANCE IMMEDIATELY. TO PREVENT CHILDREN FROM COMING INTO CONTACT WITH DETERGENT, FILL THE DISHWASHER JUST BEFORE 4&55*/( THE PROGRAM AND THEN KEEP THE DETERGENT OUT OF THE REACH OF CHILDREN. THIS DISHWASHER MUST BE USED BY ADULTS.
EN WARNINGS DO NOT INTRODUCE ANIMALS INTO THE DISHWASHER. 8)&/ 01&/*/( 5)& %*4)8"4)&3 %003 %63*/( " $:$-& 5)&3& *4 " 3*4, 0' 4$"-%*/( %6& 50 5)& )&"5 $0/5"*/&% */4*%& %0 /05 (&5 */ 5)& 8": 0' 5)& 45&". -&"7*/( 5)& "11-*"/$& "/% %0 /05 506$) 5)& $0.10/&/54 */4*%& 8"*5 .*/65&4 "'5&3 5)& &/% 0' 5)& 8"4)*/( $:$-& 03 "'5&3 */5&33615*/( *5 #&'03& 3&.07*/( 5)& %*4)&4 */ 03%&3 50 "--08 5)&.
EN WARNINGS AQUASTOP MODELS; THE AQUASTOP DEVICE PREVENTS FLOODING IN THE EVENT OF A WATER LEAK. WHEN THE AQUASTOP DEVICE IS TRIPPED (THE ERROR IS INDICATED ON THE DISPLAY), CALL IN A QUALIFIED TECHNICIAN TO IDENTIFY AND REPAIR THE FAULT. IN MODELS EQUIPPED WITH THE AQUASTOP DEVICE, THERE IS A SOLENOID VALVE INSIDE THE WATER INTAKE HOSE. DO NOT CUT THE HOSE AND DO NOT ALLOW THE SOLENOID VALVE TO DROP INTO WATER.
EN WARNINGS BY ENSURING THIS PRODUCT IS DISPOSED OF CORRECTLY, YOU WILL HELP PREVENT POTENTIAL NEGATIVE CONSEQUENCES FOR THE ENVIRONMENT AND HUMAN HEALTH. THE MANUFACTURER DECLINES ALL RESPONSIBILITY FOR DAMAGE TO PERSONS, ANIMALS OR PROPERTY RESULTING FROM FAILURE TO OBSERVE THE ABOVE PRECAUTIONS, FROM TAMPERING WITH EVEN A SINGLE COMPONENT OF THE APPLIANCE, OR FROM THE USE OF UNORIGINAL SPARE PARTS. IF IN DOUBT ABOUT THE CONTENTS OF THIS MANUAL, CONTACT THE TECHNICAL ASSISTANCE SERVICE.
EN USER INSTRUCTIONS 8 INSTALLATION AND HOOK-UP To install and hook up this appliance, consult the attached installation manual. #FBS JO NJOE UIF GPMMPXJOH XBSOJOHT XIFO JOTUBMMJOH BOE IPPLJOH VQ UIF EJTIXBTIFS DURING INSTALLATION, TAKE CARE NOT TO INJURE YOURSELF ON THE SHARP EDGES OF THE APPLIANCE; WEAR SAFETY GLOVES. INSTALLATION, REPAIRS AND SERVICING MUST BE PERFORMED BY QUALIFIED AND AUTHORIZED TECHNICIANS.
EN USER INSTRUCTIONS BEFORE MAKING ELECTRICAL CONNECTIONS, DISCONNECT THE MAINS POWER SUPPLY FROM THE WORK AREA. CHECK THAT THE MAINS SUPPLY IN THE PLACE OF INSTALLATION COMPLIES WITH THE REGULATIONS IN FORCE IN THE COUNTRY OF USE, AND THAT IT IS CORRECTLY (306/%&%. 5)*4 "11-*"/$& .
EN USER INSTRUCTIONS 9 48 Width 59.7 cm - 59.9 cm (23-1/2" - 23-5/8") Depth measured flush with the outer edge of the control panel 55 cm (21-5/8") - FD6W24FI1 57 cm (22-4/8") - FD6W24SS1 Height from 86 cm to 93 cm (from 33-14/16" to 36-10/16") Capacity 13 standard place-settings Water supply pressure min.7 - max. 130 PSI (min. 0.5-max.
FR SOMMAIRE Sommaire 1 INTRODUCTION ...................................................................................................................................... 3 2 DESCRIPTION ET UTILISATION DES COMMANDES................................................................... 5 2.1 Bandeau de commande .................................................................................................... 5 2.2 Sélection du programme de lavage, mise en marche et arrêt ............................ 6 2.
FR 2
FR INTRODUCTION 1 INTRODUCTION Nous vous remercions d’avoir choisi l’un de nos produits. Pour connaître les conditions les plus appropriées pour une utilisation correcte et sûre de votre lave-vaisselle, lisez attentivement les instructions de ce manuel. Les paragraphes sont proposés de façon à faire connaître progressivement toutes les fonctions de l’appareil; les textes sont facilement compréhensibles et sont illustrés par des images détaillées.
FR INTRODUCTION Symboles utilisés dans ce manuel (voir tab. 1-01) DANGER. Ce symbole indique des informations et avertissements qui doivent impérativement être respectés pour ne pas compromettre la sécurité des personnes ou endommager l’appareil. DANGER ÉLECTRIQUE. Ce symbole indique des informations et avertissements concernant les circuits électriques qui doivent impérativement être respectés pour ne pas compromettre la sécurité des personnes ou endommager l’appareil.
FR INSTRUCTIONS POUR L’UTILISATEUR 2 DESCRIPTION ET UTILISTATION DES COMMANDES 2.1 Bandeau de commande Les commandes et les contrlôes du lave-vaisselle sont réunis sur le bandeau de commande supérieur (voir fig. 2-01). Toutes les opérations de mise en marche, programmation, arrêt, etc. doivent être exécutées avec la porte ouverte. Une brève description (voir tab. 2-01) des différentes commandes disponibles depuis le bandeau de commande est reportée ci-après.
FR INSTRUCTIONS POUR L’UTILISATEUR 1 2 3 4 5 6 7 8 9 10 11 12 2.2 Touche marche/arrêt Quand on appuie sur cette touche, on met l’appareil sous tension. Voyants programme sélectionné Le voyant allumé indique le programme sélectionné; il est également utilisé pour signaler d’éventuelles pannes (Guide de dépannage). Touche sélection programmes En appuyant sur cette touche, on peut sélectionner le programme désiré parmi ceux qui sont proposés en séquence.
ÉNERGIE kWh (1) Lavage à 45°C (113°F) Rinçage à froid Rinçage à 65°C (149°F) Séchage
ÉNERGIE kWh (1) TREMPAGE
FR INSTRUCTIONS POUR L’UTILISATEUR Effectuer le trempage uniquement en demi-charge. Pour exécuter les programmes 6, 7, 8, 9, 10, appuyer, après avoir sélectionné le programme standard de votre choix, sur le bouton option « quick time » (rep. 6, fig. 2-02). Après avoir choisi le programme de lavage le plus adapté en se référant aux tableaux prévus à cet effet, procéder à la programmation du lave-vaisselle.
FR INSTRUCTIONS POUR L’UTILISATEUR 2.2.2 Sélection et démarrage du programme Appuyer sur la touche sélection programmes (réf. 3) le nombre qu’il faut pour que le voyant correspondant au programme souhaité s’allume (réf. 2). Sélectionner éventuellement les options souhaitées (par ex. : “séchage ultra”, “départ différé” ; voir paragr. 2.2.7 “options”) à l’aide des touches prévues à cet effet. Fermer la porte ; après environ 2 secondes, le programme démarre.
FR INSTRUCTIONS POUR L’UTILISATEUR 2.2.6 Annulation du programme en cours d’exécution Pour annuler le programme en cours, il faut, après avoir ouvert la porte, appuyer sur la touche de sélection programmes (réf. ) et la maintenir appuyée pendant quelques secondes jusqu’à ce que les voyants du quatrième et du cinquième programme s’allument en même temps (réf. pr.4, pr.5 g. ). Refermer la porte.
FR INSTRUCTIONS POUR L’UTILISATEUR 2.2.8 Arrêt À la n du programme, le lave-vaisselle émet un bref signal acoustique et les voyants du quatrième et du cinquième programme (réf. pr.4, pr.5 g. dessous) clignotent. Pour arrêter l’appareil, ouvrir la porte et appuyer sur la touche marche/arrêt (réf. 1 g. 2-02).
FR INSTRUCTIONS POUR L’UTILISATEUR 2.3 Fonctions supplémentaires (présent sur certains modèles uniquement) 2.3.1 Réglage de l’adoucisseur REMARQUE : pour effectuer ce réglage, il faut sélectionner un programme de lavage autre que le trempage. Appuyer sur la touche départ différé (réf. 1 ) et la maintenir appuyée jusqu’à ce que la valeur réglée précédemment apparaisse, suivie d’un point (normalement, 3.).
FR INSTRUCTIONS POUR L’UTILISATEUR REMARQUE : l’afficheur indique le réglage de la dureté de l’eau et le départ différé. Le point (.) après le chiffre indique que la valeur affichée se réfère à la dureté de l’eau. S’il n’y a pas de point (.), cela signifie qu’elle se réfère au départ différé.
FR INSTRUCTIONS POUR L’UTILISATEUR 3 POUR ÉCONOMISER DE L’ÉNERGIE ET RESPECTER L’ENVIRONNEMENT Essayer de toujours utiliser le lave-vaisselle en pleine charge. Ne pas rincer au préalable la vaisselle à l’eau courante. Utiliser le programme de lavage le plus approprié à chaque type de charge. Ne pas effectuer de rinçages préliminaires. Lorsque cela est possible, raccorder le lave-vaisselle à une installation d’eau chaude jusqu’à 60°C (140°F).
FR INSTRUCTIONS POUR L’UTILISATEUR 45 GUIDE DE DÉPANNAGE Le lave-vaisselle est en mesure de signaler une série d’anomalies de fonctionnement à travers l’allumage simultané de plusieurs voyants, selon les modalités indiquées dans le tableau reporté ci-après : ANOMALIE end E1 1/2 end E2 1/2 end E3 1/2 end E4 1/2 end E5 1/2 Voyant éteint 16 DESCRIPTION Problème aquastop Intervention du système anti-débordement (uniquement pour les modèles qui en sont équipés).
FR INSTRUCTIONS POUR L’UTILISATEUR ANOMALIE DESCRIPTION end E6 1/2 end E7 1/2 end E8 1/2 Anomalie vidange La vidange n’est pas exécutée ou est exécutée d’une façon anormale. Contrôler que le tuyau d’évacuation n’est pas plié ou étranglé et que le siphon ou les ltres ne sont pas obstrués. Si le problème persiste, s’adresser au service après-vente. Anomalie petite turbine (uniquement pour les modèles qui en sont équipés) La quantité d’eau chargée n’est pas mesurée de façon précise.
FR INSTRUCTIONS POUR L’UTILISATEUR 5 INSTRUCTION POUR L’UTILISATION AVANT D’UTILISER L’APPAREIL, S’ASSURER D’AVOIR LU ET COMPRIS TOUS LES AVERTISSEMENTS REPORTÉS DANS LE CHAPITRE “AVERTISSEMENTS SUR LA SÉCURITÉ ET L’UTILISATION”. Après avoir installé correctement le lave-vaisselle, le mettre en service en effectuant les opérations suivantes : • régler l’adoucisseur d’eau; • remplir de sel régénérant; • remplir de liquide de rinçage et charger le produit de lavage. 5.
FR INSTRUCTIONS POUR L’UTILISATEUR SA LT A • • • • • Lors de la première utilisation du lave-vaisselle, il faut également verser, en plus du sel, un litre d’eau. Après chaque remplissage du réservoir, s’assurer que le bouchon (réf. A) est fermé correctement. Le mélange d’eau et produit de lavage ne doit pas pénétrer dans le réservoir à sel car cela compromet le fonctionnement du système de régénération. De plus, cela entraîne la perte de la garantie.
FR INSTRUCTIONS POUR L’UTILISATEUR 5. Utilisation du distributeur de produit de lavage et du doseur de liquide de rinçage Le distributeur de produit de lavage et le doseur du liquide de rinçage se trouvent du côté interne de la porte : le distributeur à gauche (réf. A fig. EFTTPVT) et le doseur à droite (réf. B fig. EFTTPVT). A B À L’EXCEPTION DU PROGRAMME TREMPAGE, IL FAUT INTRODUIRE DANS LE DISTRIBUTEUR LA DOSE ADÉQUATE DE PRODUIT DE LAVAGE AVANT CHAQUE LAVAGE.
FR INSTRUCTIONS POUR L’UTILISATEUR 5. .1 Ajout du liquide de rinçage Le liquide de rinçage accélère le séchage de la vaisselle et évite la formation de taches et de dépôts de calcaire ; il est automatiquement ajouté à l’eau au cours du dernier rinçage depuis le réservoir qui se trouve sur le côté intérieur de la porte. B A C Pour ajouter le liquide de rinçage: • ouvrir la porte du lave-vaisselle; • dévisser le bouchon (réf. A fig.
FR INSTRUCTIONS POUR L’UTILISATEUR • • • • • Pour accéder au réglage du doseur, il faut tourner le bouchon du réservoir (réf. A fig. QSÏDÏEFOUF) du réservoir de ¼ de tour dans le sens inverse des aiguilles d’une montre et l’enlever. Ensuite, à l’aide d’un tournevis, tourner le sélecteur du dosage sur la position désirée. Remettre le bouchon (réf. A fig. QSÏDÏEFOUF) et le visser dans le sens des aiguilles d’une montre jusqu’à le fermer complètement.
FR INSTRUCTIONS POUR L’UTILISATEUR A • • • • • • • • B Quand on sélectionne un programme avec le prélavage à chaud (lire le tableau programmes reporté dans le manuel “Description des commandes”), ajouter une quantité supplémentaire de produit de lavage dans la cavité (réf. A ou B fig. EFTTVT, selon les modèles). N’utiliser que des produits de lavage spécifiques pour lave-vaisselle. L’emploi de produits de lavage de bonne qualité est important pour obtenir d’excellents résultats de lavage.
FR INSTRUCTIONS POUR L’UTILISATEUR • Quand on utilise du produit de lavage en pastilles, celles-ci devraient être placées dans le panier à couverts. Le distributeur est conçu pour l’emploi de produit de lavage en poudre ou liquide et le couvercle ne s’ouvre pas complètement pendant le cycle de lavage ; ainsi, la pastille peut ne pas se dissoudre complètement.
FR INSTRUCTIONS POUR L’UTILISATEUR paragr. 2.2).
FR INSTRUCTIONS POUR L’UTILISATEUR 5.
FR INSTRUCTIONS POUR L’UTILISATEUR 5. .
FR INSTRUCTIONS POUR L’UTILISATEUR 28
FR INSTRUCTIONS POUR L’UTILISATEUR 5. .
FR INSTRUCTIONS POUR L’UTILISATEUR 5. .
FR INSTRUCTIONS POUR L’UTILISATEUR 31
FR INSTRUCTIONS POUR L’UTILISATEUR 5-1 5-1 5-1 5-1 32
FR INSTRUCTIONS POUR L’UTILISATEUR 6 6.
FR INSTRUCTIONS POUR L’UTILISATEUR 6.2 Nettoyage du filtre d’arrivée d’eau Le filtre d’arrivée doit êre nettoyé périodiquement. Après avoir fermé le robinet d’eau, devisser la bague (réf. A fig. dessous) du tuyau d’arrivée d’eau (utiliser une pince, si necessaire), puis nettoyer délicatement le filtre en éliminant les dépôts et les impuetés. Une fois cette opéeration terminée, fixer fermement le tuyau en vissant la bague de serrage prévue à cet effet (réf. A fig. dessous) (utiliser une pince, si nécessaire).
FR INSTRUCTIONS POUR L’UTILISATEUR 6.3 Nettoyage des bras de lavage Les bras de lavage peuvent être facilement démontés pour permettre le nettoyage périodique des orifices afin d’éviter qu’ils se bouchent. Les laver sous un jet d’eau (à température ambiante) et les réintroduire avec précaution dans leurs sièges. S’assurer qu’ils tournent librement; en cas contraire, contrôler qu’ils ont été montés correctement. Démontage des bras de lavage • Pour démonter le bras de lavage supérieur (réf. A fig.
FR INSTRUCTIONS POUR L’UTILISATEUR 6.4 • • • • • 36 Nettoyage du groupe filtrant Il est conseillé de contrôler périodiquement le groupe filtrant (réf. A fig. dessous) et, si nécessaire, de le nettoyer sous l’eau courante (à la température ambiante) en utilisant une brosse dure. Pour l’enlever, il faut saisir les languattes, tourner dans les sens inverse des aigulles d’une montre et tirer vers le haut; pousser depuis le dessous le filtre central (réf. A fig.
FR INSTRUCTIONS POUR L’UTILISATEUR 6.
FR WARNINGS 6.
FR WARNINGS 39
FR WARNINGS 7 AVERTISSEMENTS SUR LA SÉCURITÉ ET L’UTILISATION (Conserver ces instructions) CE MODE D’EMPLOI EST PARTIE INTÉGRANTE DE L’APPAREIL: IL FAUT TOUJOURS LE CONSERVER INTACT PRÈS DE L’APPAREIL. AVANT L’UTILISATION, NOUS CONSEILLONS UNE LECTURE ATTENTIVE DE TOUTES LES INDICATIONS QU’IL CONTIENT. L’INSTALLATION DEVRA ÊTRE EFFECTUÉE PAR UN PERSONNEL QUALIFIÉ ET CONFORMÉMENT AUX NORMES EN VIGUEUR.
FR WARNINGS AVANT DE PROCÉDER À L’INSTALLATION, COUPER L’ALIMENTATION ÉLECTRIQUE DANS LA ZONE DE POSITIONNEMENT. NE PAS UTILISER DES PROLONGATEURS, ADAPTATEURS OU DÉRIVATEURS, CAR ILS PEUVENT PROVOQUER DES SURCHAUFFES OU S’ENFLAMMER EN ENTRAÎNANT DES RISQUES D’INCENDIE. PENDANT L’INSTALLATION, FAIRE ATTENTION AUX BORDS TRANCHANTS SUR LE LAVE-VAISSELLE ; POUR ÉVITER DE SE BLESSER, METTRE DES GANTS DE SÉCURITÉ.
FR WARNINGS NE PAS INHALER NI INGÉRER LE PRODUIT DE LAVAGE ; IL PEUT PROVOQUER DES BRÛLURES ET/OU DES LÉSIONS IRRÉPARABLES AU NEZ, À LA BOUCHE ET À LA GORGE ET MÊME PROVOQUER L’ASPHYXIE ; ÉVITER QUE LE PRODUIT DE LAVAGE ENTRE EN CONTACT AVEC LES YEUX. SI LES SITUATIONS SUSMENTIONNÉES SE PRODUISENT, FAIRE IMMÉDIATEMENT APPEL À UN MÉDECIN.
FR WARNINGS NE PAS INTRODUIRE DANS L’APPAREIL DE LA VAISSELLE EN PLASTIQUE SENSIBLE AUX TEMPÉRATURES ÉLEVÉES COMME, PAR EXEMPLE, DES COUVERTS OU RÉCIPIENTS JETABLES, CAR ILS PEUVENT SE DÉFORMER. NE PAS LAVER DES OBJETS EN PLASTIQUE S’ILS NE REPORTENT PAS L’INSCRIPTION “LAVABLE AU LAVE-VAISSELLE” OU UNE INDICATION SIMILAIRE. EN CAS D’OBJETS NON MARQUÉS, CONTRÔLER LES INDICATIONS DU FABRICANT; EN CAS D’ABSENCE D’INFORMATIONS, NE PAS LAVER CES OBJETS DANS LE LAVE-VAISSELLE.
FR WARNINGS NE PAS BOIRE L’EAU QUI EST ÉVENTUELLEMENT RESTÉE DANS LA VAISSELLE OU DANS LE LAVE-VAISSELLE. LES COUTEAUX ET LES AUTRES USTENSILES DE CUISINE AVEC DES POINTES TRANCHANTES DOIVENT ÊTRE PLACÉS DANS LE PANIER À COUVERTS AVEC LES POINTES TOURNÉES VERS LE BAS OU EN POSITION HORIZONTALE DANS LE PANIER SUPÉRIEUR, EN VEILLANT À NE PAS SE BLESSER ET À CE QU’ILS NE DÉPASSENT PAS, DE FAÇON À ÉVITER LE RISQUE DE SE COUPER.
FR WARNINGS POUR LE NETTOYAGE ET L’ENTRETIEN DE L’APPAREIL: AVANT D’EFFECTUER L’ENTRETIEN DE L’APPAREIL, DÉBRANCHER LA FICHE OU COUPER L’ALIMENTATION AU MOYEN DU DISPOSITIF D’INTERRUPTION OMNIPOLAIRE. IL FAUT ENLEVER LA PORTE DE LA CUVE DE LAVAGE ET COUPER L’ALIMENTATION ÉLECTRIQUE À L’APPAREIL QUAND ON DÉPOSE UN ANCIEN LAVE-VAISSELLE POUR DES RÉPARATIONS OU POUR LE REMPLACEMENT DÉFINITIF.
FR INSTRUCTIONS POUR L’UTILISATEUR 8 INSTRUCTIONS POUR L’INSTALLATION ET LA POSE Pour le détail des opérations à exécuter pour l’installation et la pose, consulter le manuel d’installation ci-joint. Nous reportons ci-après quelques avertissements à respecter lors des phases d’installation et pose du lave-vaisselle. PENDANT L’INSTALLATION, FAIRE ATTENTION AUX BORDS TRANCHANTS SUR LE LAVE-VAISSELLE ; POUR ÉVITER DE SE BLESSER, METTRE DES GANTS DE SÉCURITÉ.
FR INSTRUCTIONS POUR L’UTILISATEUR SI LE CORDON D’ALIMENTATION EST ENDOMMAGÉ, LE FAIRE REMPLACER PAR LE FABRICANT OU PAR UN CENTRE SAV AGRÉÉ. L’INSTALLATION DE CET APPAREIL ÉLECTROMÉNAGER DOIT PRÉVOIR SA MISE À LA TERRE. EN CAS DE PANNES OU ANOMALIES, LA MISE À LA TERRE LIMITE LE RISQUE D’ÉLECTRISATION, EN FOURNISSANT UN PARCOURS DE MOINDRE RÉSISTANCE AU COURANT ÉLECTRIQUE. AVANT DE PROCÉDER À L’EXÉCUTION DU BRANCHEMENT ÉLECTRIQUE, COUPER L’ALIMENTATION ÉLECTRIQUE DANS LA ZONE DE POSITIONNEMENT.
FR INSTRUCTIONS POUR L’UTILISATEUR 9 48 Largeur 59.7 cm - 59.9 cm (23-1/2" - 23-5/8") Profondeur mesurée au profil extérieur du bandeau de commande 55 cm (21-5/8") - FD6W24FI1 57 cm (22-4/8") - FD6W24SS1 Hauteur de 86 cm à 93 cm (de 33-14/16" à 36-10/16") Capacité 13 couverts standards Pression eau d’alimentation min.7 - max. 130 PSI (min. 0.5-max.
ES SUMARIO Sumario 1 INTRODUCCIÓN ...................................................................................................................................... 3 2 DESCRIPCIÓN DE LOS MANDOS ...................................................................................................... 5 2.1 Panel superior ....................................................................................................................... 5 2.2 Configuración del programa de lavado, encendido y apagado ..
ES 2
ES INTRODUCCIÓN 1 INTRODUCCIÓN Le agradecemos su confianza al elegir uno de nuestros productos. Con el fin de conocer las condiciones más adecuadas para un uso correcto y seguro de su lavavajillas, lea atentamente las instrucciones que figuran en este manual. Los apartados se presentan de manera que se pueda avanzar paso a paso en el conocimiento de todas las funciones del aparato. Los textos son de fácil comprensión y están ilustrados con imágenes detalladas.
ES INTRODUCCIÓN Símbolos utilizados en este manual PELIGRO. Este símbolo se refi ere a información y advertencias cuyo incumplimiento puede perjudicar la seguridad de las personas o dañar el aparato. PELIGRO ELÉCTRICO. Este símbolo se refi ere a información y advertencias de tipo eléctrico cuyo incumplimiento puede perjudicar la seguridad de las personas o dañar el aparato. Este símbolo se refi ere a información y advertencias generales.
ES INSTRUCCIONES PARA EL USUARIO 2 DESCRIPCIÓN DE LOS MANDOS 2.1 Panel superior Todos los mandos y los dispositivos de control del lavavajillas están situados en el panel superior (véase la fig. 2-01). Las operaciones de encendido, programación, apagado, etc. se pueden ejecutar solamente con la puerta abierta. A continuación se describen brevemente (véase la tab. 2-01) los diferentes mandos presentes en el panel superior.
ES INSTRUCCIONES PARA EL USUARIO 1 2 3 4 5 6 7 8 9 10 11 12 2.2 Tasto de encendido/apagado Pulsando este pulsador se pone el aparato bajo tensión. Pilotos de programa seleccionado El piloto encendido indica el programa seleccionado y la presencia de eventuales averías (Remedios para eventuales anomalías de funcionamiento). Pulsador de selección programas Pulsando este pulsador en secuencia es posible seleccionar el programa deseado.
DURAÇÃO CONSUMOS ENERGÍA kWh (1) Lavado a 45°C (113°F) Aclarado en frío Aclarado a 65°C (149°F) Secado
DURAÇÃO CONSUMOS ENERGÍA kWh (1) REMOJO Marmitas y vajilla en espera de completar la carga.
ES INSTRUCCIONES PARA EL USUARIO Lleve a cabo el ciclo de remojo únicamente cuando la carga sea parcial. Para ejecutar los programas 6, 7, 8, 9 y 10 es necesario pulsar, tras haber seleccionado el programa estándar deseado el pulsador opción quick time (ref. 6). Una vez que haya identificado el programa de lavado más adecuado mediante las tablas indicadas, realice la programación del lavavajillas.
ES INSTRUCCIONES PARA EL USUARIO 2.2.2 Selección e inicio del programa Pulse varias veces el pulsador de selección de programas (ref. 3) hasta que el piloto correspondiente al programa deseado se encienda (ref. 2); utilice los pulsadores correspondientes para seleccionar las funciones complementarias deseadas (p.ej. “Secado extra” y “Retraso del programa”; véase el apdo. 2.2.
ES INSTRUCCIONES PARA EL USUARIO 2.2.6 Borrado del programa en ejecución Para anular el programa en ejecución es necesario, tras haber abierto la puerta, pulsar y mantener pulsado por algunos segundos el pulsador de selección de programas (ref. 3) hasta que los pilotos del cuarto y quinto programa se enciendan simultáneamente (ref. pr. 4 y pr. 5 g. ). Cierre la puerta. Después de aproximadamente 1 minuto el lavavajillas alcanza el n del ciclo; los pilotos del cuarto y quinto programa (ref.
ES INSTRUCCIONES PARA EL USUARIO 2.2.8 Apagado Al nal del programa el lavavajillas emite una breve señal acústica y, además, los pilotos del cuarto y quinto programa (ref. pr. 4 y pr. 5 g. ) parpadean. El apagado del aparato se obtiene abriendo la puerta y pulsando el pulsador de encendido/apagado (ref. 1).
ES INSTRUCCIONES PARA EL USUARIO 2.3 Funciones suplementarias 2.3.1 Regulación del descalcificador NOTA: para realizar la siguiente regulación es necesario que el programa de lavado sea diferente al de remojo. Pulse y mantenga pulsado el pulsador de retraso del programa (ref. 11) hasta que aparezca el valor predefinido, seguido del punto (en general 3.). Suelte el pulsador, luego vuelva a pulsarlo repetidas veces para visualizar el valor deseado, según la tabla (véase la tab. dureza del agua).
ES INSTRUCCIONES PARA EL USUARIO NOTA: el display indica la regulación de la dureza del agua y el retraso del programa. El punto (.) después del número indica que se está visualizando la regulación de la dureza del agua. Si el punto (.) no aparece, significa que se está visualizando el retraso del programa.
ES INSTRUCCIONES PARA EL USUARIO 3 CÓMO AHORRAR ENERGÍA Y RESPETAR EL MEDIO AMBIENTE Trate de utilizar siempre el lavavajillas a plena carga. No lave la vajilla bajo el agua corriente. Utilizar el programa de lavado más adecuado para el tipo de carga. No enjuague previamente la vajilla. Si fuese posible, empalme el lavavajillas a una instalación de agua caliente hasta 60°C (140°F).
ES INSTRUCCIONES PARA EL USUARIO 45 REMEDIOS PARA EVENTUALES ANOMALÍAS DE FUNCIONAMIENTO El lavavajillas está en condiciones de señalar una serie de funcionamientos anómalos mediante el encendido simultáneo de diferentes pilotos con el siguiente signi cado (véase la tabla representada a continuación): ANOMALÍA DESCRIPCIÓN end E1 1/2 end E2 1/2 end E3 1/2 end E4 1/2 end E5 1/2 Piloto apagado 16 Avería aguastop Se ha activado el sistema antidesbordamiento (sólo para los modelos que dispone
ES INSTRUCCIONES PARA EL USUARIO ANOMALÍA end E6 1/2 end E7 1/2 end E8 1/2 end E9 1/2 Piloto apagado DESCRIPCIÓN Anomalía en descarga del agua No se obtiene la descarga del agua o se veri ca de modo anómalo. Controle que el tubo de descarga no esté doblado o aplastado y que el sifón o los ltros no estén obstruidos. Si el problema persiste, se ponga en contacto con el servicio técnico de asistencia clientes.
ES INSTRUCCIONES PARA EL USUARIO 4 5 INSTRUCCIONES PARA EL USO ANTES DE UTILIZAR EL APARATO, ASEGÚRESE DE HABER LEÍDO Y COMPRENDIDO TODAS LAS ADVERTENCIAS PRESENTES EN EL CAPÍTULO “ADVERTENCIAS PARA LA SEGURIDAD Y EL USO”. Una vez instalado correctamente el lavavajillas, lleve a cabo las siguientes operaciones para que pueda funcionar correctamente: • coloque el abrillantador y el detergente. 5.
ES INSTRUCCIONES PARA EL USUARIO SA LT A • Cuando utilice el lavavajillas por primera vez, además de la sal, deberá colocar en el mismo depósito también un litro de agua. • Todas las veces que rellene el depósito de sal, controle que el tapón (ref. A fig. página anterior) esté cerrado correctamente. La mezcla de agua y detergente no debe penetrar en el depósito de la sal para no perjudicar el funcionamiento de la instalació de regeneración. En este caso la garantía perdería su validez.
ES INSTRUCCIONES PARA EL USUARIO 5.2 4. Uso del dispensador de abrillantador y detergente El dispensador de detergente y el dosi cador de abrillantador están situados en la parte interior de la puerta: a la izquierda se encuentra el ) y a la derecha el A B EXCLUYENDO EL PROGRAMA DE REMOJO, ANTES DE CADA LAVADO SE DEBERÁ COLOCAR EN EL DISPENSADOR LA DOSIS ADECUADA DE DETERGENTE.
ES INSTRUCCIONES PARA EL USUARIO 5.2.1 Adición del abrillantador para el aclarado El abrillantador acelera el secado de la vajilla y previene la formación de manchas y depósitos calcáreos; la máquina añade el producto de forma automática al agua durante el último aclarado, tomándolo del depósito correspondiente, situado en la parte interior de la puerta. B A C Para agregar el abrillantador: • Abra la puerta del lavavajillas. • Gire el tapón (ref. A g.
ES INSTRUCCIONES PARA EL USUARIO mínima de abrillantador (indicador del selector situado en “1”) sea 1 ml aprox. y la dosis máxima de abrillantador (indicador del selector situado en “6”) sea 6 ml aprox. • Para regular la dosi cación gire el tapón del depósito (ref. A g. página anterior dándole ¼ de vuelta en sentido antihorario y retírelo de su lugar. • Luego gire con un destornillador el selector de dosi cación hasta alcanzar la posición deseada. • Vuelva a situar el tapón (ref. A g.
ES INSTRUCCIONES PARA EL USUARIO A A B • Cuando se selecciona un programa con prelavado caliente (véase la tabla de programas presente en el manual “Descripción de los mandos”), se deberá introducir una cantidad adicional de detergente en la cubeta (ref. A o B g. , según los modelos). • Utilice exclusivamente detergentes especí cos para lavavajillas. El uso de detergentes de buena calidad es importante para conseguir excelentes resultados de lavado.
ES INSTRUCCIONES PARA EL USUARIO • Coloque la dosis correcta de detergente. Una cantidad insuficiente elimina la suciedad de forma parcial mientras que una cantidad excesiva no aumenta la eficacia de lavado pero representa un desperdicio inútil de producto. • El mercado ofrece detergentes líquidos y en polvo que se diferencian por su composición química: algunos contienen fosfatos, otros no pero están provistos de enzimas naturales.
ES INSTRUCCIONES PARA EL USUARIO lavado a ½ carga, mientras que el otro cesto deberá permanecer vacío. El lavado previo de la vajilla bajo el agua corriente, antes de colocarla en los cestos, representa un desperdicio inútil de agua. La correcta colocación de la vajilla asegurará buenos resultados de lavado.
ES INSTRUCCIONES PARA EL USUARIO 4 5. Uso de los cestos El lavavajillas tiene una capacidad de 13 cubiertos, incluyendo la vajilla de servir. A continuación se dan algunos ejemplos para la carga de los 13 cubiertos en el cesto superior y en el cesto inferior.
ES INSTRUCCIONES PARA EL USUARIO 5.4.1 Cesto inferior El cesto inferior recibe la acción de la tobera de rociado inferior a la máxima intensidad, por lo tanto se deberá destinar a la vajilla más sucia y “difícil” de lavar. Están permitidas todas las combinaciones y variedades en la carga de la vajilla sucia, teniendo siempre cuidado de colocarla, junto a cacerolas y sartenes, de manera que todas las super cies sucias estén expuestas a los chorros de agua procedentes desde abajo.
ES INSTRUCCIONES PARA EL USUARIO Cómo se carga el cesto inferior Coloque con cuidado y en posición vertical los platos llanos, hondos, de postre y de servir. Las cacerolas, las ollas y sus tapas se deben colocar boca abajo. Coloque los platos hondos y los de postre teniendo cuidado de que quede siempre espacio entre los mismos.
ES INSTRUCCIONES PARA EL USUARIO 5.4 .2 Cesto para cubiertos El cesto está provisto de soportes porta cubiertos extraíbles, en los cuales se colocan los cubiertos de manera que queden su cientemente separados a n de permitir un paso optimizado del agua. Los soportes porta cubiertos y la tapa central se encuentran dentro de la bolsa de los accesorios. La tapa central desempeña solamente una función de cobertura. Los soportes pueden ser desprendidos y utilizados por separado.
ES INSTRUCCIONES PARA EL USUARIO 5.4 .3 Cesto superior Según los modelos, el cesto puede ser equipado con todos o algunos de los siguientes accesorios: - Soportes para tazas u objetos largos (cucharones, cucharas…), a la izquierda; pueden ser dispuestos y dejados en posición vertical mientras no se los utilice. - Soporte para copas de pie largo (glass holder), a la izquierda; para utilizarlo basta elevarlo y bloquearlo en los respectivos ganchos.
ES INSTRUCCIONES PARA EL USUARIO Cómo se carga el cesto superior Coloque los platos orientados hacia adelante; las tazas y los recipientes cóncavos se deberán colocar siempre con la abertura orientada hacia abajo. El lado izquierdo del cesto se podrá cargar con tazas y vasos dispuestos en dos pisos. En el centro se pueden colocar platos y platillos insertándolos verticalmente en los soportes correspondientes.
ES INSTRUCCIONES PARA EL USUARIO Regulación del cesto superior El cesto superior se puede regular en tres diferentes posiciones por ambos lados. Los lados del cesto deben estar a la misma altura. Para alzar el cesto (ref. A g. abajo) elévelo mediante las dos asas correspondientes (p.ej. ref. B g. abajo), hasta el primero o segundo disparo según la altura deseada; para bajarlo (ref. C g. abajo) es necesario tirar hacia arriba de las dos palancas de desbloqueo (p.ej. ref. D g. abajo).
ES INSTRUCCIONES PARA EL USUARIO 6 5 INSTRUCCIONES PARA LA LIMPIEZA Y EL MANTENIMIENTO ANTES DE CADA OPERACIÓN DESCONECTE LA ALIMENTACIÓN ELÉCTRICA DEL APARATO 6.1 5.1 Advertencias y consejos generales EVITE ABSOLUTAMENTE EL USO DE DETERGENTES ABRASIVOS Y/O CORROSIVOS PARA LIMPIAR EL APARATO. Las superficies exteriores y la puerta del lavavajillas se deberán limpiar periódicamente con un paño suave y limpio, humedecido con un detergente neutro común (no abrasivo y/o corrosivo) para superficies pintadas.
ES INSTRUCCIONES PARA EL USUARIO 6.2 Limpieza del ltro de entrada del agua El ltro de entrada del agua necesita una limpieza periódica. Tras haber cerrado la llave de suministro, desenrosque la virola (ref. A g. abajo) del tubo de carga del agua (utilice una pinza, si es necesario) y limpie delicadamente el ltro eliminando los depósitos o las impurezas. Al nalizar la operación, je rmemente el tubo, enroscando la virola de jación correspondiente (ref. A g.
ES INSTRUCCIONES PARA EL USUARIO A B tabera de rociado superior A tabera de rociado inferior 35
ES INSTRUCCIONES PARA EL USUARIO 6.4 • • • • • Limpieza del grupo filtrante Controle periódicamente el grupo filtrante (ref. A fig. abajo) y, si fuese necesario, límpielo bajo el agua corriente (a temperatura ambiente), utilizando un cepillo duro. Para sacarlo de su lugar, tome entre los dedos las lengüetas, gire en sentido antihorario y levante tirando hacia arriba; empuje desde abajo el filtro central (ref. A fig.
ES INSTRUCCIONES PARA EL USUARIO 6.5 Advertencias y consejos para el correcto mantenimiento • Los ltros se deben limpiar bajo el agua corriente (a temperatura ambiente) con un cepillo duro. Al retirar el ltro se deberá controlar que en el mismo no hayan quedado residuos de alimentos. Posibles residuos, cayendo en el desagüe (ref. A g. 6-06), podrían bloquear algunos componentes hidráulicos u obstruir los inyectores de las toberas de rociado.
ES ADVERTENCIAS Antes de volver a utilizar el lavavajillas después de mucho tiempo de inutilización • Controle que en la tubería no se hayan depositado sedimentos de lodo o herrumbre. En este caso, deje correr el agua desde la llave de alimentación hasta que salga limpia. • Vuelva a conectar la clavija a la toma de corriente. • Empalme nuevamente el tubo flexible de alimentación del agua y vuelva a abrir la llave. 6.6 5.
ES ADVERTENCIAS Cuando la vajilla presente manchas estriadas o manchas en general… controle que: • la regulación de la dosis de abrillantador no sea excesiva. Cuando la cuba de lavado presente manchas de herrumbre: • recuerde que la cuba es de acero, por lo tanto eventuales manchas de herrumbre se deben atribuir a elementos exteriores (pedacitos de herrumbre de las tuberías del agua, de cacerolas, cubiertos, etc.). Para eliminar estas manchas existen algunos productos específicos.
ES ADVERTENCIAS 72 ADVERTENCIAS PARA LA SEGURIDAD Y EL USO CONSERVAR ESTAS INSTRUCCIONES EL PRESENTE MANUAL ES UNA PARTE INTEGRANTE DEL APARA TO: SE DEBERÁ CONSERVAR SIEMPRE EN BUENAS CONDICIO NES DE INTEGRIDAD JUNTO A LA MÁQUINA. ANTES DEL USO LE ACONSEJAMOS LEA DETENIDAMENTE TODAS LAS INDICA CIONES CONTENIDAS EN EL MISMO. LA INSTALACIÓN SE DE BERÁ ASIGNAR A PERSONAS COMPETENTES, EN EL RESPETO DE LAS NORMAS VIGENTES.
ES ADVERTENCIAS NO ABANDONE EVENTUALES RESIDUOS DE EMBALAJE EN EL AMBIENTE DOMÉSTICO. SEPARE LOS DISTINTOS MATERIALES DE DESPERDICIO DEL EMBALAJE Y ENTRÉGUELOS AL CENTRO DE RECOLECCIÓN SELECTIVA DE RESIDUOS MÁS CERCANO. LOS RESIDUOS DEL EMBALAJE NO DEBEN QUEDAR AL ALCANCE DE LOS NIÑOS, DE PERSONAS CON CAPACIDADES FÍSICAS Y/O MENTALES REDUCIDAS O DE ANIMALES; EXISTE EL PELIGRO DE SOFOCACIÓN. ANTES DE REALIZAR LA INSTALACIÓN DESCONECTA LA ALIMENTACIÓN ELÉCTRICA DEL ÁREA DE TRABAJO.
ES ADVERTENCIAS ¡NO UTILICE APARATOS QUE HAYAN SUFRIDO DAÑOS DURANTE EL TRANSPORTE! EN CASO DE DUDAS PÓNGASE EN CONTACTO CON EL VENDEDOR. EL APARATO SE DEBERÁ INSTALAR Y CONECTAR SEGÚN LAS INSTRUCCIONES SUMINISTRADAS POR EL FABRICANTE Y POR PERSONAL COMPETENTE. UTILICE SOLAMENTE DETERGENTES DECLARADOS ADECUADOS PARA EL USO EN LAVAVAJILLAS. NO UTILICE DETERGENTES PARA EL LAVADO A MANO. UTILICE EXCLUSIVAMENTE ABRILLANTADOR PARA LAVAVAJILLAS DOMÉSTICOS.
ES ADVERTENCIAS NO VIERTA EL DETERGENTE EN POLVO Y/O LÍQUIDO EN EL COMPARTIMENTO DEL ABRILLANTADOR YA QUE LO DAÑARÍA. NO VIERTA EL DETERGENTE EN POLVO Y/O LÍQUIDO EN EL DEPÓSITO DEL DESCALCIFICADOR YA QUE LO DAÑARÍA. NO UTILICE DETERGENTES PARA EL USO INDUSTRIAL; EXISTE EL RIESGO DE DAÑAR LOS MATERIALES QUE CONSTITUYEN EL APARATO Y EL PELIGRO DE REACCIONES QUÍMICAS VIOLENTAS (P.EJ. GAS EXPLOSIVO). NO PONGA EN EL APARATO VAJILLA QUE PRESENTE RESIDUOS DE CENIZA, CERA O PINTURA.
ES ADVERTENCIAS DEJAR CORRER EL AGUA POR ALGUNOS MINUTOS. DE ESTE MODO SE PERMITIRÁ LA ELIMINACIÓN DE POSIBLES ACUMULACIONES DE HIDRÓGENO. COMO ESTE GAS ES INFLAMABLE, NO FUME NI UTILICE LLAMAS ABIERTAS DURANTE ESTE PERIODO. NO SE APOYE NI SUBA A LA PUERTA ABIERTA DEL LAVAVAJILLAS YA QUE EL APARATO SE PODRÍA VOLCAR PROVOCANDO SITUACIONES PELIGROSAS PARA LAS PERSONAS. NO DEJE LA PUERTA DEL LAVAVAJILLAS ABIERTA YA QUE SE PODRÍA TROPEZAR CON ELLA. NO SE APOYE NI SUBA A LOS CESTOS DEL LAVAVAJILLAS.
ES ADVERTENCIAS CAER LA ELECTROVÁLVULA EN EL AGUA. EN CASO DE QUE SE PERJUDIQUE EL TUBO DE ALIMENTACIÓN DEL AGUA, DESCONECTE EL APARATO DE LA RED HÍDRICA Y ELÉCTRICA. TERMINADA LA INSTALACIÓN, LLEVE A CABO ALGUNAS PRUEBAS DEL APARATO (VÉASE EL MAN. “INSTALACIÓN”). EN CASO DE QUE EL APARATO NO FUNCIONE, DESCONECTELO DE LA RED ELÉCTRICA Y DIRÍJASE AL CENTRO DE ASISTENCIA TÉCNICA MÁS CERCANO. NO TRATE DE REPARAR EL APARATO POR SU CUENTA.
ES INSTRUCCIONES PARA EL USUARIO ASEGURÁNDOSE DE QUE ESTE PRODUCTO SE ELIMINE DE MODO CORRECTO, EL USUARIO CONTRIBUYE A PREVENIR LAS POTENCIALES CONSECUENCIAS NEGATIVAS PARA EL MEDIO AMBIENTE Y LA SALUD. EL FABRICANTE NO SE ASUME NINGUNA RESPONSABILIDAD EN CASO DE DAÑOS SUFRIDOS POR PERSONAS, COSAS Y ANIMALES, PROVOCADOS POR EL INCUMPLIMIENTO DE LAS PRESCRIPCIONES CITADAS O DEBIDOS A LA VIOLACIÓN DE ALGUNA PIEZA DEL APARATO O AL EMPLEO DE REPUESTOS NO ORIGINALES.
ES INSTRUCCIONES PARA EL USUARIO 8 3 INSTRUCCIONES PARA LA INSTALACIÓN Y LA PUESTA EN OBRA Para realizar las operaciones de instalación y puesta en obra, véase el manual de instalación adjunto. A continuación se dan algunas advertencias que se deben seguir durante la fase de instalación y puesta en obra del lavavajillas. DURANTE LA INSTALACIÓN TENGA CUIDADO CON LOS BORDES CORTANTES PRESENTES EN EL LAVAVAJILLAS, PARA EVITAR HERIDAS; LLEVE GUANTES DE SEGURIDAD.
ES INSTRUCCIONES PARA EL USUARIO CONTROLE QUE LOS VALORES DE TENSIÓN Y FRECUENCIA DE RED CORRESPONDAN A LOS QUE SE INDICAN EN LA PLACA DE IDENTIFICACIÓN DEL APARATO. ESTA PLACA ESTÁ FIJADA EN EL BORDE INTERIOR DE LA PUERTA. EN CASO DE DAÑARSE EL CABLE DE ALIMENTACIÓN, DEBERÁ SER SUSTITUIDO POR EL FABRICANTE O POR UN CENTRO DE ASISTENCIA AUTORIZADO. LA INSTALACIÓN DE ESTE ELECTRODOMÉSTICO DEBE INCLUIR LA PUESTA A TIERRA.
ES INSTRUCCIONES PARA EL USUARIO LA SUSTITUCIÓN DEL CABLE DE ALIMENTACIÓN DEBE SER EFECTUADA POR EL FABRICANTE O POR UN CENTRO DE ASISTENCIA AUTORIZADO A FIN DE PREVENIR TODO POSIBLE RIESGO. NO UTILICE PROLONGADORES, ADAPTADORES O DERIVADORES YA QUE PODRÍAN PROVOCAR RECALENTAMIENTOS CON EL CONSIGUIENTE PELIGRO DE INCENDIO.
ES INSTRUCCIONES PARA EL USUARIO 9 50 CARACTERÍSTICAS TÉCNICAS Anchura 59.7 cm - 59.9 cm (23-1/2" - 23-5/8") Espesor medido al ras exterior del panel de mandos 55 cm (21-5/8") - FD6W24FI1 57 cm (22-4/8") - FD6W24SS1 Altura de 86 cm a 93 cm (de 33-14/16" a 36-10/16") Capacidad 13 cubiertos estándar Presión del agua de alimentación min.7 - max. 130 PSI (min. 0.5-max.
FULGOR MILANO ® Meneghetti S.p.a. Via Borgo Lunardon, 8 • 36027 Rosà (Vicenza) - Italy http://www.fulgor-milano.us • e-mail: info@fulgor-milano.