
Installation Instructions


EN
5
2 - Product Dimensions and Cutout Requirements
Before moving the range, protect any finished flooring and
secure oven door(s) closed to prevent damage.
Vent hood Combinations:
It is recommended that these ranges be installed in conjunction
with a suitable overhead vent hood.
Due to the high heat capacity of this unit, particular attention
should be paid to the hood and ductwork installation to assure
it meets local building codes.
WARNING
Air curtain or other overhead hoods, which operate by
blowing a downward air flow on to a range, shall not be used
in conjunction with ranges with gas cooktop other than when
the hood and range have been designed, tested and certified
by an independent test laboratory for use in combination with
each other.
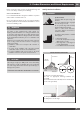
Clearances to horizontal surfaces above the range, measured
to the cooking surface are below. Failure to comply may
result in fire hazard.
• Installations without a hood require 30” minimum to
combustibles.
• A custom hood installation with exposed horizontal
combustible surfaces must have an Auto-On feature.
• For other installations with a hood, refer to the hood
installation instructions for specific hood clearances.
CAUTION
These ranges weigh up to 400 pounds. Some disassembly
will reduce the weight considerably. Due to the weight and
size of the range and to reduce the risk of personal injury or
damage to the product:
TWO PEOPLE ARE REQUIRED FOR PROPER INSTALLATION.
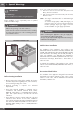
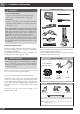
Anti-Tip Bracket Installation
WARNING
Tip Over Hazard
A child or adult can tip the range and
be killed.
Ensure the anti-tip bracket is engaged
when the range is moved.
Do not operate range without anti-tip
bracket installed and engaged.
Failure to follow these instructions
can result in death or serious burns to
children and adults.
Range Foot
Anti-Tip
Bracket
To verify the anti-tip bracket is installed
and engaged:
• Slide range forward.
• Look for the anti-tip bracket securely
attached to floor or wall.
• Slide range back so rear range foot
is under anti-tip bracket.
• See installation instructions for details.
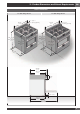
ANTI-TIP BRACKET INSTALLATION
ANTI-TIP
BRACKET
FLUSH
CABINET
SIDEWALL
BACKWALL
WALL
ANCHOR
For Concrete or Cement Construction:
You must use appropriate fastening hardware (not
provided).
Secure the bracket to the wall and/or floor with at least 4
wood screws (provided).
The anti-tip bracket should be inserted into the opening on
the anti-tip brace on the range.