
Manual

6) Tighten the nyloc nut a few turns. Your goal should be to tighten the nut just to the point where it keeps the
adapter plate from slipping around, but not so tight that the plate can’t float freely (i.e., independent of the
movement of the throttle flipper). The clearance should be approximately the thickness of a business card. Don’t
worry, since it’s a locking nut it won’t vibrate off (see Photo C).
7) Now, hold the adapter plate with your left hand while engaging the right side throttle with your right hand. You
should feel no friction whatsoever, yet the plate should not wobble excessively on the bolt. Adjust the tightness of
the nyloc nut until it feels as described in step 6.
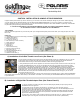
C) Routing of Cable From Left Throttle to Right-Side Cable Attachment (See Photos E & F)
(CAUTION: Your kit contains a black vinyl cable housing. This cable housing MUST BE TRIMMED
to the proper length during installation for safe and proper operation.)
1) In order to protect your cable from the many hazards of snowmobiling, we recommend that you route your left-
throttle-to-right-throttle cable shroud underneath the handlebar padding on models so equipped. To do this you will
first need to remove the center handlebar padding. Most snowmobile models have either zippers or a velcro
closure system which you will first need to open before removing the foam padding.
2) Push the “hammerhead” cable end of the stainless cable into the slot on the back of the GOLDFINGER left
throttle lever, then thread through the hole in the GOLDFINGER throttle perch housing as shown in photo E.
3) Insert the stainless cable bare end into the black cable housing (starting at the end with the chrome ferrule
end), then push all the way through until it comes out the other end.
4) Route the cable housing across the handlebars and through the hole in the rounded end of the
barrel bolt (you may need to loosen the short allen screw slightly to allow the cable to pass through the hole). It is
very important that the cable follow as straight a line as possible to the right side in order to reduce kinks or
binding, which may cause friction. (TIP: On our snowmobile we found it worked best to run the cable UNDERNEATH the brake line and wiring harness
on the LEFT SIDE of the handlebars, but OVER the wires and OEM throttle cables on the RIGHT SIDE of the handlebars.)
5) Secure the newly routed cable shroud with two zip ties on the left and two on the right side of the handlebars. (SEE ARROWS IN PHOTO F.) Pull
the zip ties snug, but not so tight as to kink the cable, then cut off the excess length from each zip tie.
6) With the GOLDFINGER left throttle in the fully-closed position, check to make sure chrome-capped cable housing end is pushed all the way into the
left throttle perch assembly. Next, measure 1 ¼” to the LEFT from the rounded end of the barrel bolt and make a mark on the black cable housing.
7) Before trimming cable housing, you MUST slide the stainless cable far enough into the housing so you don’t cut through the cable itself. Use a
sharp pair of diagonal cutters (dikes) to cut the cable housing. After trimming cable shroud, inspect end for any burrs or obstructions which might need
further trimming. (TIP: If there is a burr inside the cable housing you can usually clear it with a drill bit or other sharp pointed tool which is slightly
smaller than the internal diameter of the cable housing .)
8) Lightly crimp the shiny chrome cable end (included in your kit) on to the cut end of the cable housing
(slip-joint pliers work nicely), then push stainless cable back through the cable housing, making sure the
cable slides smoothly in and out of housing. If there is any friction, refer to burr removal tip found in step 7.
9) Next, run the bare end of the stainless cable through the large end of the rubber accordion boot, pulling
the boot up until it slides on to the chrome cable housing end.
10) Insert stainless cable through hole in the rounded end of barrel bolt. For now, leave excess cable
hanging out of the end of the barrel bolt, and do not tighten the barrel bolt short allen screw yet. You will do
this in step D.
11) Replace the handlebar padding and vinyl cover.
D) Left Throttle Adjustment
THE FOLLOWING IS THE MOST CRITICAL PART OF THE INSTALLATION PROCESS!
1) With the right throttle in the FULLY CLOSED position and while holding the throttle plate from moving, pull the bare cable end tightly to the right to
eliminate slack in the cable (slip-joint pliers or vice grips help to grip the cable).
2) Using the 4mm allen wrench, tighten the short allen screw into the barrel bolt to secure the cable. DO NOT TIGHTEN COMPLETELY until you are
satisfied with the adjustment of the cable (this will flatten the cable inside the barrel bolt, making it more difficult to adjust).
3) Slowly engage the left throttle (with the engine off, of course--we had to put that in for obvious legal reasons) while watching the movement of
the right-side adapter plate. If adjusted properly, the right throttle should open fully, and then CLOSE COMPLETELY when left throttle is released. If it
does not close completely, continue adjusting position of cable inside barrel bolt until throttle opens and closes fully. When satisfied with adjustment,
tighten short allen screw into barrel bolt. (NOTE: There should be one washer between the short allen screw head and the top side of the adapter plate,
and another washer between the plate and the barrel bolt. When the short allen screw is tightened completely into the barrel bolt it will secure the cable,
but there should still be a tiny bit of clearance so the barrel bolt can rotate freely without binding.) Use your best judgment so you don’t strip the threads
in the barrel bolt (we’ve never done it yet, but we’re sure someone out there might be stronger than us….)
4) One more test: Engage the right throttle flipper fully with your right hand while watching the left throttle. Does the left throttle move any more
than 1/8” to 1/4”? If so you will need to remove the friction by either adding or removing stainless washers from between the right-side throttle flipper and
the throttle block housing.
5) Final step: Now you’re ready to trim the excess stainless steel cable. It’s best to use a sharp pair of diagonal cutting pliers or other sharp wire
cutters. You should leave about 1/2”” of cable sticking out of the blunt (right) end of the barrel bolt. Push the bare wire into the aluminum crimp cap
included with your kit, and crimp lightly with pliers to secure it on to the cable.
Before starting snowmobile, confirm that OEM throttle is in the fully closed (idle) position.
CONGRATULATIONS -- You are finished with the installation of your
GOLDFINGER left-side throttle!
E
C
F