INITIAL SETTING CR270TT8 CONNECTION Owner’s Manual INTRODUCTION 27 ” Digital / Analog Television WATCHING TV OPTIONAL SETTING TROUBLESHOOTING INFORMATION TO RECEIVE DIGITAL/ANALOG SIGNAL, YOU MUST CONNECT ANTENNA. IF YOU NEED ADDITIONAL ASSISTANCE WITH SETUP OR OPERATING AFTER READING OWNER’S MANUAL, PLEASE CALL TOLL FREE 1-800-844-5001. L4758UJ_EN.
INTRODUCTION WARNING: TO REDUCE THE RISK OF FIRE OR ELECTRIC SHOCK, DO NOT EXPOSE THIS APPLIANCE TO RAIN OR MOISTURE. CAUTION RISK OF ELECTRIC SHOCK DO NOT OPEN THIS SYMBOL INDICATES THAT DANGEROUS VOLTAGE CONSTITUTING A RISK OF ELECTRIC SHOCK IS PRESENT WITHIN THIS UNIT. CAUTION: TO REDUCE THE RISK OF ELECTRIC SHOCK, DO NOT REMOVE COVER (OR BACK). NO USER SERVICEABLE PARTS INSIDE. REFER SERVICING TO QUALIFIED SERVICE PERSONNEL.
ATTENTION: POUR ÉVITER LES CHOCS ÉLECTRIQUES, INTRODUIRE LA LAME LA PLUS LARGE DE LA FICHE DANS LA BORNE CORRESPONDANTE DE LA PRISE ET POUSSER JUSQU’AU FOND. FCC WARNING This equipment may generate or use radio frequency energy. Changes or modifications to this equipment may cause harmful interference unless the modifications are expressly approved in the manual. The user could lose the authority to operate this equipment if an unauthorized change or modification is made.
INTRODUCTION LOCATION For safe operation and satisfactory performance of the unit, keep the following in mind when selecting a place for its installation: • Shield it from direct sunlight and keep it away from sources of intense heat. • Avoid dusty or humid places. • Avoid places with insufficient ventilation for proper heat dissipation. Do not block the ventilation holes at the top and bottom of the unit. Do not place the unit on a carpet because this will block the ventilation holes.
Contents INTRODUCTION CONNECTION Basic Connection. . . . . . . . . . . . . . . . . . . . . . . . . . . . . . . . . . . . . . . . . . . . . . . . . . 8 External Device Connection . . . . . . . . . . . . . . . . . . . . . . . . . . . . . . . . . . . . . . . . 9 INITIAL SETTING WATCHING TV OPTIONAL SETTING Channel Add/Delete. . . . . . . . . . . . . . . . . . . . . . . . . . . . . . . . . . . . . . . . . . . . . . 16 Picture Adjustment . . . . . . . . . . . . . . . . . . . . . . . . . . . . . . . . . .
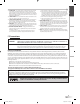
INTRODUCTION 5 Remote Control Function 1. 2. / DTV TV POWER 1 7 AUDIO 2 1 2 3 4 5 6 7 8 9 0 +100 –/ENT 3 4 INFO 8 9 CHANNEL RETURN 10 CH VOL VOL 3. CH 5 11 MENU 6 INPUT SELECT SLEEP 4. MUTE 12 5. 6. POWER button (p10) Press to turn the unit on and off. Number buttons (p12) • Press to select channels. -/ENT button • Press to shift the minor channel from the major channel. +100 button • Press to select 100 or higher channels.
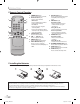
INTRODUCTION 5 Control Panel 1. 3. 5. 6. 7. L - AUDIO - R MENU Y VOLUME X L CHANNEL K WATCHING TV VIDEO INITIAL SETTING 4. CONNECTION 2. Infrared Sensor Window Receives infrared rays transmitted from the remote control. POWER button (p10) Press to turn the unit on and off. CHANNEL K / L buttons (p11) Press to select channels or move up/down through the main menu items. VOLUME X / Y buttons (p12) Press to adjust the volume or move right(X)/left(Y) through the main menu items.
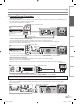
CONNECTION Cables not included. Please purchase the necessary cables at your local store. 5 Basic Connection This section describes how to connect the unit to an antenna, cable/satellite box, etc. Note: • Be sure your antenna or other device is connected properly before plugging in the power cord. [Antenna Cable Connection] When connecting the unit to an antenna or cable TV company (without cable/satellite box) Connect the RF coaxial cable on your home outlet to the antenna input jack of this unit. e.g.
INTRODUCTION Cables not included. Please purchase the necessary cables at your local store. 5 External Device Connection CONNECTION [Component Connection] This is the best method to connect this TV to video devices with the component output jack, such as DVD player, etc. It can minimize the deterioration of image quality. Use the component cable for connection. component video cable INITIAL SETTING e.g.
INITIAL SETTING These operations are accessible by remote control. Some may also be accessible by controls on the main unit. 5 Initial Setup This section will guide you through the unit’s initial setting which includes selecting a language for your on-screen menu and “AUTO PRESET CH”, which automatically scans and memorizes viewable channels. [CH K/L] to select “AUTO PRESET CH(TV/DTV)” 5 Use for TV channels or “AUTO PRESET CH(CATV)“ for CATV channels, then press [VOL X].
2 Use [CH K/L] to select “CHANNEL SET”, then press [VOL X]. e.g.) digital TV mode CH or CH PICTURE CHANNEL SET [ENG]/ESP/FRA V-CHIP SET UP CAPTION [OFF] DTV SET UP VOL 5 Language Selection You can choose English, Spanish, or French as your on-screen language. 1 Press [MENU] to display the main menu. [CH K /L] to select “[ENG]/ESP/FRA”, 2 Use then press [VOL X] repeatedly to change the setting. e.g.
WATCHING TV 5 Channel Selection 5 Volume Adjustment Select channels by pressing [CH K /L] or [the Number buttons]. This section describes how to adjust the volume. The mute function, which turns the sound off and on, is also described. • To select the memorized channels, use [CH K/L] or [the Number buttons]. • To select the non-memorized channels use [the Number buttons]. Use [VOL X/Y] to adjust the audio volume.
5 Screen Information Use your remote control to access an external device when they are connected to the unit. You can display the currently selected channel or other information such as the audio mode on the TV screen. TV CONNECTION Press [INPUT SELECT] repeatedly to cycle through analog TV, digital TV, VIDEO1 and VIDEO2. In the analog mode, the current channel number is displayed. Press [INFO].
WATCHING TV 5 TV Screen Display Mode DTV In the digital mode, the detailed broad casting information for the current channel such as program title, the program guides are displayed. 2 types of display modes can be selected in the digital mode. DTV Press [INFO] repeatedly to cycle through the available display modes. [OFF] 1 Press [MENU] to display the main menu. INFO MENU [BROADCASTING INFORMATION] [PROGRAM GUIDE] 2 Use [CH K /L] to select “DTV SET UP”, then press [VOL X]. e.g.
INTRODUCTION 5 Sleep Timer The sleep timer can be set to automatically turn off the unit after an incremental period of time. CONNECTION 1 Press [SLEEP] to set the sleep timer. SLEEP INITIAL SETTING SLEEP 0 • Sleep timer display appears on the TV screen. 2 Press [SLEEP] repeatedly to change the amount of time until shut off. WATCHING TV SLEEP SLEEP 90 OPTIONAL SETTING TROUBLESHOOTING • You can set the unit to turn off after a set period of time (from 10 to 90 minutes).
OPTIONAL SETTING 5 Channel Add/Delete The channel add/delete function lets you add the channel that was not added by the auto channel scan due to the reception status at the initial setting. You can also delete the unnecessary channels. 6 Press [MENU] to exit. MENU 1 Press [MENU] to display the main menu. Note: MENU 2 Use [CH K/L] to select “CHANNEL SET”, then press [VOL X]. e.g.) digital TV mode CH • The main menu will disappear automatically in about 10 seconds.
5 Closed Caption You can adjust brightness, contrast, color, tint and sharpness. You can view closed captioning (cc) for TV programs, movies and news. Closed caption refer to text of dialogue or descriptions displayed on-screen for the hearing impaired. CONNECTION 1 Press [MENU] to display the main menu. 1 Press [MENU] to display the main menu. MENU MENU or CH 2 Use [CH K /L] to select “CAPTION”, then use [VOL X /Y] to change the setting.
OPTIONAL SETTING 3 Press [MENU] to exit. MENU Note: • To show the closed caption on your TV screen, broadcast signal must contain the closed caption data. • Not all TV programs and commercials have the closed caption or all types of the closed caption. • Captions and texts may not match the TV voice exactly. • Changing channels may delay the closed caption for a few seconds. • Adjusting or muting the volume may delay the closed caption for a few seconds.
[OFF] INTRODUCTION [CAPTION SERVICE] [FONT STYLE] Font style of the displayed caption can be switched as below. CONNECTION [STYLE1/8] [SERVICE1/6] [STYLE2/8] [SERVICE2/6] VOL or VOL [STYLE3/8] [SERVICE3/6] or VOL INITIAL SETTING [SERVICE4/6] [STYLE4/8] VOL [STYLE5/8] [SERVICE5/6] [STYLE6/8] [SERVICE6/6] [STYLE7/8] [STYLE8/8] • “CAPTION SERVICE” you can switch differs depending on the broadcast description.
OPTIONAL SETTING [FORE COLOR] Font color of the displayed caption can be switched as below. 5 V-chip V-chip reads the ratings for programs, then denies access to the programs which exceed the rating level you set. With this function, you can block certain programming inappropriate for children. [TRANSPARENT] [WHITE] 1 Press [MENU] to display the main menu. [BLACK] MENU [RED] VOL or VOL [GREEN] 2 Use [CH K /L] to select “V-CHIP SET UP“, then press [VOL X]. [BLUE] e.g.
Selection INTRODUCTION A. TV Rating Rating Category Explanations LOWER Appropriate for all children e.g.) analog TV mode TV-Y7 Appropriate for all children 7 and older CH or CH TV RATING MPAA RATING CHANGE CODE TV-G General audience TV-PG Parental guidance suggested TV-14 Unsuitable for children under 14 VOL TV-MA Mature audience only INITIAL SETTING TV-Y then press [VOL X].
OPTIONAL SETTING B. MPAA Rating C. Change Code MPAA Rating is the rating system created by MPAA (Motion Picture Association of America). Although the default code “0000” is supplied with the unit, you can set your own code. 4 Use [CH K /L] to select “MPAA RATING”, then press 4 Use [CH K /L] to select “CHANGE CODE”, then [VOL X]. press [VOL X]. e.g.) analog TV mode CH e.g.
INTRODUCTION 5 D.S.T. 5 Time Zone DTV DTV If you move the TV to a different area after the initial setting you set when you first turned on the power, you can set the area again. 1 Press [MENU] to display the main menu. 1 Press [MENU] to display the main menu. MENU INITIAL SETTING MENU CONNECTION After the initial setting you set when you first turned on the power, you can set the D.S.T. (daylight saving time) again.
TROUBLESHOOTING 5 Troubleshooting Guide If the unit does not perform properly when operated as instructed in this owner’s manual, check the following chart once before calling for service. Symptom Remedy No power • Be sure the power cord is plugged in. • If a power failure occurs, unplug the power cord for 30 minutes to allow the unit to reset itself. No picture or sound • Check if the power is on. • Check the outlet connection. • Check the antenna or cable connection to the main unit.
• Many digital channels have alternate channel numbers. The unit changes the numbers automatically to the ones signifying the broadcasting stations. These are the numbers used for analog broadcasts. Remote control does not work • Check the antenna or cable connection to the main unit. • Check the batteries of the remote control. • Check if there is an obstacle between the infrared sensor window and the remote control. • Test the signal output. If OK, then possible infrared sensor trouble.
INFORMATION 5 Glossary Access Code ATSC NTSC A stored 4-digit number that allows access to parental control features. Acronym that stands for Advanced Television Systems Committee and the name of the digital broadcasting standards. Acronym that stands for National Television Systems Committee and the name of the current analog broadcasting standards. Dolby Digital SDTV (standard definition TV) The system developed by Dolby Laboratories to compress digital sound.
5 Electrical Specification Television system: ATSC / NTSC-M TV standard Sound output: §15.122/FCC (Digital CC) §15.
LIMITED WARRANTY FUNAI CORP. will repair this product, free of charge in the USA in the event of defect in materials or workmanship as follows: DURATION: PARTS: LABOR: FUNAI CORP. will provide parts to replace defective parts without charge for one (1) year from the date of original retail purchase. Two (2) years for Picture Tube. Certain parts are excluded from this warranty. FUNAI CORP. will provide the labor without charge for a period of ninety (90) days from the date of original retail purchase.
AJUSTE INICIAL PARA VER LA TELEVISIÓN AJUSTE OPCIONAL SOLUCIÓN DE PROBLEMAS CR270TT8 CONEXIÓN Manual del Usuario INTRODUCCIÓN Televisión Digital / Analógica de 27 Pulgadas INFORMACIÓN PARA RECIBIR LA SEÑAL DIGITAL/ANALÓGICA, DEBE CONECTAR LA ANTENA. SI NECESITA AYUDA ADICIONAL CON LA INSTALACIÓN O CON EL FUNCIONAMIENTO DESPUÉS DE LEER EL MANUAL DEL USUARIO, LLAME AL TELÉFONO GRATUITO 1-800-844-5001. L4758UJ_ES.
INTRODUCCIÓN ADVERTENCIA: PARA REDUCIR EL RIESGO DE INCENDIO O DESCARGA ELÉCTRICA, NO EXPONGA ESTE APARATO A LLUVIA O HUMEDAD. CAUTION RISK OF ELECTRIC SHOCK DO NOT OPEN ESTE SÍMBOLO INDICA QUE EL INTERIOR DEL APARATO CONTIENE TENSIÓN PELIGROSA CON RIESGO DE DESCARGA ELÉCTRICA. CUIDADO: PARA REDUCIR EL RIESGO DE DESCARGA ELÉCTRICA, NO ESTE SÍMBOLO INDICA QUE LA DOCUMENTACIÓN QUE ACOMPAÑA A ESTE APARATO CONTIENE IMPORTANTES INSTRUCCIONES DE FUNCIONAMIENTO Y MANTENIMIENTO.
CUIDADO: PARA EVITAR LA DESCARGA ELÉCTRICA, HAGA COINCIDIR EL CONTACTO ANCHO DEL ENCHUFE CON LA RANURA ANCHA E INSERTE FIRMEMENTE. ADVERTENCIA DE LA FCC Este equipo puede generar o utilizar energía de radiofrecuencia. Los cambios o modificaciones en este equipo pueden provocar interferencia perjudicial a menos que las modificaciones estén expresamente aprobadas en el manual.
INTRODUCCIÓN UBICACIÓN Para un funcionamiento seguro y un rendimiento satisfactorio del aparato, tenga en cuenta lo siguiente a la hora de seleccionar un lugar para su instalación: • Debe protegerlo de la luz solar directa y mantenerlo apartado de fuentes de calor intenso. • Evite lugares polvorientos o húmedos. • Evite lugares con ventilación insuficiente para una disipación de calor adecuada. No bloquee los orificios de ventilación situados en la parte superior e inferior del aparato.
5 Índice INTRODUCCIÓN CONEXIÓN Conexión Básica . . . . . . . . . . . . . . . . . . . . . . . . . . . . . . . . . . . . . . . . . . . . . . . . . . 8 Conexión de Dispositivo Externo . . . . . . . . . . . . . . . . . . . . . . . . . . . . . . . . . . . . 9 AJUSTE INICIAL Configuración Inicial . . . . . . . . . . . . . . . . . . . . . . . . . . . . . . . . . . . . . . . . . . . . . 10 Menú Principal . . . . . . . . . . . . . . . . . . . . . . . . . . . . . . . . . . . . . . . . . . . . . . . . . .
INTRODUCCIÓN 5 Función de Mando a Distancia / DTV TV POWER 1 7 AUDIO 2 1 2 3 4 5 6 7 8 9 0 +100 –/ENT 3 4 INFO 8 9 CHANNEL RETURN 10 CH VOL VOL CH 5 11 MENU 6 INPUT SELECT SLEEP MUTE 12 1. Botón POWER (p. 10) Presione para activar y desactivar el aparato. 2. Botones numéricos (p. 12) • Presione para seleccionar los canales. Botón -/ENT • Presione para separar el canal menor del canal mayor. Botón +100 • Presione para seleccionar el canal 100 o superiores.
INTRODUCCIÓN 5 Panel de Control 1. 3. 5. 6. 7. VIDEO L - AUDIO - R MENU Y VOLUME X L CHANNEL K POWER 1 2 3 4 5 6 7 5 Panel Trasero 1. 2. VIDEO Y Cb L Cr 4. DIGITA L AUDIO OUTPUT L AUDIO INPUT S-VIDEO R ANT. IN R COMPONENT INPUT VIDEO-1 INPUT 5. VIDEO Y DIGITAL AUDIO OUTPUT L Cb L Cr AUDIO INPUT R S-VIDEO R COMPONENT INPUT VIDEO-1 INPUT ANT. IN 1 2 3 4 5 6 6. INFORMACIÓN 3. Toma ANT. IN (p. 8) Conexión de cable coaxial RF para su antena o caja de cable/satélite.
CONEXIÓN Cables no incluidos. Deberá adquirir los cables necesarios en su establecimiento local. 5 Conexión Básica En esta sección se describe cómo conectar el aparato a una antena, caja de cable/satélite, etc. Nota: • Asegúrese de que su antena u otro dispositivo está conectada correctamente antes de enchufar el cable de alimentación.
INTRODUCCIÓN Cables no incluidos. Deberá adquirir los cables necesarios en su establecimiento local. 5 Conexión de Dispositivo Externo CONEXIÓN [Conexión De Componente] Este es el mejor método para conectar el TV a los equipos de vídeo con la clavija de salida del componente, como el reproductor de DVD, etc. Así se minimiza el deterioro de la calidad de imagen. Para la conexión utilice el cable del componente. component video cable p. ej.
AJUSTE INICIAL Se puede acceder a estas operaciones mediante el mando a distancia. Algunas también pueden ser accesibles mediante los mandos del aparato principal. 5 Configuración Inicial Esta sección le guiará a través del ajuste inicial del aparato, que incluye la selección de un idioma para sus menús de pantalla y “PREA. AUTO CA.”, que explora y memoriza automáticamente los canales visibles. [CH K /L] para seleccionar “PREA. AUTO 5 Utilice CA.(TV/DTV)” para canales de televisión o “PREA. AUTO CA.
Asegúrese de que el aparato está conectado a la antena o al cable. 1 Presione [MENU] para mostrar el menú principal. MENU 2 Utilice [CH K/L] para seleccionar “CANAL PREP.”, y presione [VOL X]. p. ej.: modo TV digital CH o CH IMAGEN CANAL PREP. [ESP]/FRA/ENG AJUSTE DE V-CHIP TITULO [OFF] INSTALACIÓN DTV • Cuando la exploración y la memorización han finalizado, se muestra el canal memorizado más bajo. • Cuando haya seleccionado, “PREA. AUTO CA.
PARA VER LA TELEVISIÓN 5 Selección de Canal 5 Ajuste de Volumen Seleccione los canales presionando [CH K /L] o [los botones numéricos]. En esta sección se describe cómo ajustar el volumen. También se describe la función de silenciamiento, que activa y desactiva el sonido. • Para seleccionar los canales memorizados, utilice [CH K/L] o [los botones numéricos]. • Para seleccionar los canales no memorizados, utilice [los botones numéricos]. Utilice [VOL X/Y] para ajustar el volumen de audio.
5 Información de Pantalla Utilice su mando a distancia para acceder a un dispositivo externo cuando esté conectado al aparato. Puede visualizar el canal actualmente seleccionado u otra información, por ejemplo el modo de audio, en la pantalla del televisor. TV En el modo analógico, se visualiza el número de canal actual. CONEXIÓN Presione [INPUT SELECT] repetidamente para cambiar entre TV analógica, TV digital, VIDEO1 y VIDEO2. Presione [INFO].
PARA VER LA TELEVISIÓN DTV En el modo digital, se muestra la información detallada de emisión del canal actual, por ejemplo el título de programa y las guías de programas. 5 Modo de Visualización de Pantalla del Televisor En el modo digital pueden seleccionarse 2 tipos de modos de visualización. DTV Presione [INFO] repetidamente para recorrer los modos de visualización disponibles. 1 Presione [MENU] para mostrar el menú principal.
INTRODUCCIÓN 5 Temporizador de Apagado El temporizador de apagado puede configurarse para apagar automáticamente el aparato después de un periodo incremental de tiempo. CONEXIÓN 1 Presione [SLEEP] para ajustar el temporizador de apagado. AJUSTE INICIAL PARA VER LA TELEVISIÓN AJUSTE OPCIONAL SOLUCIÓN DE PROBLEMAS SLEEP REPOSAR 0 • El temporizador de apagado aparece en la pantalla del televisor. 2 Presione [SLEEP] repetidamente para cambiar el tiempo que debe transcurrir hasta el apagado.
AJUSTE OPCIONAL 5 Agregar/Borrar Canales La función de agregar/borrar canales le permite agregar el canal que no se haya agregar mediante la exploración automática de canales debido al estado de la recepción en el ajuste inicial. También puede eliminar los canales innecesarios. 1 Presione [MENU] para visualizar el menú principal. MENU 2 Utilice [CH K/L] para seleccionar “CANAL PREP.”, y presione [VOL X]. 6 Presione [MENU] para salir.
5 Subtítulos Cerrados Puede ajustar el brillo, el contraste, el color, el matiz y la nitidez. Puede ver los subtítulos cerrados (cc) para programas de televisión, películas e informativos. Subtítulo cerrado se refiere al texto de diálogo o descripciones visualizadas en pantalla para personas con problemas auditivos. CONEXIÓN 1 Presione [MENU] para visualizar el menú principal. INTRODUCCIÓN 5 Ajuste de Imagen 1 Presione [MENU] para visualizar el menú principal.
AJUSTE OPCIONAL 5 Subtítulos Cerrados en DTV 3 Presione [MENU] para salir. MENU Nota: • Para mostrar los subtítulos cerrados en la pantalla de su televisor, la señal de emisión debe contener los datos de los subtítulos cerrados. • No todos los programas y anuncios de TV contienen subtítulos cerrados o todo tipo de subtítulos cerrados. • Los subtítulos y textos pueden no coincidir exactamente con la voz del televisor. • El cambio de canales puede retrasar los subtítulos unos segundos.
[OFF] INTRODUCCIÓN [SERVICIO TITULO] [ESTILO FUENTE] El estilo de fuente del subtítulo mostrado puede elegirse entre los siguientes. [ESTILO1/8] CONEXIÓN [SIRVE1/6] [ESTILO2/8] [SIRVE2/6] VOL o [ESTILO3/8] [SIRVE3/6] VOL VOL o VOL [ESTILO4/8] [ESTILO5/8] [SIRVE5/6] [ESTILO6/8] [SIRVE6/6] [ESTILO7/8] AJUSTE INICIAL [SIRVE4/6] [BORDE CARACTER] El tipo de borde del subtítulo mostrado puede elegirse entre los siguientes.
AJUSTE OPCIONAL [COLOR ADELANTE] El color de fuente del subtítulo mostrado puede elegirse entre los siguientes. 5 V-chip V-chip lee las clases de los programas, y niega el acceso a los programas que exceden el nivel de clasificación establecido. Con esta función, puede bloquear determinados programas inapropiados para niños. [TRANSPARENTE] [BLANCO] 1 Presione [MENU] para visualizar el menú principal.
INFERIOR Apto para todos los niños CLASE DE TV CLASE DE MPAA CAMBIAR CODIGO TV-Y7 Apto para todos los niños desde los 7 años o CH TV-G Todos los públicos TV-PG Se sugiere orientación de los padres VOL TV-14 No apto niños menores de 14 años TV-MA Exclusivamente para público adulto SUPERIOR Utilice [CH K /L ] para seleccionar la clasificación 5 deseada y luego presione [VOL X] repetidamente para Selección Explicaciones de subcategorías de clasificación FV Fantasía Violencia V Violencia S
AJUSTE OPCIONAL B. Clase de MPAA C. Cambiar Codigo Clase de MPAA es el sistema de clasificación creado por la MPAA (Motion Picture Association of America). Aunque el código predeterminado “0000” viene incorporado con el aparato, usted puede ajustar su propia contraseña. 4 Utilice [CH K /L] para seleccionar “CLASE DE MPAA” 4 Utilice [CH K /L] para seleccionar “CAMBIAR CÓDIGO” y luego presione [VOL X]. y presione [VOL X]. p. ej.: modo de televisión analógica CH p. ej.
INTRODUCCIÓN 5 Hora de Verano 2 Utilice [CH K /L] para seleccionar “INSTALACTIÓN DTV DTV” y luego presione [VOL X]. Después de realizar los ajustes iniciales al encender por primera vez la corriente, podrá establecer de nuevo la hora de verano. Cuando esta función está en ON, el reloj avanza automáticamente una hora a las 2:00 a.m. del último domingo de octubre. p. ej.: modo TV digital CONEXIÓN CH IMAGEN CANAL PREP.
SOLUCIÓN DE PROBLEMAS 5 Guía de Solución de Problemas Si el aparato no funciona correctamente cuando se siguen las instrucciones de este manual del usuario, compruebe la siguiente tabla antes de llamar al servicio técnico. Síntoma Solución No hay corriente • Asegúrese de que el cable de alimentación está enchufado. • Si se produce un corte de alimentación, desenchufe el cable de alimentación durante 30 minutos para permitir que el aparato se reinicie.
INTRODUCCIÓN Solución Recepción deficiente en determinados canales • Compruebe la conexión de antena o de cable con el aparato principal. • Cuando se utilice la antena exterior, compruebe el estado del cable y de la conexión. • La interferencia eléctrica de aparatos cercanos puede afectar a la calidad de la imagen. • Vea otros canales de televisión. El problema podría limitarse a una emisora.
INFORMACIÓN 5 Glosario ATSC NTSC Acrónimo de Advanced Television Systems Committee (Comité de sistemas avanzados de televisión) y el nombre de unas normas de emisión digital. Acrónimo de National Television Systems Committee (Comité de sistemas nacionales de televisión) y el nombre de unas normas de emisión digital. Contraseña Relación de Aspecto Un número almacenado de 4 dígitos que permite el acceso a las funciones de control parental.
INTRODUCCIÓN 5 Especificaciones Generales 5 Especificación Eléctrica Sistema de televisión: ATSC / NTSC-M TV estándar Salida de sonido: Subtítulos cerrados (CC): Sistema: §15.122/FCC (Subtítulos cerrados digitales) §15.
GARANTÍA LIMITADA FUNAI CORP. reparará este producto, de forma gratuita en Estados Unidos, en caso de defecto de materiales o fabricación, del modo siguiente: DURACIÓN: PIEZAS: FUNAI CORP. suministrará piezas de repuesto de las piezas defectuosas de forma gratuita durante un (1) año desde la fecha de compra minorista original. Dos (2) años para tubo de imagen. Determinadas piezas están excluidas de esta garantía. MANO DE OBRA: FUNAI CORP.