
Operation Manual


7
EN
English
PREPARATION FOR USE
Installing the Batteries
1) Open the battery compartment cover.
2) Insert “R6/AA” penlight batteries into battery compartment in
the direction as indicated by the polarity (+/–) markings.
Batteries installed with incorrect polarity may damage the remote
unit.
3) Close the cover.
4) Push the cover on its top side until it clicks in order to fit the
cover completely to the compartment.
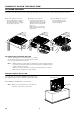
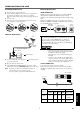
Antenna Connection
1) Connect an RF cable (not supplied) to (Aerial) input jack
at the rear of this unit.
2) Plug this unit into an AC outlet.
3) The STAND BY / POWER indicator on the front panel
lights red, then press [Q (standby-on)] to turn on the unit.
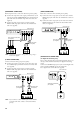
External Connection
[HDMI CONNECTION]
HDMI connection offers the highest picture quality. HDMI
(High Definition Multimedia Interface) transports high
definition video and multi-channel digital audio through a single
cable.
Connect the HDMI output jack of your video device and the
HDMI-IN (HDMI 1 or HDMI 2 or HDMI 3) jack of this unit.
Use an HDMI cable (not supplied).
[SCART CONNECTION]
Scart connection offers better picture quality.
Connect the scart jack of your video device and the SCART
(SCART1 or SCART2) jack of this unit. Use a scart cable (not
supplied).
Note:
If you like to connect an active DVB-T antenna, the
antenna must have its own power supply.
It is not possible to power the antenna from the TV.
To (Aerial) input jack
Rear of this unit
RF cable (not supplied)
VHF/UHF
MIXER
VHFUHF
Dear Customer,
By connecting an HDMI cable to your Funai LCD TV, you
have to use only a certified HDMI cable to guarantee a
sufficient immunity against parasitic frequency radiation.
A certified HDMI cable can be identified by the HDMI logo
on the cable or the cable package.
Note:
• This unit accepts 480i / 480p / 576i / 576p /
720p / 1080i / 1080p video signals and 32 kHz /
44.1 kHz / 48 kHz audio signals.
• This unit accepts only 2 channel audio signals
(LPCM).
• You need to select “PCM” for the digital audio
output of the device you connect. Make sure the
device outputs the digital audio. Audio sometimes
makes no sound if you select “Bitstream”, etc.
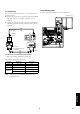
Connector
INPUT OUTPUT
S-VIDEO
AUDIO
(L/R)
CVBS RGB
VIDEO and
AUDIO (L/R)
SCART 1 Yes Yes Yes Yes
only ATV or
DTV output is
available.
SCART 2 Yes Yes Yes No
output you can
choose
HDMI OUT
*&/+
Rear of this unit
HDMI cable
(not supplied)
or
To HDMI (HDMI 1 or HDMI 2 or HDMI 3) jack
Side of
this unit
scart cable (not supplied)
Rear of this unit