
Operation Manual


16 EN
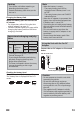
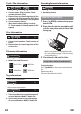
LCD Control
You can adjust the pictures on the LCD
screen.
1 Press [LCD].
2 Use [K / L] to select the desired
setting.
“
” (Brightness) :
Adjusts the brightness level of the picture.
(-7 to +7)
“ ” (Contrast) :
Adjusts the contrast level of the picture.
(-7 to +7)
“ ” (Sharpness) :
Adjusts the sharpness level of the picture.
(-7 to +7)
“ ” (Hue) :
Adjusts the hue (tint) level of the picture.
(-7 to +7)
“ ” (Saturation):
Adjusts the colour saturation level of the
picture. (-7 to +7)
“ ” (Monitor) :
Turns on (“ “) or off (“ “) the LCD
screen. If you select “
“, the LCD screen
will be turned off after 10 seconds. To
activate the setting immediately, press
[OPTION] on the unit or [LCD] on the
remote control.
3 Use [0 / 1] to change the setting.
4 Press [LCD] to exit.
Note
• You can also set the LCD settings in the
setup menu. (Refer to page 43.)
• “LCD Control” is also selectable in the
option menu. To call up the option
menu, press [OPTION] on the unit.
(Option menu will differ depending on
the status of playback or playback
media / file.)
• Pressing [LCD] does not work while
setup menu is displayed or the unit is
outputting the picture from AV OUT
jack or HDMI OUT jack.
• To turn on the LCD screen when
“Monitor” is set to “Off”, press
[A OPEN] / [OPTION] on the unit or
[LCD] / [C (stop)] / [SETUP] on the
remote control.