Owner's Manual TB100MW9 DTV Digital to Analog Converter (Set Top Box) THANK YOU FOR CHOOSING MAGNAVOX. NEED HELP FAST? READ YOUR QUICK GUIDE AND/OR OWNER'S MANUAL FIRST FOR QUICK TIPS THAT MAKE USING YOUR MAGNAVOX PRODUCT MORE ENJOYABLE. IF YOU HAVE READ YOUR INSTRUCTIONS AND STILL NEED ASSISTANCE, YOU MAY ACCESS OUR ONLINE HELP AT HTTP://WWW.FUNAI-CORP.COM OR CALL 1-800-605-8610 WHILE WITH YOUR PRODUCT. INSTRUCCIONES EN ESPAÑOL INCLUIDAS. © 2007 Funai Electric Co., Ltd. X6040UD_Book.
BEFORE USING The serial number of this product may be found on the bottom of the unit. You should record the number and other vital information here and retain this book as a permanent record. Serial numbers are not kept on file. Date of Purchase Dealer Purchase from Dealer Address Dealer Phone No. Model No. Serial No. WARNING: TO REDUCE THE RISK OF FIRE OR ELECTRIC SHOCK, DO NOT EXPOSE THIS APPLIANCE TO RAIN OR MOISTURE.
BEFORE USING F IGURE A BEFORE USING EXAMPLE OF ANTENNA GROUNDING AS PER NATIONAL ELECT RICAL CODE ANTE NNA L EAD I N WI RE GROUND CLAMP A NTENNA DI SCHARG E UN I T (NEC SECTION 8 10 -2 0) EL ECT RI C SE RV I CE EQ U I PM EN T G RO UNDI NG CO NDUCT ORS (NEC SECTION 8 10 -2 1) G RO UND CL AM PS NEC - NATI O NAL EL ECTRI CAL CO DE 13.
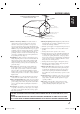
BEFORE USING Precautions Location For safe operation and satisfactory performance of this product, keep the following in mind when selecting a place for its installation: • Shield it from direct sunlight and keep it away from sources of intense heat. • Avoid dusty or humid places. • Avoid places with insufficient ventilation for proper heat dissipation. Do not block the ventilation holes at the top and bottom of the unit. Do not place the unit on a carpet because this will block the ventilation holes.
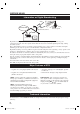
BEFORE USING BEFORE USING . . . . . . . . . . . . . . . . . . Important Safeguards . . . . . . . . . . . . . . . . Precautions . . . . . . . . . . . . . . . . . . . . . . . . Information on Digital Broadcasting . . . . Major Features of STB . . . . . . . . . . . . . . . Trademark Information . . . . . . . . . . . . . . . Location of Controls . . . . . . . . . . . . . . . . . Accessories . . . . . . . . . . . . . . . . . . . . . . . . Installing Batteries . . . . . . . . . . . . . . . . . .
BEFORE USING Information on Digital Broadcasting ATSC Receives ATSC Digital terrestrial antenna STB (Set Top Box) Digital terrestrial signals TV Digital broadcasting is the most advanced format of broadcasting, employing a new technology for compression of audio and video signals which allows broadcasters to transmit digital signals using existing terrestrial systems.
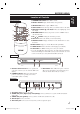
BEFORE USING BEFORE USING Location of Controls 1 STANDBY-ON button: Turns STB on and off. Remote Control 2 Number buttons: Input channel numbers and passwords. 1 3 SETUP button: Enters or quits “SETUP” menu. STANDBY-ON 1 2 3 СH + 4 5 6 СH - 7 8 9 . 0 ALT.CH DISPLAY SETUP STILL AUDIO EPG 2 3 4 5 6 RETURN 4 STILL button: Pause the image while you continue to listen to the audio. 7 5 Navigation buttons 8 OK K / L / s / B : Moves the highlight up, down, left or right.
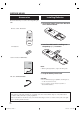
BEFORE USING Accessories Installing Batteries Check the following accessories when unpacking the STB: 1 Unsnap the battery cover from the back of the remote control. Remote control: NA383UD STANDBY-ON 1 2 3 4 5 6 7 8 9 . 0 ALT.CH DISPLAY SETUP STILL AUDIO EPG RETURN 2 AA batteries СH + СH - OK 2 Install two AA batteries making sure the polarity (+ / -) is correct. Owner’s manual: 1VMN24075 NOTE: • When replacing batteries, replace them in pairs. 3 Snap the battery cover back.
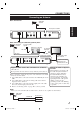
CONNECTIONS Connecting an Antenna Basic Connection: VHF/UHF antenna AUDIO OUT R L VIDEO OUT ANT. IN CONNECTIONS RF cable Rear panel of STB ANT. ΟUΤ When Connecting to Cable Box (optional) Also: VHF/UHF antenna Incoming cable signals Cable box (optional) ANT IN RF cable To antenna input jack ANT OUT RF cable RF cable Rear panel of STB AUDIO OUT R L VIDEO OUT ANT. IN To audio/video input jacks of the TV ANT. ΟUΤ Refer to following pages for the connection to TV.
CONNECTIONS Connecting to TV Rear panel of STB AUDIO OUT R L VIDEO OUT ANT. IN ANT. ΟUΤ To audio input jacks (L, R) Video cable Audio cable RF cable AND/OR To video input jack To antenna input jack Supplied cables used in this connection are as follows: • RF cable x1 Please purchase the rest of the necessary cables at your local store. Before connecting, ensure the AC power cords of all devices are NOT connected to the AC outlets.
OTHER CONNECTIONS STB Connection to a Standard Stereo System Rear panel of STB AUDIO OUT R L VIDEO OUT ANT. IN ANT. ΟUΤ STEREO COMPONENT OTHER CONNECTIONS Audio cable To audio input jacks (L, R) Supplied cables used in this connection are as follows: • RF cable x1 Please purchase the rest of the necessary cables at your local store. Before connecting, ensure the AC power cords of all devices are NOT connected to the AC outlets.
OTHER CONNECTIONS Connecting to TV and Video Devices (VCR, DVD Recorder, etc) e.g.: Connection to DVD Recorder Rear panel of STB AUDIO OUT R L VIDEO OUT ANT. IN ANT. ΟUΤ Video cable To audio input jacks (L, R) Audio cable Audio cable Video cable To video input jack DVD Recorder Supplied cables used in this connection are as follows: • RF cable x1 Please purchase the rest of the necessary cables at your local store.
INITIAL SETUP (SETUP WIZARD) Initial Setup Setup Wizard When STB is turned on for the first time or before completing autoscan, “SETUP WIZARD” is displayed on the screen automatically. You can complete the following items for the initial setups through this menu. 1 Language for screen 2 Connection for audio output 3 Time zone 4 Daylight saving time (DST) 5 Display mode 6 Channel Scanning 1 Turn the TV on and select the input to which the STB is connected.
INITIAL SETUP (SETUP WIZARD) 9 Select “AUTOSCAN” using [K / L], then press [OK]. The system is now scanning AUTOSCAN will rescan all channels. This may take a while to complete. EXIT 12% AUTOSCAN Channel Found EXIT STB starts receiving available digital channels and stores them in the channel map. When the scanning is complete, “AUTOSCAN COMPLETED” will be indicated. After autoscan is complete, press [CH / ] to verify whether STB is receiving channels properly.
BASIC OPERATION Selecting Channels on the STB About Sub-channel Broadcasting Digital broadcasting offers a service that enables multiple signals, called “sub-channels”, to be sent simultaneously on one main channel by using its high compression technology. Therefore, every digital channel number consists of a main channel and a sub-channel number. ATSC 18:00 CH4-1 : changes automatically : changes manually by using [CH / ].
BASIC OPERATION Choosing Audio Language Electronic Program Guide (EPG) You can change languages when the channel provides alternate languages. Electronic Program Guide (EPG) is the electronic equivalent of a printed TV program guide. You can view a list of programs scheduled for the next few hours. To display the correct information on “EPG”, “TIME ZONE” and ”D.S.T” must be set correctly. 1 Press [AUDIO] repeatedly. Audio language changes as follows. • ENGLISH 1/4 1 Press [EPG] while watching TV.
ADVANCED OPERATION Adding/Deleting Channels Add or delete desired channels in the channel map. 5 Press [OK] again to add the channel to the channel map. E.g., adding channel 6 CAUTION: • You cannot recover the deleted channels once they 0 6 OK are deleted unless you perform the autoscan again. 1 Press [SETUP] to display “SETUP” menu. (or leave for a few seconds) OK 6.X ADD/DELETE EXIT 2 Select “CHANNEL” using [K / L], then press [OK].
ADVANCED OPERATION 5 Select the channel number you want to delete from the channel list on the right using [K / L], then press [OK]. 5 Adjust the antenna’s direction to get the best reception. • E.g., deleting channel 26. 26.1 ADD/DELETE [OK] EXIT CHANNEL ADD 10 DELETE TIME 56.1 ADD/DELETE EXIT CHANNEL ADD DELETE 20 TIME 26 DETAIL • A status bar stretches to the right according to the signal strength.
ADVANCED OPERATION 4 Select “AUTOSCAN” using [K / L], then press [OK]. AUTOSCAN 3 Select “DISPLAY MODE” using [K / L], then press [OK]. DETAIL AUTOSCAN The system is now scanning EXIT CHANNEL EXIT AUTOSCAN will rescan all channels. This may take a while to complete.
ADVANCED OPERATION INFORMATION on Display Mode For standard 4:3 TVs displaying widescreen 16:9 broadcasts, your choices are: Time Zone 3 Select “TIME ZONE” using [K / L], then press [OK]. TIME EXIT CHANNEL TIME ZONE EASTERN D.S.T OFF TIME DETAIL 4:3 TV screen 16:9 broadcast LETTERBOX Displays the entire picture image while fitting the picture to the screen by applying gray bars to the top and bottom of the screen. No information will be lost.
ADVANCED OPERATION V-Chip Options See the following description for setting each item. V-CHIP V-chip reads the ratings for programs, then denies access to the programs which exceed the rating level you set. With this function, you can block certain programming inappropriate for children. EXIT A B MPAA RATING CHANNEL TIME DETAIL INITIAL TV RATING DOWNLOADABLE RATING CLEAR DOWNLOADABLE RATING C NEW PASSWORD A... “MPAA Rating”D this page 1 Press [SETUP] to display “SETUP” menu. B...
ADVANCED OPERATION Rating Category X Mature audience only higher NC-17 No one under 17 admitted R Restricted; under 17 requires accompanying parent or adult guardian PG-13 Unsuitable for children under 13 PG Parental guidance suggested G General audience NR No rating lower 7 Press [SETUP] to exit “SETUP” menu. 7 Press [SETUP] to exit “SETUP” menu. To Set the Sub Ratings As for TV-MA, TV-14, TV-PG, or TV-Y7, you can further set the sub ratings to block specific elements of programming.
ADVANCED OPERATION 3 Enter the new 4-digit password using the number buttons. • 5 Select the desired DTV closed caption using [K / L], then press [OK]. Enter password again in “Confirm password.” entry field. Select service. OFF SERVICE1 SERVICE2 SERVICE3 SERVICE4 SERVICE5 SERVICE6 V-CHIP EXIT Enter password. CHANNEL TIME Confirm password. DETAIL INITIAL • Do not forget the password. It will be used as your new v-chip access password from the next time onward.
ADVANCED OPERATION [Back Color] Background color of the displayed caption can be switched. [Back Opacity] Background opacity of the displayed caption can be switched. [Edge Color] Edge color of the displayed caption can be switched. [Edge Type] Edge type of the displayed caption can be switched. CC Style Edit You can edit the style of CC such as font, color or size, etc. This feature is available only when “CC STYLE” is set to “MANUAL”. 1 Repeat steps 1 to 3 in “Closed Caption Options” on page 23.
OTHERS Troubleshooting Before requesting service for this STB, check the table below for a possible cause of the problem you are experiencing. Some simple checks or a minor adjustment on your part may eliminate the problem and restore proper operation. Symptom Remedy • Make sure that the AC power cord is securely plugged into the power outlet. • Make sure that the POWER indicator is lit. The STB is not responding to the remote control • Make sure to point the remote control at the remote control sensor.
OTHERS Symptom Remedy When you forget the password for v-chip • If you forget the password, refer to “New Password” on page 22. Closed captioning display (TEXT mode) does not go off even after changing channels through STB. • Change the TV setting to a mode other than VIDEO. • Change channels through the TV. • Turn off the power of the TV, then turn on the power again. The screen goes blank just after turning the STB on. • This is a normal part of the start-up process and is not a malfunction.
GUÍA PARA RÁPIDA CONSULTA Antes de utilizar 2 Instale dos pilas AA asegurándose que la polaridad (+ / -) sea la correcta. Ubicación del control Mando a distancia 1 2 3 4 5 6 STANDBY-ON 1 2 3 СH + 4 5 6 СH - 7 8 9 . 0 ALT.CH DISPLAY SETUP STILL AUDIO EPG RETURN 7 8 OK NOTA: • Cuando cambie las pilas, hágalo por pares. 9 10 11 3 Cierre la cubierta de pilas. 12 PRECAUCIÓN: • No mezcle tipos de baterías (baterías alcalinas y de manganeso).
GUÍA PARA RÁPIDA CONSULTA Antena de VHF/UHF Conexiones Otro dispositivo A RF-IN Conexión a una antena Divisor ejemplo, VCR A ANT. IN STB Conexión básica: Antena de VHF/UHF Conexión a TV Panel trasero del STB Cable de RF AUDIO OUT R L VIDEO OUT ANT. IN Panel trasero del STB AUDIO OUT R L ANT. ΟUΤ Cuando conecte tambien a la caja de cable (opcional): Antena de VHF/UHF Señales del cable de entrada Caja de cable (opcional) ANT IN Cable de RF ANT OUT VIDEO OUT ANT.
GUÍA PARA RÁPIDA CONSULTA Conexión STB a un sistema estéreo normal Panel trasero del STB AUDIO OUT R L VIDEO OUT ANT. IN ANT. ΟUΤ COMPONENTE STEREO Cable de audio A las tomas de entrada de audio (der., izq.) Los cables provistos utilizados en eseta conexión son los siguientes: • Cable de RF x 1 Adquiera el resto de los cables necesarios en una tienda de su zona. Antes de la conexión, asegúrese de que los cables eléctricos de CA de todos los dispositivos NO estén conectados al tomacorriente de CA.
GUÍA PARA RÁPIDA CONSULTA 2 Conecte la alimentación del STB utilizando el [STANDBY-ON] y aparece “SETUP WIZARD”. NOTA: • Demora unos 8 segundos en aparecer el “SETUP WIZARD” después de conectar la alimentación. • El “SETUP WIZARD” no aparecerá si finalizó la exploración automática. • Puede acceder al “SETUP WIZARD” desde “INICIO” en el “AJUSTE” menu. Para cancelar durante la exploración: Presione [OK].
MEMO 31 ES 1A23 X6040UD_Book.
LIMITED WARRANTY FUNAI CORP. will repair this product, free of charge in the USA in the event of defect in materials or workmanship as follows: DURATION: PARTS: FUNAI CORP. will provide parts to replace defective parts without charge for one (1) year from the date of original retail purchase. Certain parts are excluded from this warranty. LABOR: FUNAI CORP. will provide the labor without charge for a period of ninety (90) days from the date of original retail purchase.