E-commerce Division - Enitial Lab FGI-1883C25 (Not Included) Page 1 of 16 19-05-20
Page 2 of 16
Page 3 of 16
Page 4 of 16
Page 5 of 16
DOOR STORAGE 18 " 4 5.7 1 MODEL #FGI-1883C25 A 1PC .18 B 1PC " A D 1PC C K 70.86" C 1PC F 1PC E 2PCS I G 1PC H 1PC I 1PC J 1PC H DIMENSIONS: K 1PC 1 29PCS 2 29PCS 0.47" 7 1PC 8 1PC 3 34PCS L 4PCS 4 2Sets 0.47" 0.98" 9 2PCS 8PCS 5 3PCS 6 12PCS 0.59" 8PCS 4PCS 0.98" 1PC 1PC 1PC 1PC 1.26" 2PCS 0.
Get Ready Please group boards as below I 1PC B 1PC J 1PC C 1PC F 1PC G 1PC E 2PCS H 1PC D 1PC L 4PCS A 1PC Body K 1PC Doors Page 7 of 16
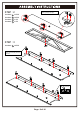
STEP : 1 1 Hardware 1 x 29PCS 1 3 Hardware 3 x 34PCS 1 1 3 1 1 A 1 1 3 1 1 1 3 1 1 1 1 B 3 1 1 3 1 1 1 3 1 1 Attach stopper (#4) onto panel (#D). 1 1 C 3 3 1 3 1 1 1 3 I J 3 D 3 1 3 Dowel hole 3 Depending on how you want the door is oriented, attach the stoppers (#4) to either one of the set holes on panels (#D,F). H 3 3 G 3 3 3 3 3 3 3 3 3 E F 3 3 3 3 Page 08 of 16 x2 Use a small dab of glue (#13) onto the dowel holes inserting dowels (#3).
STEP : 2 Align hinges (#5) to panel (#K), then secure by using screws (#6). Hardware 5 x 3PCS Hardware 7 x 1PC Hardware 8 x 1PC 6 6 Hardware 6 x 6PCS 6 6 5 6 5 6 K 5 6 6 5 7 STEP : 3 Hardware 2 x 8PCS 8 2 Refer to page 5 on how to properly secure cam locks (#2) onto cam bolts (#1).
STEP : 4 Hardware 2 x 8PCS G F Finish E 2 B 2 2 E D 2 2 2 Dowel hole H 2 2 STEP : 5 L L L L Page 10 of 16
STEP : 6 Hardware 2 x 8PCS Dowel hole C F G 2 2 E 2 2 E 2 2 STEP : 7 2 Hardware 2 x 5PCS Hardware D x 4PCS A 2 2 2 C 2 B Apply stickers (#12) to all cam locks (#2) in this step.
Which way do you want? Right-open Door Left-open Door • Please follow Step.8-1 • Please follow Step.
STEP : 8-1 (Right-open Door) Hardware 4 x 2SETS Hardware 6 x 6PCS Hardware 9 x 2PCS K K 6 I J 6 Align hinges on panel (#K) to the unit, then secure by using screws (#6).
STEP : 8-2 (Left-open Door) Hardware 4 x 2SETS Hardware 6 x 6PCS Hardware 9 x 2PCS K K 6 I J 6 Align hinges on panel (#K) to the unit, then secure by using screws (#6).
STEP : 9 Hardware Hardware x 8 PCS x 8 PCS Align and insert fixative plates (#10) all around the grooves of the back panels, then secure by using screws (#11). STEP : 10 Hardware Hardware Hardware Hardware Hardware Hardware x 1PC x 1PC x 1PC x 1PC x 2PCS x 1PC 2) Align bracket (#17) to the top back of the unit, then secure by using screws (#18). Use strap (#19) onto the bracket (#17) and hook (#16). Wall Wall 1) Measure and drill a hole into the wall according to the height of the unit.
STEP : 11 Page 16 of 16