Assembly Instructions For more information contact our team: service.ec@foagroup.com CM7384Q ASSEMBLY RATING Tools Required For Assembly: The Assembly Rating is a 5-point system that shows the degree of effort needed in assembling a specific product (with 1 being easy and 5 being difficult). For some products, two persons are recommended.
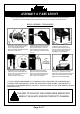
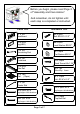
FOR YOUR FURNITURE TO LAST,CORRECT ASSEMBLY AND PROPER MAINTENANCE ARE NECESSARY. PLEASE FOLLOW THE INFORMATION PROVIDED BELOW TO FULLY ENJOY YOUR FURNITURE. BASIC ASSEMBLY TECHNIQUES When lock or spring washer is used in an assembly, please make sure the lock or spring washer is placed between the larger flat washer and the head of the screw or bolt. Position each part correctly and insert screws or bolts into their respective holes by hand tighten or using the proper hand tool.
Before you begin, please read Page 2 of "Assembly and Care Advice". And remember, do not tighten until each step is completed or instructed.
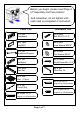
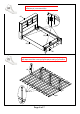
Exploded View #2R #1 #6 #3 #7 #2L #5 #8 #9 #5 #10 #4 Align connecting rod (#3) to the holes of the legs (#2R/L), then secure by using bolts (#A) with washers (#B,C).
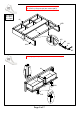
Align legs (#2R,L) to the holes of the headboard (#1), then secure by using bolts (#A) with washers (#B,C). #A x 4pcs #B x 4pcs #C x 4pcs #1 #2R #3 #C #B #A #2L #E Attach leg supports (#9,10) to the holes of the footboard (#4).
Align and hook the side rails (#5) to the latches of the headboard (#1) and footboard (#4). #1 #5 #5 #4 Align center slat (#7) to the slat kit (#6), then secure by using leg supports (#8). Adjust the leveler of the leg supports (#8) according to ground level.
Align slat kit (#6) to the side rails (#5), then secure by using screws (#D).
Assembly Instructions For more information contact our team: service.ec@foagroup.com CM7384CK ASSEMBLY RATING Tools Required For Assembly: The Assembly Rating is a 5-point system that shows the degree of effort needed in assembling a specific product (with 1 being easy and 5 being difficult). For some products, two persons are recommended.
FOR YOUR FURNITURE TO LAST,CORRECT ASSEMBLY AND PROPER MAINTENANCE ARE NECESSARY. PLEASE FOLLOW THE INFORMATION PROVIDED BELOW TO FULLY ENJOY YOUR FURNITURE. BASIC ASSEMBLY TECHNIQUES When lock or spring washer is used in an assembly, please make sure the lock or spring washer is placed between the larger flat washer and the head of the screw or bolt. Position each part correctly and insert screws or bolts into their respective holes by hand tighten or using the proper hand tool.
Before you begin, please read Page 2 of "Assembly and Care Advice". And remember, do not tighten until each step is completed or instructed.
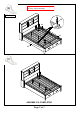
Exploded View #2R #1 #6 #3 #7 #5 #2L #8 #9 #11 #5 #10 #4 Align connecting rod (#3) to the holes of the legs (#2R/L), then secure by using bolts (#A) with washers (#B,C).
Align legs (#2R,L) to the holes of the headboard (#1), then secure by using bolts (#A) with washers (#B,C). #A x 4pcs #B x 4pcs #C x 4pcs #1 #2R #3 #C #B #A #2L #E Attach leg supports (#9,10) to the holes of the footboard (#4).
Align and hook the side rails (#5) to the latches of the headboard (#1) and footboard (#4). #1 #5 #5 #4 Align center slat (#7) to the slat kit (#6), then secure by using leg supports (#8). Adjust the leveler of the leg supports (#8) according to ground level.
Align slat kit (#6) to the side rails (#5), then secure by using screws (#D). #D x 26pcs #D #6 #5 Align top bed rails (#11) to the upper holes of the side rails (#5), then secure by using bolts (#F).
Assembly Instructions For more information contact our team: service.ec@foagroup.com CM7384EK ASSEMBLY RATING Tools Required For Assembly: The Assembly Rating is a 5-point system that shows the degree of effort needed in assembling a specific product (with 1 being easy and 5 being difficult). For some products, two persons are recommended.
FOR YOUR FURNITURE TO LAST,CORRECT ASSEMBLY AND PROPER MAINTENANCE ARE NECESSARY. PLEASE FOLLOW THE INFORMATION PROVIDED BELOW TO FULLY ENJOY YOUR FURNITURE. BASIC ASSEMBLY TECHNIQUES When lock or spring washer is used in an assembly, please make sure the lock or spring washer is placed between the larger flat washer and the head of the screw or bolt. Position each part correctly and insert screws or bolts into their respective holes by hand tighten or using the proper hand tool.
Before you begin, please read Page 2 of "Assembly and Care Advice". And remember, do not tighten until each step is completed or instructed.
Exploded View #2R #1 #6 #3 #7 #5 #2L #8 #9 #5 #10 #4 Align connecting rod (#3) to the holes of the legs (#2R/L), then secure by using bolts (#A) with washers (#B,C).
Align legs (#2R,L) to the holes of the headboard (#1), then secure by using bolts (#A) with washers (#B,C). #A x 4pcs #B x 4pcs #C x 4pcs #1 #2R #3 #C #B #A #2L #E Attach leg supports (#9,10) to the holes of the footboard (#4).
Align and hook the side rails (#5) to the latches of the headboard (#1) and footboard (#4). #1 #5 #5 #4 Align center slat (#7) to the slat kit (#6), then secure by using leg supports (#8). Adjust the leveler of the leg supports (#8) according to ground level.
Align slat kit (#6) to the side rails (#5), then secure by using screws (#D).