E-commerce Division - Enitial Lab FGI-1767C21 (Not Included) Page 1 of 15 18-01-22
Page 2 of 15
Page 3 of 15
Page 4 of 15
Page 5 of 15
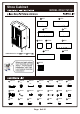
Shoe Cabinet MODEL #FGI-1767C21 A 1PC " .29 16 31 B 1PC .49 " A C D 1PC 56.9" C 1PC E 4PCS F 6PCS G 1PC H 2PCS DIMENSIONS:31.49 16.29 I 2PCS 56.9 J 2PCS 1 22PCS 2 22PCS 0.47" 8 8PCS 15 1PC 3 28PCS 4 48PCS 5 6PCS 1.5" 6 16PCS 7 8PCS 0.98" 0.98" 0.59" 9 4PCS 10 24PCS 11 4PCS 12 4PCS 13 8PCS 14 6PCS 16 1PC 17 1PC 18 1PC 19 1PC 20 2PCS 21 1PC 1.26" 0.62" 0.
Get Ready Please group boards as below B 1PC D 1PC E 4PCS H 2PCS G 1PC C 1PC A 1PC Body F 6PCS I 2PCS J 2PCS Doors /Shelf Page 7 of 15
STEP : 1 1 Hardware 1 x 22PCS Attach dowels (#3) and cam bolts (#1) to the designated panels. Hardware 3 x 28PCS 1 1 Hardware 6 x 16PCS Hardware 11 x 4PCS 3 A 3 3 1 1 3 1 1 1 1 1 1 1 1 1 B C 3 3 3 3 3 1 1 3 1 1 1 1 Flip panel (#G) 1 1 G G 3 Low 3 High 6 6 6 Align the lower end of the plates (#11) facing towards the corners of panel (#D).
STEP : 2 Hardware 4 x 16PCS Hardware 7 x 8PCS Hardware 8 x 8PCS 8 I Hardware 9 x 4PCS 4 J 4 8 4 4 9 8 4 9 7 8 7 4 7 4 4 x2 7 x2 STEP : 3 Refer to page 5 on how to secure cam locks (#2) onto cam bolts (#1). Hardware 2 x 4PCS E E finish 2 2 2 Dowel hole 2 B Use a small dab of glue into dowel holes before inserting dowels (#3).
STEP : 4 Hardware 2 x 4PCS Dowel hole B E E 2 2 G 2 2 STEP : 5 Hardware 2 x 4PCS B G E E finish 2 2 2 2 Page 10 of 15 E E
STEP : 6 Hardware 2 x 4PCS B Dowel hole G E E E E 2 C 2 2 2 STEP : 7 Hardware 5 x 6PCS B G C 5 5 5 D 5 5 5 Page 11 of 15
STEP : 8 Hardware 12 x 4PCS B G D 12 C 12 12 12 STEP : 9 H H Page 12 of 15
STEP : 10 Hardware 2 x 6PCS Hardware 14 x 6PCS A Use stickers (#14) to cover cam locks (#2) in this step. 2 2 2 2 2 Dowel hole 2 STEP : 11 Hardware 10 x 24PCS Insert shelf pins (#10) to the desired height of the shelves (#F).
STEP : 12 Hardware 4 x 32PCS I 4 4 4 4 J This screw adjusts the length of the hinges. J This screw adjusts the depth of the hinges. STEP : 13 Hardware 13 x 8PCS 13 Insert fixative plates (#13) through the thin lined gaps of the back panels, then secure by using screws (#13).
STEP : 14 Hardware Hardware Hardware Hardware Hardware 16 x 1PC 17 x 1PC 18 x 1PC 19 x 1PC Wall Wall 20 x 2PCS Hardware 21 x 1PC STEP : 15 Page 15 of 15