ASSEMBLY INSTRUCTIONS VERSION # 20-04-27 TOOLS REQUIRED Hammer (Not Included) Philips Screwdriver {Not Included) 2 People Recommended 00CG0 EASY mmm DIFFICULT The Assembly Rating isa S-point system showing the level of effort needed to assemble a specific product.
CHECK BEFORE STARTING Are you missing anything? Double-check all parts, hardware and accessories sifted on Page 6 are accounted for. Should we send any replacements? Are there any irregularities or flaws in the pairs? We can send replacements! Check out our Quick Tips! We cameramen reviewing the per-assembly handouts.
PRE ASSEMBLY INTRODUCTION We understand building ready-to-brasserie furniture can be a challenging experience for some. To help avoid confusion, we have provided some helpful tips that may speed up the process, Teamwork ALWAYS have at least two people {o help with transporting and assembling the product to avoid potential injury and/or damage.
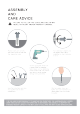
ASSEMBLY AND CARE ADVICE A FAILURE TO FOLLOW THE GUIDELINES BELOW MAY RESULT IN INJURY AND/OR PROPERTY DAMAGE. Turn clockwise to tighten and only Heighten when step is completed or when instructed io da so. Position each part correctly and insert screws or bolts into their respective holes. Use the appropriate hand tools or power tools for assembly.
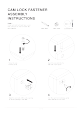
CAM LOCK FASTENER ASSEMBLY INSTRUCTIONS Note : ND oe Every cam lock bolt must have a cam “Na, << i lock connector in order to fasten the pairs together, cam bolt cam lock screwdriver Sower the cam insert the cam bolt into the bolt into panel bolt hole of joint panel ree” 3 4 Align the cam lock with its side opening Turn the cam lock clockwise gently {or arrow} pointing to cam bolt. curtail # will not turn any more.
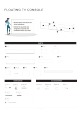
FLOATING TV CONSOLE « Please keep instructions for future reference. = Check the quantity and irregularity of parts and hardware before you start. Ga irc @rc 1PC @nrc @1rC @1PC @orcs PCs @1rc @irc irc Laue ACCESSORIES Merck @arcs @ASPCA {| (Adepts [(AZj2oPcs (ABJURES (Rape 0.47" 0.96" : ~ 082 <2) {rms oO Oe @PCs 1.57 (8) PCS 3.
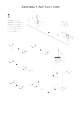
ASSEMBLY INSTRUCTIONS 1 Hardware (1) x PCS Hardware (3) x PCS Hardware (8) x PCS Accessory {AT)x PCS Accessory [AZ)x PCS Accessory (AD)x 1PC into dowel holes of panels before inserting dowels 8/15
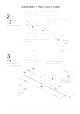
2 ASSEMBLY INSTRUCTIONS Please follow indications on each sleeps to ensure the orientation of panels all fit properly. The distance [rom the hole 10 the deep of Part § PCs Ce the panel is longer. Part @ x1PC Longer Hardware @)x PCS ~] Shorter The distance from the hole to the edge of he panel is shorter, Front To Flip Part §§ x1PC The distance from the hole to the edge of the panel is shorter. The distance from the hole to the Hardware @x PCS edge of the panel is longer.
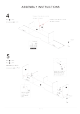
ASSEMBLY INSTRUCTIONS 4 Distance from dowel {0 end of the panel is shorter. Part § x1PC Accessory (BEX 1PC Distance from dowel to end of pe the panel is longer. (2) Front Dowel hole aan 5 Part § x1PC Part @ x1PC Hardware (yx PCS Accessory [AZ ix PCS Please refer to Page & for detailed instructions on how to fasten cam locks #2} to cam bolts (#1) Use the provided stickers {#A3) to cover exposed locks.
ASSEMBLY INSTRUCTIONS 8 This is the recommended distance for the hit of the product, Drawer a fine at the desired height of the product by using & pens. COMPREHENDED 9 Part {§ x1PC Hardware Bx PCS Align panel (#K) to the line on the wall, then secure resews (#6) onto the holes of panel (#K} where the studs behind the wall is located at.
ASSEMBLY INSTRUCTIONS 10 Accessory (AZ BPS Align the brackets of the TV-stand to the Part §§ x1PC Part @ x1PC insert upper side of panels (#4) first orator inserting the 13118
ASSEMBLY INSTRUCTIONS © Keep this handy! Please retain this instruction manual and any order reflated information tor future reference. © Lift during moving! ALWAYS have at least two people to help LIFT the product during transport to designated area.
ASSEMBLY INSTRUCTIONS Wall Mounting and Fixing == EXPANSION WALL ANCHOR Our provided expansion wall anchors are only suitable for masonry walls, such as drywall, plaster or concrete, and are best for holding lightweight items or for anti-tip prevention. if you are unsure of the correct wall anchor to use with the product, please request professional guidance. liability for product damage or failure due io using the incorrect anchors will fall on the installer. QUICK TIPS ‘1.